Respuesta rápida
Coser líneas rectas se reduce a controlar la tela, no la máquina. Establece una costura real de 1/4 de pulgada, usa la placa de aguja o una guía de costura como punto de referencia, mira la guía en lugar de la aguja, y mantén las manos planas con presión ligera y uniforme. Practica en tela de prueba hasta que puedas coser una costura completa sin desviarte.
Las costuras rectas son la base de casi todos los proyectos, y también son lo primero que preocupa a los principiantes. La buena noticia: la costura recta es una habilidad que se desarrolla con una configuración repetible y unos minutos de práctica, no algo que se tiene o no se tiene.
Esta guía recorre ocho pasos en orden, desde preparar la máquina hasta revisar tu trabajo. Cada paso incluye el error que más a menudo tropieza a la gente, para que puedas detectarlo antes de que aparezca en una costura terminada.
Por qué las costuras rectas salen mal
La mayoría de las costuras onduladas no tienen nada que ver con la velocidad de la máquina ni con el talento. Vienen de mirar la aguja en lugar de un punto de referencia, de tirar o empujar la tela, o de coser más rápido de lo que tus manos pueden guiar. Cuando miras fijamente la aguja, reaccionas tarde y sobrecorriges, que es lo que crea la ondulación.
Una segunda causa es la preparación. Si el margen de costura no se mide con precisión, el borde de la tela se aleja de la línea guía y empiezas a corregir a mitad de la costura. Arreglar la preparación primero hace que la parte de coser sea mucho más fácil.
- Mira el borde de la tela contra una línea guía, no la aguja subiendo y bajando.
- Deja que los dientes de arrastre muevan la tela. Tus manos deben guiar, no tirar.
Prepara antes de coser
Empieza con una aguja nueva adecuada a tu tela y una máquina correctamente enhebrada. Enrolla una bobina con el mismo hilo que usas arriba y prueba la tensión en un retal de la misma tela. Una puntada equilibrada se ve igual por ambos lados, sin bucles ni fruncidos.
Plancha la tela antes de empezar. Las arrugas y los pliegues hacen que el borde se levante o se hunda, y ninguna guía cuidadosa arreglará un margen de costura arrugado.
- Ajusta el tamaño de la aguja al peso de la tela; una aguja desafilada o incorrecta se desvía al entrar en la tela.
- Prueba primero en un retal y ajusta la tensión antes de tocar tu proyecto.
Encuentra un punto de referencia confiable
La referencia más confiable es la línea guía de costura grabada en la placa de aguja. Si tu máquina tiene una línea de 1/4 de pulgada, alinea el borde crudo de la tela con ella y mantenla ahí durante toda la costura. Si tu máquina no tiene una línea clara, coloca una tira de cinta de pintor en la base a la medida de tu margen de costura.
Para márgenes de costura repetidos, una guía de costura dedicada o un prensatelas de cuarto de pulgada te da una pared física para que el borde de la tela la siga. Esto elimina las conjeturas al coser costuras rectas para principiantes y hace que los resultados consistentes sean mucho más rápidos.
- Marca la línea guía con cinta o una guía magnética para que puedas verla fácilmente.
- Ajusta la posición de la aguja para que coincida con la guía en lugar de mover la tela.
Position Your Hands and Fabric
Place both hands flat on the fabric, one on each side of the needle, with fingers relaxed and slightly spread. Your right hand can rest lightly near the front of the machine to steady the fabric, while your left hand guides the edge along the reference line. Do not grip or tug.
Let the fabric feed itself. If you pull from the front, the seam stretches; if you push from the back, the fabric bunches. Light, even contact is all you need.
- Keep elbows close to your body so your hands stay relaxed.
- Never pull the fabric through the machine; the feed dogs do that job.
Control Speed and Rhythm
Sew at a moderate, steady speed rather than full throttle. A consistent pace gives your hands time to make small corrections, and it produces more even stitches than a stop-and-go approach. If your machine has a speed limiter, use it while you practice.
Start and stop with the needle down. That keeps the fabric from shifting when you pause, and it lets you pivot or adjust without losing your place.
- Press the pedal smoothly rather than in short bursts.
- Use the hand wheel to take the first stitch if starting slowly helps.
Practice Straight Stitch Drills
Before you sew on a project, run a few practice seams on scrap fabric. Draw straight lines on the fabric with a ruler and pencil, then stitch along them. This trains your eye to follow a line and shows you how your machine responds at different speeds.
Next, practice without drawn lines. Fold a piece of scrap in half and sew a consistent distance from the fold, or layer two scraps and aim for a steady seam allowance. Five minutes of this straight stitch practice will improve your accuracy more than an hour of sewing on a real project.
- Sew a line, then sew a second line exactly one presser-foot width away.
- Check your practice seams for wobble before moving to your project.
Check and Correct as You Go
Stop every few inches and look at the fabric edge against your guide. If it has drifted, lower the needle, lift the presser foot, and nudge the fabric back into place. Small corrections early prevent a seam that needs to be ripped out later.
If you notice the seam wandering consistently in one direction, the problem is usually your reference point, not your hands. Recheck that the guide line is where you think it is and that the fabric edge is actually touching it.
- Correct drift in small increments rather than steering hard.
- If a seam goes badly wrong, stop and restart rather than fighting it.
Finish and Evaluate the Seam
At the end of the seam, backstitch a few stitches or use your machine's lock stitch to secure the thread. Then press the seam as sewn before pressing it open or to one side. Pressing reveals the truth about your stitch line: a straight seam presses flat, while a wavy one shows ripples.
Measure the seam allowance at several points along the seam. If it varies by more than about 1/16 inch, adjust your guide or slow down before starting the next one.
- Press, don't iron, to avoid stretching the seam.
- Measure at the start, middle, and end of the seam for consistency.
Eight Steps to Straighter Seams
- Set up the machine: Insert a fresh needle suited to your fabric, thread the machine correctly, and test tension on scrap until the stitch looks balanced on both sides. Checkpoint: no loops, puckers, or skipped stitches on the test scrap.
- Press the fabric: Iron the fabric flat before sewing so the edge lies smooth against the guide line. Common mistake: skipping this step and fighting creases for the whole seam.
- Choose a reference point: Use the needle plate guide line, a strip of tape, or a seam guide set to your seam allowance. Checkpoint: you can see the guide clearly without leaning around the needle.
- Position your hands: Rest both hands flat on the fabric, one on each side of the needle, with light contact only. Common mistake: pulling or pushing the fabric instead of letting the feed dogs move it.
- Sew at a steady speed: Use a moderate, consistent pace and start with the needle down to keep the fabric from shifting. Checkpoint: stitches are even and the fabric edge stays on the guide line.
- Practice on scrap: Sew along drawn lines, then without them, until you can hold a consistent distance from an edge or fold. Common mistake: practicing on your project fabric instead of scrap.
- Correct drift early: Stop every few inches, lower the needle, lift the presser foot, and nudge the fabric back to the guide. Checkpoint: the fabric edge is still touching the guide line.
Tools That Help You Sew Straighter
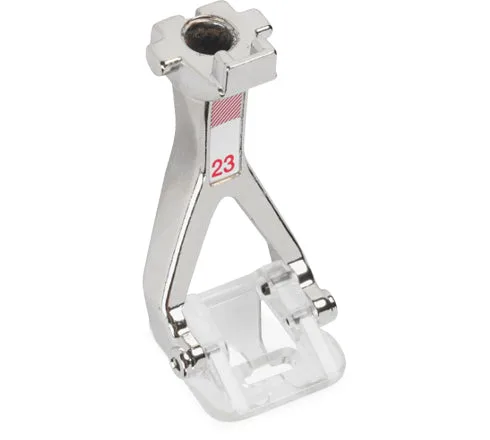
- #23 BERNINA Appliqué Foot: The BERNINA #23 Appliqué Foot has a clear sole and a center groove that lets you see the seam line while keeping the fabric edge aligned. It is a good choice for straight seams, edge stitching, and topstitching.
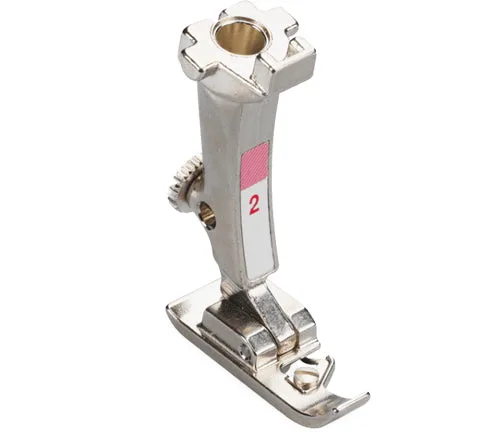
- #2 BERNINA Overlocker Foot: A quarter-inch presser foot is the fastest way to sew a consistent 1/4-inch seam allowance. The built-in guide acts as a physical wall for the fabric edge, so you can sew quickly without measuring each seam.
A magnetic seam guide attaches to the needle plate and gives you an adjustable edge to run the fabric against. It is easy to move for different seam allowances and works well on machines without etched guide lines.