Start with a clean, dry wheel
The 12 inch Wheel Rim Sticker Type-A is a straightforward cosmetic upgrade, but the result depends heavily on preparation. Before you peel anything, give the rim a proper clean. Use a mild soap and water solution to remove dirt, brake dust, and oily residue, then rinse thoroughly. Dry the wheel completely with a clean microfiber cloth. Any moisture left behind can trap under the sticker and weaken the adhesive.
Work in a shaded area if possible. Direct sunlight can make the sticker overly soft and difficult to reposition, while a cool, dry surface gives you a little more working time. You do not need special tools, but a clean rag, isopropyl alcohol for a final wipe, and a plastic squeegee or your thumb will help.
Plan your layout before you peel
The Type-A sticker set includes 18 strips (two of which are spares) and four logo stickers. That count gives you room to plan a consistent pattern around the wheel. Before removing any backing paper, hold a strip against the rim to see how it follows the curve. The sticker is 7mm wide, so it suits the narrow band of a 12-inch motorcycle wheel rather than a wide, flat surface.
Decide where you want the logo stickers to sit. A common approach is to place them at evenly spaced intervals, but the set does not prescribe a layout. If you are unsure, start with the logo stickers last so you can adjust the strip spacing first. Keep the two spare strips untouched until you have finished the main run; they are your margin for error.
Applying the rim sticker, step by step
These steps assume a clean, dry rim. The sticker set does not include a separate primer or adhesion promoter, so rely on thorough cleaning rather than extra chemicals.
- Wipe with isopropyl alcohol: Dampen a clean cloth with isopropyl alcohol and wipe the rim section where the sticker will go. Let it flash off completely. This removes any lingering oils from the soap or your fingers.
- Peel back a small section of backing: Do not remove the entire backing at once. Expose about an inch of adhesive, then press that end onto the rim at your starting point.
- Follow the curve gradually: Work the strip around the wheel in short segments, peeling more backing as you go. Keep light tension so the sticker follows the rim's curve without stretching or wrinkling.
- Press firmly along the length: Once the strip is in place, run your thumb or a plastic squeegee along the entire sticker to push out trapped air. Start from the center and work toward the edges.
- Repeat for each strip: Continue around the wheel, keeping consistent spacing between strips. If a strip goes down crooked, lift it slowly from one end and reposition it; the adhesive allows a small amount of adjustment before it grabs fully.
- Add the logo stickers last: Place the four logo stickers at your chosen intervals. Press them down firmly, especially around the edges.
What you get in the Type-A set
-
12 inch Wheel Rim Sticker Type-A: Contents: 18 strips (include 2 spares) & 4 pcs of logo stickers The spare strips let you recover from a misaligned or damaged piece without running short, and the logo stickers add a finishing touch.
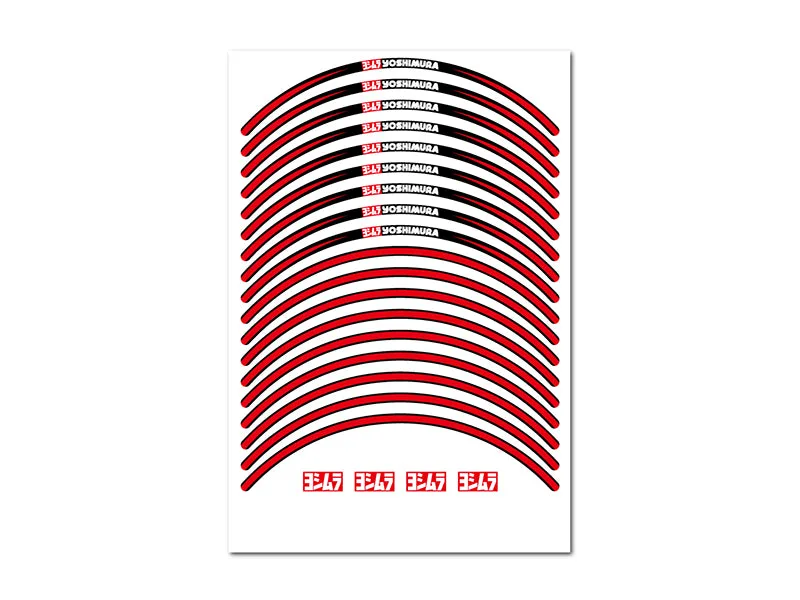
12 inch Wheel Rim Sticker Type-A
-
12 inch Wheel Rim Sticker Type-A: Sticker width 7mm A 7mm width is narrow enough to follow the curve of a 12-inch wheel without buckling, but it also means you should avoid stretching the strip during application.
-
12 inch Wheel Rim Sticker Type-A: Suitable for 12 inch motorcycle wheel This is the key compatibility check: the sticker is sized for 12-inch wheels, not larger or smaller rims.
Caring for the sticker after installation
Once applied, the sticker needs a little care to stay looking sharp. Avoid washing the wheel with a high-pressure spray directed at the sticker edges, as that can lift the adhesive over time. Instead, wash gently with a soft sponge and mild soap, then rinse and dry with a microfiber cloth. Avoid abrasive brushes or strong solvents, which can dull the color or soften the adhesive.
The set is available in Red, Blue, Yellow, Green, and Gray. If you ride in dusty or wet conditions, inspect the sticker edges periodically for lifting. A quick press with your thumb can reseat a small lifted edge before it grows. If a strip becomes damaged beyond repair, swap in one of the two spares rather than trying to patch it.
Color choices and availability
- 12 inch Wheel Rim Sticker Type-A: Color variations: Red, Blue, Yellow, Green & Gray Choose a color that complements your bike's scheme; the set is offered in five distinct options.
- 12 inch Wheel Rim Sticker Type-A: IN STOCK! (If add to cart button is available) Availability can change, so check the product page for current stock before ordering.
When the sticker is not the right fit
The Type-A sticker is designed for 12-inch motorcycle wheels. If your wheel is a different diameter, this set is not intended for it. Also note that the supplied information does not include a step-by-step instruction sheet or a recommended curing time; the process above is based on general decal application practice, not a manufacturer procedure. If you are unsure about surface preparation or adhesion on your specific rim material, test a small area first or consult a professional.
For riders who want a subtle, removable accent, this sticker set is a low-commitment option. For those expecting a permanent, paint-like finish, manage expectations: decals can be removed with heat and patience, but they are not a substitute for painted or powder-coated rims.