Why the F70 cover deserves its own care routine
The Agilite 3M F70 Helmet Cover is built from 500D Mil-Spec CORDURA and designed to protect the ballistic surface of your high-cut 3M F70 helmet from scratches, scrapes, and abrasive field conditions. That protective job means the cover takes the wear so the helmet shell does not. A simple cleaning and inspection routine keeps the cover doing that job without adding unnecessary wear of its own.
The supplied product record does not include a manufacturer washing or drying procedure, so the steps below focus on what the record does support: keeping abrasive grit out of the fabric, checking the parts that see the most handling, and making sure the cover stays correctly seated on the helmet.
What the cover is made to handle
-
3M F70 Helmet Cover-(High Cut Version): 500D Mil-Spec CORDURA construction with a Mil-Spec polymer cord-lock and rear PVC grip tab. These are the wear points to inspect: the fabric surface, the cord-lock, and the grip tab you pull when opening the rear pouch with gloves on.
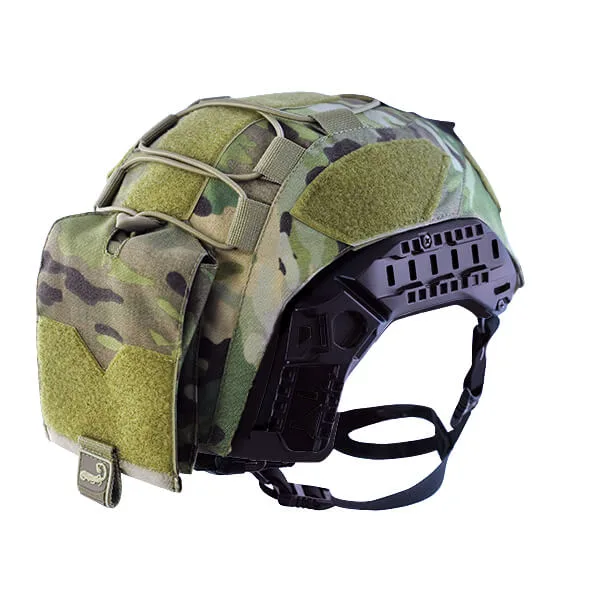
3M F70 Helmet Cover-(High Cut Version)
-
3M F70 Helmet Cover-(High Cut Version): Designed to protect and increase the service life of the helmet by shielding the ballistic surface from scratches, scrapes, and abrasive environments. The cover is a sacrificial layer. Its condition matters, but the priority is keeping the helmet shell underneath clean and undamaged.
A safe cleaning sequence for the high-cut cover
These steps stay within what the supplied record supports. They avoid harsh processes the record does not confirm and focus on removing grit before it works into the fabric.
- Remove the cover before cleaning: The record states the cover can be fitted to the helmet in seconds with no tools required, so removal for cleaning is straightforward. Take it off rather than cleaning it on the helmet.
- Empty the rear pouch and accessory points: The sewn-in rear pouch is sized for a PVS 31 battery pack or counterweights, and the central bungee and harness points hold strobes, cameras, and other accessories. Remove those items first so you can clean the cover and inspect the pouch and bungee.
- Brush or wipe off loose dirt and grit: Start dry. Loose sand, dust, and mud are abrasive; removing them before any wet cleaning reduces the chance of grinding particles into the CORDURA.
- Wipe the fabric with a damp cloth: Use a damp cloth and mild action on the fabric. The supplied record does not specify detergents, washing machines, or drying temperatures, so avoid guessing at those and keep the process gentle.
- Air-dry fully before refitting: Let the cover dry completely before putting it back on the helmet. The record does not give a drying method, so air-drying is the conservative choice.
- Check the cord-lock, bungee, and grip tab: These are the handling points named in the record. Make sure the cord-lock still adjusts, the central bungee still tensions, and the rear PVC grip tab is intact before you refit the cover.
Wear checkpoints worth a look after each use
The cover is built for tough military and law enforcement environments, but wear still shows up first at the points you touch and tension. A quick check after use catches small issues before they affect fit or accessory retention.
- Fabric surface over the shell: Look for thinning, abrasion, or tears, especially where the cover contacts the helmet edge. The cover's job is to absorb this wear instead of the ballistic surface.
- Central bungee retention: The bungee is designed to hold IR strobes, cameras, and similar items. Check that it still tensions and that the cord-lock holds.
- Rear pouch and grip tab: The rear pouch holds a PVS 31 battery pack or counterweights. Confirm the pouch is intact and the PVC grip tab still gives you a secure pull when wearing gloves.
- Harness points: The multiple harness points are there to keep accessories secure. Check that they are not frayed or loose.
- Cable management: The integrated cable management is part of the accessory platform. Make sure cables are routed cleanly and not pinched.
Refitting the cover so it stays put
The record says the cover fits the high-cut 3M F70 helmet perfectly and installs in seconds without tools. When you refit it, seat the cover evenly around the shell and confirm the rear pouch and bungee sit where you expect them. A cover that is not fully seated can shift during use and put uneven stress on the fabric or the accessory points.
If you use the rear pouch for a PVS 31 battery pack or counterweights, check the pouch position after refitting. The record does not give a specific placement procedure beyond the sewn-in design, so rely on a even, secure fit rather than forcing the cover into a position it does not naturally take.
Fit and handling details that affect care
- 3M F70 Helmet Cover-(High Cut Version): Easy installation: the cover can be fitted to the helmet in seconds with no tools required. Removing the cover for cleaning and inspection is quick, so there is little reason to skip it.
- 3M F70 Helmet Cover-(High Cut Version): Includes a sewn-in rear pouch for a PVS 31 or other battery packs and counterweights, plus multiple harness points and central bungee retention. These are the accessory attachment points to check for wear and to keep clean so they continue to hold gear securely.
- 3M F70 Helmet Cover-(High Cut Version): Integrated cable management and a rear grip tab for ease of opening when wearing gloves. The grip tab and cable routing are high-use points; inspect them as part of your routine.
What the supplied information does not cover
The supplied product record does not include a washing machine procedure, detergent recommendations, drying temperatures, or a replacement schedule. It also does not state water resistance or chemical compatibility. Treat any cleaning method beyond a damp wipe and air-dry as unverified, and contact Agilite directly if you need manufacturer guidance for a specific situation.
The record also does not list care instructions for the helmet itself. Keep the helmet shell clean and dry according to its own manufacturer guidance, and let the cover do its protective job.