Start with the parts you actually have
Before you remove the old handguard, lay out the new one-piece free float handguard and confirm what came in the box. The AR15 15" Slim M-LOK Handguard Rail One Piece Free Float includes a steel barrel nut, an Allen key, and crush washers. If any of those are missing, stop and resolve it before disassembly—you cannot complete a free float handguard installation without the barrel nut.
You will also need the tools your upper requires for the barrel nut and handguard screws. The supplied Allen key covers the handguard fasteners, but the barrel nut interface depends on your upper and is not specified in the product information. Check your upper's instructions or use a barrel nut wrench that matches the nut you received.
What the handguard includes
-
AR15 15" Slim M-LOK Handguard Rail One Piece Free Float: Includes steel barrel nut, Allen key, and crush washers. These are the parts you must have on hand before starting; missing hardware stalls the install.
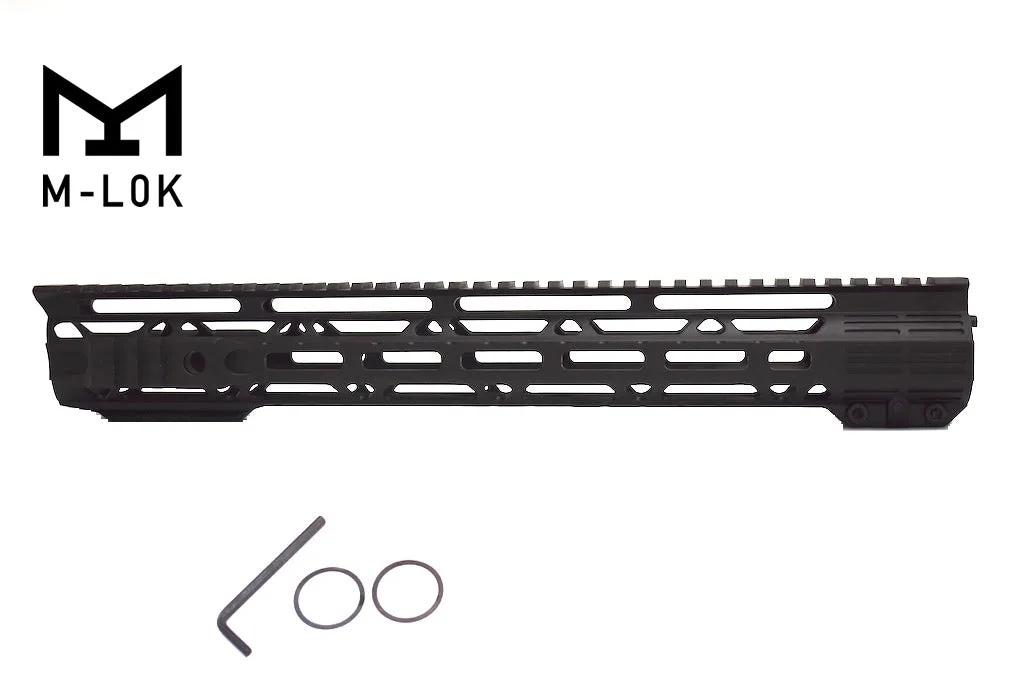
AR15 15" Slim M-LOK Handguard Rail One Piece Free Float
-
AR15 15" Slim M-LOK Handguard Rail One Piece Free Float: Lightweight 6061-T6 aluminum construction with M-LOK at the 3-side positions. Tells you where accessories can mount and that the rail is aluminum, so treat threads and surfaces accordingly.
Free float handguard installation: the sequence
Work on an unloaded rifle with the bolt carrier group and charging handle removed. The steps below assume you are replacing an existing handguard; if you are building from scratch, start with the barrel installed in the upper.
- Remove the old handguard and barrel nut: Take off the old handguard and its barrel nut. Clean the upper's barrel nut threads so the new steel barrel nut starts by hand.
- Test-fit the new barrel nut: Thread the supplied steel barrel nut onto the upper by hand. It should turn smoothly without binding. If it binds, stop and inspect the threads rather than forcing it.
- Apply the barrel nut torque: Tighten the barrel nut to the torque value specified by your upper or barrel nut manufacturer. The product record does not supply a torque value, so do not guess—use the specification for your upper and nut interface.
- Align the handguard and start the screws: Slide the one-piece handguard over the barrel nut. Check that the top rail lines up with the upper's rail before tightening. Start the handguard screws by hand using the supplied Allen key.
- Check M-LOK slot alignment: With the handguard seated, confirm the M-LOK slots at the 3-side positions are clear and square to the rail. Test-fit any accessory you plan to use before final tightening.
- Final tighten and verify: Tighten the handguard screws evenly. Recheck rail alignment and that the handguard does not shift. Install crush washers where your muzzle device or barrel nut instructions call for them.
Slim M-LOK rail fitting: what to check before you commit
A slim handguard changes how the rifle feels and how accessories sit. These checks catch most fit problems before you tighten anything.
- Barrel nut compatibility: The supplied steel barrel nut is part of the kit. Confirm it threads onto your upper before you torque it. If your upper uses a different thread pattern, this handguard may not be the right fit.
- Handguard-to-upper rail height: The top rail should sit flush with the upper's rail. A step or gap means the handguard is not fully seated or the barrel nut is not aligned.
- Accessory clearance at the 3-side positions: M-LOK slots are provided at the 3-side positions. Before final tightening, mount the accessories you plan to use and check for contact with the barrel or gas block.
- Screw length and thread engagement: Use the supplied Allen key and the handguard screws that came with the unit. If a screw bottoms out before the handguard is tight, stop—do not shorten screws or add washers without manufacturer guidance.
Barrel nut torque: why you should not guess
The product record for this handguard does not list a barrel nut torque value. That is a decision limitation, not a reason to improvise. Torque specs vary by upper receiver and barrel nut design, and using the wrong value can damage threads or leave the nut loose.
Use the torque specification from your upper receiver or barrel nut manufacturer. If you do not have that specification, have a qualified armorer or gunsmith tighten the barrel nut. The handguard screws themselves are tightened with the supplied Allen key; the product record does not give a separate torque value for those either, so follow the handguard's included instructions if present.
M-LOK handguard alignment tips that save time
- Check alignment before tightening: Slide the handguard on and verify the top rail is flush before you run the screws down. Once screws are tight, alignment is harder to correct.
- Use the crush washers where specified: Crush washers are included, but the product record does not say exactly where they go. Follow your muzzle device or barrel nut instructions for their use.
- Keep M-LOK slots clear: The 3-side M-LOK positions should be free of obstructions. Test your accessory mounts before the final tighten so you are not loosening screws later.
- Recheck after firing: The product record does not include a post-installation checklist. As a general practice, verify handguard screws and accessory mounts after your first range session.
Product facts for this install
- AR15 15" Slim M-LOK Handguard Rail One Piece Free Float: AR15 15" Slim M-LOK Handguard Rail One Piece Free Float, lightweight 6061-T6 aluminum, M-LOK at 3-side positions, includes steel barrel nut, Allen key, and crush washers. Confirms the handguard type and included hardware so you can plan the install without missing parts.
- AR15 15" Slim M-LOK Handguard Rail One Piece Free Float: Catalog price USD 55.99 (comparison price USD 79.99). Relevant if you are comparing this handguard against others before committing to the install.