Quick answer
Mount the Casevac Conversion Kit (CCK) to your existing litter or platform, confirm every strap and connection point, then rehearse the carry with a weighted load before you rely on it. The kit converts gear you already carry; it does not replace a dedicated litter.
What the CCK does and does not change
The Casevac Conversion Kit (CCK) is an accessory designed to support casualty evacuation needs in tactical or emergency medical environments. It is part of the NARescue product line and comes in a Standard configuration. That means it is a conversion layer, not a standalone litter: it adapts a platform or gear setup you already have into a casualty transport configuration.
Because the kit does not include a litter or platform, your first decision is what you will convert. Check that your chosen platform has solid attachment points and can bear a loaded casualty. If it cannot, the kit will not fix that limitation.
When a conversion kit makes sense over a dedicated litter
A conversion kit earns its place when space and weight are tight and you already carry a platform that can serve double duty. It is less suitable when your team has no compatible platform, when the casualty load will be heavy and repeated, or when you need a litter that is ready without assembly. In those cases, a dedicated litter is the more reliable choice.
The CCK is listed at USD 989.99, with a catalog comparison price of USD 1,649.99. Treat that as a budget checkpoint, not a reason to skip the platform compatibility check.
Step-by-step casevac conversion setup
- Confirm your platform is compatible: Inspect the litter or platform you plan to convert. It needs solid attachment points and enough strength for a loaded casualty. Common mistake: assuming any frame or board will work without checking its load rating. If the platform has no rated attachment points, stop and choose a different platform.
- Lay out the kit and inspect every component: Unpack the CCK and check that all straps, buckles, and connection hardware are present and undamaged. Common mistake: skipping the inspection because the kit is new. Replace or set aside any damaged component before assembly.
- Attach the kit to the platform: Follow the kit's connection points to secure it to your platform. Route straps so they cannot slip or cross over the casualty area. Common mistake: over-tightening one side and leaving the other loose. Check that the kit sits centered and cannot shift when you push or pull it.
- Rehearse with a weighted load: Before relying on the setup, load it with a weight close to a real casualty and lift, carry, and lower it with your team. Common mistake: testing only with an empty platform. If the load shifts or the straps loosen, re-rig before field use.
- Brief your team on the carry: Assign carry positions and agree on commands for lift, move, and set down. Common mistake: assuming everyone knows the plan without a dry run. Run one full carry with the weighted load and all team members present.
- Pack the kit for quick access: Store the CCK where it can be reached without unpacking everything else. Common mistake: burying the kit at the bottom of a pack. Label the kit's location so any team member can find it under pressure.
Product facts
-
Casevac Conversion Kit (CCK): The Casevac Conversion Kit (CCK) is an accessory designed to support casualty evacuation needs in tactical or emergency medical environments. It is built to convert compatible gear into a casualty transport setup rather than serve as a standalone litter, so platform choice comes first.
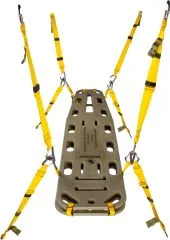
Casevac Conversion Kit (CCK)