What the Size 2 Black Headcollar Is Designed to Do
The COA Halti Headcollar Size 2 Black is a training aid aimed at dogs that pull. Rather than relying on force, the design steers and guides your dog's direction, so the lead pressure comes from the head rather than the throat. That makes it a useful option for owners who want more control on walks without a constant tug-of-war.
Before you head out, it helps to understand what the headcollar does and does not confirm. The supplied product information describes the padded nose band, reflective webbing and safety link, but it does not list a specific dog weight range for Size 2. Treat the size label as a starting point and check the fit on your own dog rather than matching it to a number on the scales.
Key Features That Shape the Fit
-
COA Halti Headcollar Size 2 Black: Fully padded nose band The padding sits across the nose, so the band should rest comfortably rather than press into the bridge.
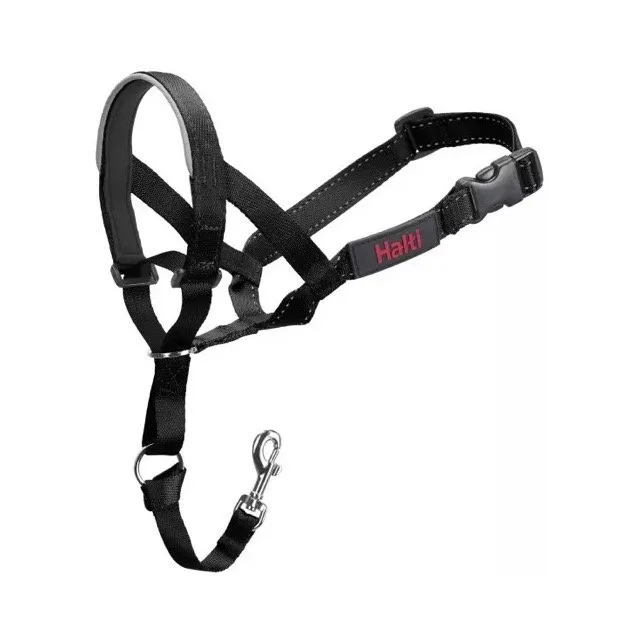
COA Halti Headcollar Size 2 Black
-
COA Halti Headcollar Size 2 Black: Waterproof reflective webbing Reflective straps help visibility on evening walks and the waterproof material suits wet weather.
-
COA Halti Headcollar Size 2 Black: Safety link to attach to your dog's collar The link gives a secondary connection so the headcollar is not the only point of attachment.
Fitting the Headcollar Step by Step
Work through these checks with your dog standing calmly, ideally before a walk when energy is lower.
- Slip the nose band on first: Place the padded nose band over your dog's muzzle so the padding sits against the nose. The design is intended to allow panting, eating and drinking, so check that your dog can still open its mouth and breathe normally once the band is in place.
- Settle the strap behind the head: Bring the head strap around behind the ears and fasten it. The headcollar should feel secure without being tight enough to dig in or slide around when your dog shakes its head.
- Connect the safety link: Clip the safety link from the headcollar to your dog's collar. This is the backup connection described in the product information, so make sure it is attached before you clip on the lead.
- Attach the lead and check the steering point: Clip the lead to the headcollar's lead attachment. Gently apply light pressure to see how the headcollar guides your dog's head to the side; the movement should be smooth and your dog should not flinch.
- Recheck after a few minutes: Walk your dog a short distance on familiar ground and check the nose band and head strap again. New headcollars can shift slightly once your dog moves, so adjust before heading further afield.
Choosing Between Sizes When Weight Is Not Listed
The supplied information does not include a weight chart for Size 2, so you cannot pick a size from your dog's weight alone. Instead, use the fit checks above as your guide. If the nose band looks too long or the head strap runs out of adjustment, the size is likely wrong for your dog, and moving to another Halti size is more sensible than forcing the fit.
Size also interacts with breed shape. A dog with a broad muzzle or a very narrow one may need a different size even at a similar weight. Because the range is available in multiple sizes to give a safe but forgiving fit, it is worth comparing the band against your dog's actual head rather than assuming Size 2 will suit every medium dog.
The First Walk with a Halti Headcollar
The first walk is about teaching your dog that the headcollar is not a punishment. Start with a short session on a quiet route, keep the lead loose and let your dog sniff and settle. If your dog paws at the nose band or freezes, pause, reward calm behaviour and try again later rather than dragging them forward.
When your dog does pull, the headcollar steers the head to the side instead of yanking backwards. Keep your own lead handling soft and consistent so the steering feels predictable. The reflective webbing is a practical bonus if your first walks happen at dusk, and the waterproof material means a bit of rain is not a reason to skip the session.
Keep the safety link attached to the collar throughout these early walks. It is there as a backup rather than a substitute for the headcollar, and it gives you a second connection if your dog slips out of the nose band.
What to Expect in the First Few Weeks
- Acceptance takes time: Some dogs settle into a headcollar within minutes; others need several short sessions. The product is described as easy to use, but that refers to handling, not to instant training results.
- Pulling reduces gradually: The design prevents pulling by steering rather than by force, so expect improvement as your dog learns what the pressure means, not on the very first outing.
- Check the fit regularly: Recheck the nose band and head strap before each walk, especially if your dog has been shaking or rolling.
- Pair it with training: The headcollar is a training aid, so reward loose-lead walking alongside it rather than relying on the headcollar alone.
Product Details for Reference
- COA Halti Headcollar Size 2 Black: Market-leading design that prevents pulling by gently steering and guiding your dog's direction Explains why the lead pressure works through the head rather than the neck.
- COA Halti Headcollar Size 2 Black: Available in a range of sizes for a safe but forgiving fit Supports checking the fit and switching size if Size 2 does not sit correctly.
- COA Halti Headcollar Size 2 Black: Designed with comfort and safety in mind, including a padded nose band and safety link Sets the standard to check during fitting: comfort on the nose and a secure backup connection.