Why a cast iron cornstick pan earns its place
A cast iron cornstick pan turns out crisp-edged, golden cornbread sticks with the kind of even browning that thin metal molds struggle to match. The material holds heat steadily, so each stick bakes consistently from batch to batch. The Lodge Seasoned Cast Iron Cornstick Pan arrives with a naturally seasoned surface, ready to use straight from the foundry, which means you can skip the initial seasoning ritual and get straight to baking.
Because cast iron won’t dent, bend, or warp at high temperatures, the pan keeps its shape through repeated oven use. That durability makes it a practical choice for anyone who bakes cornbread regularly, whether for weeknight dinners or holiday spreads.
What the Lodge cornstick pan brings to the oven
-
Seasoned Cast Iron Cornstick Pan: Naturally seasoned cooking surface, ready to use straight from the foundry. You can bake your first batch without a separate seasoning step, saving time and effort.
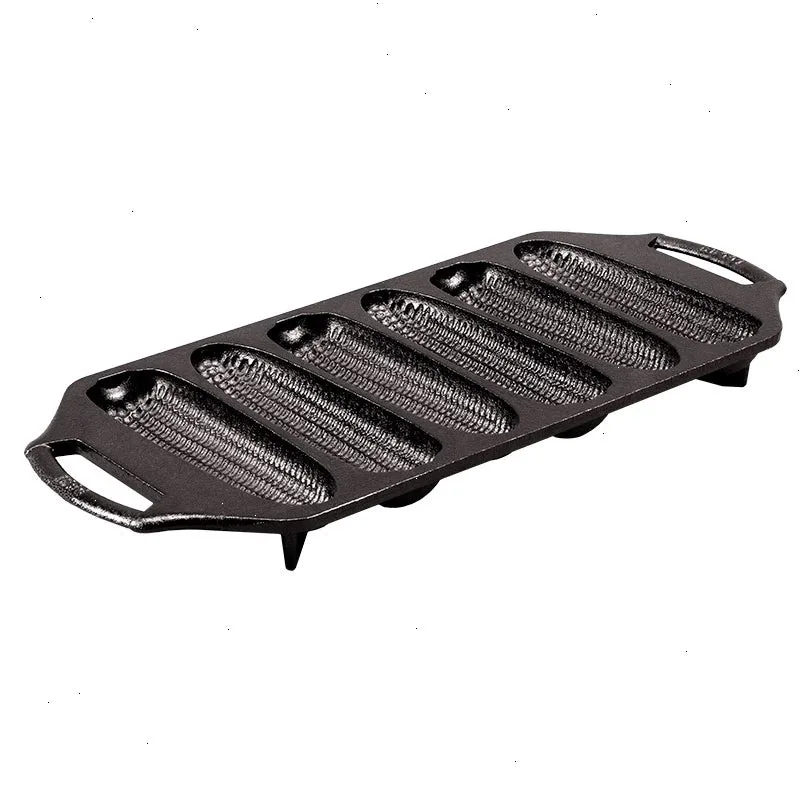
Seasoned Cast Iron Cornstick Pan
-
Seasoned Cast Iron Cornstick Pan: Cast iron bakeware won’t dent, bend, or warp at high temperatures. The pan holds its shape and performs reliably through repeated high-heat baking.
-
Seasoned Cast Iron Cornstick Pan: Great heat retention helps you get perfect bakes every single time. Even heat distribution promotes consistent browning across all the cornstick molds.
How to bake cornbread sticks: a simple process
The method below focuses on the pan itself. For the batter, use your favorite cornbread recipe or a mix, and follow its instructions for mixing and oven temperature.
- Preheat the pan: Place the cornstick pan in the oven while it preheats to the temperature your recipe calls for. A hot pan helps create a crisp crust and encourages the batter to set quickly when it hits the molds.
- Grease the molds generously: Even though the pan is seasoned, a little extra fat helps ensure clean release. Brush melted butter or oil into each cornstick cavity, making sure to coat the corners and ridges.
- Fill the molds: Spoon the batter into the hot, greased molds, filling each about three-quarters full to leave room for rise. Avoid overfilling, which can cause the batter to spill over and create uneven sticks.
- Bake until golden: Return the pan to the oven and bake according to your recipe’s timing, typically until the sticks are golden brown and a toothpick inserted into the center comes out clean. Keep an eye on them, as cast iron’s heat retention can speed browning.
- Cool briefly, then release: Let the pan cool for a few minutes, then run a thin knife or spatula around the edges of each stick and lift them out. Serve warm.
Preheating the cornstick pan: why it matters
Preheating a cast iron cornstick pan is not just about warming the metal. The heat stored in the iron transfers quickly to the batter, helping it rise and set before too much fat is absorbed. This results in a lighter texture and a more defined shape. If you skip preheating, the batter may spread more slowly and the crust may be less crisp.
Always preheat the empty pan, never with batter already inside, and use oven mitts when handling it. The pan will be very hot, so work carefully.
Seasoning and maintaining your cornstick pan
The Lodge cornstick pan comes preseasoned, so you do not need to season it before the first use. After each baking session, let the pan cool completely, then rinse it with warm water and a stiff brush. Avoid soaking it or putting it in the dishwasher. Dry it thoroughly with a towel and place it over low heat for a few minutes to remove any remaining moisture.
To maintain the seasoning, apply a thin layer of cooking oil to the inside of the molds after drying. Wipe out any excess. Over time, this simple routine keeps the surface naturally nonstick and protects the iron from rust.
Practical tips for better cornbread sticks
- Don’t overmix the batter: Stir just until the dry ingredients are moistened. Overmixing can make the sticks tough.
- Let the batter rest: A short rest before baking allows the flour to hydrate and can improve texture.
- Use a scoop for even filling: A small ice cream scoop or measuring cup helps distribute batter evenly among the molds.
- Experiment with add-ins: Fold in corn kernels, shredded cheese, or chopped jalapeños for variety.
Serving and storing your cornbread sticks
Cornbread sticks are best served warm, straight from the pan, with butter, honey, or alongside chili. The pan’s heat retention keeps them warm at the table for a few minutes after baking. If you have leftovers, store them in an airtight container at room temperature for up to two days. Reheat in a warm oven or toaster oven to restore crispness.
When the cornstick pan is the right choice
This pan suits anyone who wants classic, crusty cornbread sticks without the fuss of seasoning a new pan. It’s also a good fit for cooks who appreciate cast iron’s durability and even heating. If you prefer soft, muffin-style cornbread, a standard baking pan might be more appropriate. But for crisp-edged sticks with a traditional shape, the Lodge Seasoned Cast Iron Cornstick Pan is a reliable tool.