Why the under-layer patterns change your prep plan
Perfect Cell's body patterns are recreated through part under-layers, according to the kit listing. That single design choice should shape how you handle the kit before paint: the color separation is built into the plastic, so your job is to protect it, not to cover it up. If you plan to paint, decide early which areas you want to keep as molded and which you want to repaint.
The kit also includes two face types and a wide range of motion for dynamic poses, so assembly decisions affect display more than a static figure would. Work through the build with the final pose in mind.
Kit facts that affect your build order
-
Figure-rise Perfect Cell: Cell's distinctive body patterns are recreated through part under-layers. The pattern is part of the plastic construction, so sanding or painting over those areas changes the look the kit was designed to produce.
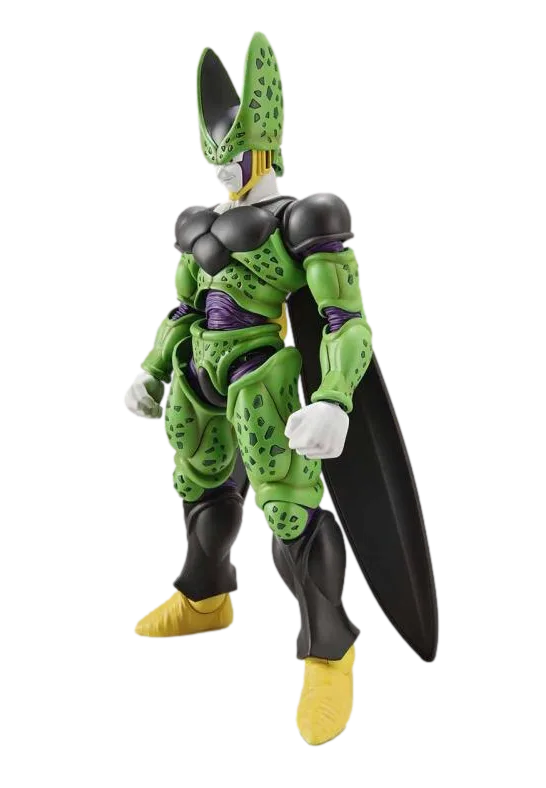
Figure-rise Perfect Cell
-
Figure-rise Perfect Cell: The kit comes with two types of face parts. Choose your face before final assembly so you can test fit and avoid handling painted parts repeatedly.
-
Figure-rise Perfect Cell: Kamehameha effect parts (charge and release) are included, along with an effect stand. Plan the pose around the effect parts early; the stand gives you a display option without needing an Action Base.
-
Figure-rise Perfect Cell: Action Base not included. If you want an airborne or action display, plan for a separate stand rather than assuming one is in the box.
A practical assembly sequence for a paint-ready Cell
The listing includes stickers and instructions, so start there rather than improvising. The sequence below is a sensible order for a builder who intends to paint or finish the kit.
- Dry-fit the body before any cleanup: Snap the main body together first to see how the under-layer patterns line up. This tells you which seams will be visible and which areas you want to keep unpainted.
- Test-fit both face options: Try the two supplied face types and the optional angry expression before committing. Decide which one you will display so you can focus cleanup and paint on that part.
- Remove nubs and address seam lines: Trim nubs flush and smooth the surface. Where parts meet, decide whether you will remove the seam or leave it as a panel break. The listing does not specify a seam-removal method, so use your usual plastic model technique and test on hidden areas first.
- Check the effect parts and stand: Assemble the charge and release Kamehameha effects and the effect stand early. Confirm how the figure sits with the effect attached so you know whether the pose needs adjustment before paint.
- Plan paint around the under-layers: Mask or avoid the patterned areas if you want to preserve the molded color separation. Paint the rest of the body in sub-assemblies so you can reach inner surfaces.
- Apply stickers last: The kit includes stickers. Apply them after paint and any topcoat has fully cured, and only on areas you are not planning to repaint.
Seam line removal: what to check before you sand
- Identify pattern-bearing parts: Because the body patterns come from under-layers, sanding across those areas can dull the effect. Check the part before you sand and keep abrasion away from patterned surfaces unless you intend to repaint them.
- Work from hidden to visible: Test your seam-removal approach on an inner surface first. The listing does not provide a specific seam-removal procedure, so treat this as your own technique applied carefully.
- Keep the pose in mind: The wide range of motion means some seams will be hidden by the pose and some will be exposed. Prioritize the seams your chosen display angle will show.
Painting prep without losing the kit's color separation
The listing does not specify paint types, primer, or thinning ratios, so choose materials you already know on plastic and test on a hidden runner first. The main decision is how much of the under-layer pattern you want to preserve. If you paint over it, you are replacing the kit's built-in color separation with your own work.
Keep sub-assemblies separate until paint is cured, especially around the face and hands, since the kit includes two pairs of hands and two face options. Handling painted parts repeatedly to swap expressions is a common way to scuff a finish.
Care and handling after assembly
- Store the effect parts separately: The Kamehameha charge and release effects and their stand are separate accessories. Keep them bagged when not displayed to avoid losing the small stand piece.
- Support the pose: The kit has a wide range of motion, but the listing does not confirm a stand is included beyond the effect stand. If a pose feels unstable, adjust the stance rather than forcing joints.
- Keep the spare face and hands accessible: Store the unused face and hand pairs in the box so you can change the display without digging through loose parts.
What the supplied information does not confirm
The listing gives the height as 7.61 inches (19.5cm) and confirms the kit is made of plastic, but it does not specify an age rating, paint compatibility, or a recommended seam-removal method. Treat those as decisions you make with your own materials and experience. The listing also does not confirm whether the effect stand can support the figure in every pose, so test the display before you finalize it.