Quick answer
Assemble the Chihuahua (waving) DIY Paper Toy Postcard #102 by carefully cutting out the pieces, scoring the fold lines, and gluing the tabs in the correct order. Patience and a sharp craft knife make the difference.
Before you start: tools and workspace
Monkey Design notes that knife, scissors, glue, and patience are required for assembly. A small pair of sharp scissors or a craft knife with a fresh blade will give you clean edges. A metal ruler helps score fold lines precisely. Clear-drying craft glue or a glue stick with a fine tip works best for small tabs. Set up a well-lit, flat surface with enough room to keep pieces organized.
Understanding the paper toy postcard format
The Chihuahua #102 comes as a printed postcard with all the parts attached. Unlike a pre-cut kit, you cut out each piece yourself. The design includes tabs marked with matching numbers or letters that tell you which tab glues to which surface. Take a moment to study the layout before cutting so you know which pieces connect.
Assembly steps for the Chihuahua (waving) DIY Paper Toy Postcard #102
- Cut out all pieces carefully: Use scissors or a craft knife to cut along the solid outlines. Leave a tiny margin around each piece if using scissors, then trim closer. Keep pieces grouped by number or letter so you can find them later. Common mistake: cutting through a tab or fold line by accident. Take your time on curved edges like the ear and paw outlines. Cut slightly outside the line, then trim inward for a clean edge.
- Score the fold lines: Lay each piece flat on a cutting mat. Use the back of a craft knife blade or a bone folder along a metal ruler to lightly score every dashed fold line. Fold the piece along the score to create a crisp crease. Common mistake: scoring too deeply, which can tear the paper. Apply gentle, even pressure. Test the fold after scoring; if it resists, score again lightly.
- Pre-fold all tabs and body panels: Before applying glue, fold every tab and body panel along the scored lines. This ensures the paper bends easily when you assemble. Fold tabs inward so they are hidden inside the finished figure. Common mistake: forgetting to pre-fold a tab, then struggling to fit it into place after glue is applied. Pre-fold all pieces first; it saves time and frustration.
- Start with the main body pieces: Identify the largest body sections (typically the left and right sides of the Chihuahua). Apply a thin layer of glue to the matching tabs and press them together. Hold each joint for 20–30 seconds until the glue sets. Common mistake: using too much glue, which causes the paper to warp or the tab to slip out of position. A thin, even coat of glue is stronger than a thick blob.
- Attach the head and ears: Once the body is assembled and dry, glue the head piece to the top of the body using the marked tabs. Then attach the waving paw and the opposite front leg. Add the ears last so they sit at the correct angle. Common mistake: attaching ears too early, making it hard to align the head joint. Let the head dry fully before adding ears to avoid misalignment.
- Add the tail and final details: Glue the tail to the back of the body using its designated tab. Check that the Chihuahua stands evenly on a flat surface; if it wobbles, gently adjust the leg tabs. Let the entire figure dry for at least 30 minutes before handling. Common mistake: rushing the drying time and accidentally denting a panel. Place the finished figure on a flat surface to dry undisturbed.
Product details
-
Chihuahua (waving) DIY Paper Toy Postcard #102: Monkey Design is a creative, quirky, and fun group of designers from Taiwan who express themselves mainly through 3D paper models. Their perspective is unique and their designs are universal. The Chihuahua's waving pose and clean geometry reflect Monkey Design's playful style, making it a satisfying project for both beginners and experienced paper crafters.
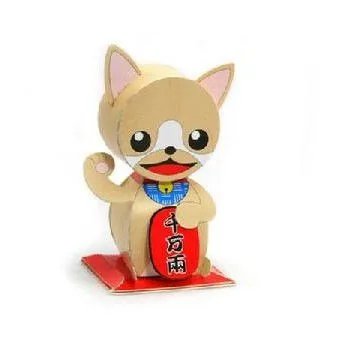
Chihuahua (waving) DIY Paper Toy Postcard #102