Center the island first, then set the chandelier width
A linear chandelier over a kitchen island works when its width relates to the island and its drop clears the work surface. Before ordering, measure your island and compare that number with the fixture widths in the catalog. The Andreas Linear Chandelier comes in 46" width x 4.5" depth x 12.25" height and 54" width x 3" depth x 12" height, so your island length determines which size can sit comfortably in the middle.
Centering is the next check. Mark the island's centerline and plan the chandelier's center on that line. Because the Andreas is hardwired with professional installation recommended, treat the ceiling junction location as a fixed constraint. If the existing junction is off-center, adjust the island plan or consult your electrician rather than relying on a long canopy to hide the offset.
Andreas dimensions that drive island fit
-
Andreas Linear Chandelier: 46" Width x 4.5" Depth x 12.25" Height The narrower option leaves more visual breathing room over a shorter island.
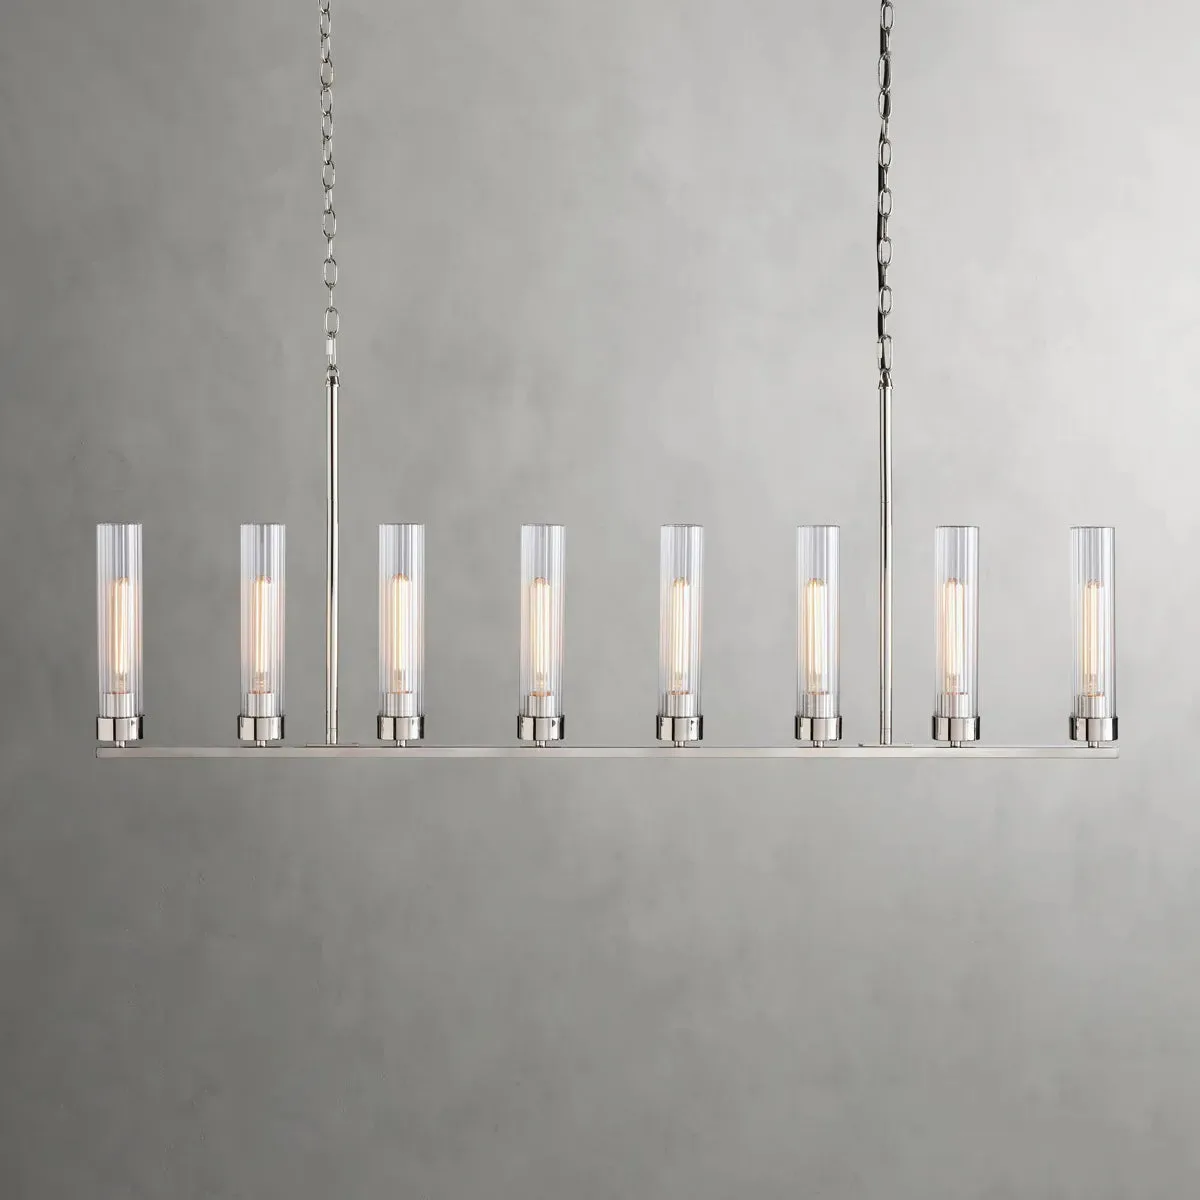
Andreas Linear Chandelier
-
Andreas Linear Chandelier: 54" Width x 3" Depth x 12" Height The longer option suits a longer island but needs more ceiling width to center cleanly.
-
Andreas Linear Chandelier: Adjustable drop length ranges from 26"-144". This is the supported hanging range; use it to confirm your ceiling height can accommodate the fixture before installation.
Use the adjustable drop to set a workable height
The Andreas includes 16 interchangeable extension rods and chains: two 6" rods, two 12" rods, two 18" rods, and two 108" chains. That kit gives you a supported drop range of 26"-144", which is the number to compare against your ceiling height and island clearance. The catalog does not specify a recommended hanging height above an island, so do not treat any single height as a manufacturer instruction. Instead, use the drop range to confirm the fixture can hang high enough for your space and low enough to read as a centerpiece.
The 155" black fabric-wrapped cord gives additional slack, but the rod and chain combination is what sets the visible drop. Plan the rod selection before drilling: the 108" chains are the long elements, while the shorter rods fine-tune the final height.
A supported installation sequence for the Andreas
- Confirm the ceiling and junction: The Andreas is ETL Certified Dry and hardwired with professional installation recommended. Check that your ceiling is dry-rated and that the junction box location can be centered over the island.
- Choose the size and finish: The 46" and 54" widths are distinct variants. Finishes include nickel, brass, and bronze, and light counts are 7-light or 8-light. Match the size to your island length before selecting finish.
- Assemble the drop: Use the supplied two 6" rods, two 12" rods, two 18" rods, and two 108" chains to reach a drop within the 26"-144" range. The catalog does not prescribe a rod sequence, so follow the assembly instructions included with the fixture.
- Center and mount: Align the chandelier's center with the island centerline. The fixture can be mounted on a sloped or vaulted ceiling, which helps if your kitchen ceiling is not flat.
- Install the bulbs: The 7-light version holds seven 60-watt-max T9 E26 bulbs; the 8-light version holds eight. The catalog recommends LED T9 Filament E26 bulbs.
Check the bulb count and finish against your kitchen
The Andreas is a five-point illumination design in its broader family, but the island variants here are 7-light and 8-light. That difference matters for visual rhythm over a long island: more bulbs create a more continuous line of light, while fewer bulbs can feel calmer. The catalog recommends LED T9 Filament E26 bulbs, so plan for that bulb style rather than assuming a standard A19 will suit the fluted glass shades.
Finish is the last decision, not the first. Nickel, brass, and bronze are all offered in both light counts. Pick the finish that relates to your island hardware or nearby metals, then confirm the size still fits your measured island. The fluted glass shades are the textural element; the frame is powder-coated bronze or plated brass, so the finish choice should support the room rather than compete with it.
46" vs. 54" Andreas: which island width fits
- 46" width: Better for a shorter island where a 54" fixture would leave little margin at the ends. The 4.5" depth and 12.25" height give it a slightly deeper, taller profile.
- 54" width: Better for a longer island that can carry the longer linear form. The 3" depth and 12" height make it visually slimmer despite the extra width.
What the catalog does not settle
The supplied information does not state a recommended hanging height above an island, a minimum island length, or a required rod sequence. Those are decisions for your installer based on ceiling height and local code. The catalog does confirm the adjustable drop range, the two widths, the bulb counts, the finish options, and sloped-ceiling mounting. Use those confirmed numbers as your planning anchors, and leave the final height to the professional installing the fixture.