Quick answer
Assemble the support system first, then hang and tension the muslin, and finally position your lights. Work from the floor up and check for wrinkles before you turn on any lamp.
Why the order matters for a three-muslin kit
A 10x10 backdrop support system is tall and wide, so building it after the muslin is hung invites tipped stands and torn fabric. Set the frame first, then add the backdrop. Also, each muslin color behaves differently under light: black absorbs light and can look flat, white reflects and can cause spill, and green needs even illumination to key cleanly. Hanging and tensioning before lighting lets you see and fix wrinkles while the fabric is still easy to reach.
When this kit is not the right choice
This kit is designed for indoor use with 110V power. If you plan to shoot in a location with 220V outlets, you will need a voltage converter or a different lighting setup. Also, the muslins are 10ft x 10ft; if your space is smaller than about 12ft x 12ft, the stands may be too wide and the fabric may drag. Finally, the kit includes umbrellas, not softboxes, so the light will be somewhat broad and less controllable for tight product shots.
Step-by-step setup for the 3-muslin chromakey kit
- Clear the floor and lay out all parts: Unpack the support system, muslins, light stands, umbrellas, and bulbs. Separate the three muslins by color and set the support stand uprights and crossbar within reach. Common mistake: assembling on a slippery surface without checking that all feet are on the same level. Use a tape measure to confirm you have at least 12ft of width and 9ft of height clearance before you build.
- Assemble the background support stand: Connect the two 8ft uprights to the 10ft-wide crossbar according to the included instructions. Tighten all knobs firmly but do not overtighten. Common mistake: extending the uprights to full height before attaching the crossbar, which makes the stand top-heavy and hard to control. With the stand built, gently push it from the side; if it tips, reposition or add sandbags (not included) before hanging fabric.
- Hang the muslin and secure it: Drape the chosen muslin over the crossbar, centering it left to right. Use the rod pocket or clips (if provided) to attach the top edge, then pull the bottom corners taut and secure them to the uprights with clamps or tape. Common mistake: letting the fabric puddle on the floor, which creates wrinkles and a tripping hazard. Step back and check for sagging between the uprights; if the middle dips, add a center support or tighten the fabric.
- Set up the lights and umbrellas: Assemble the two light stands and attach the umbrella holders. Insert the 5500K bulbs into the holders and mount the white umbrellas so they face the subject. Place one light on each side of the camera, angled about 45 degrees toward the subject. Common mistake: pointing the umbrellas directly at the backdrop, which causes uneven lighting and shadows. Turn on the lights and check that the backdrop is evenly lit from edge to edge; adjust light distance or angle if you see hot spots.
- Check for wrinkles and color evenness: With lights on, look at the muslin from the camera position. If you see shadows or creases, steam or mist the fabric lightly (with the lights off and unplugged) and re-tension. For green muslin, ensure no dark or bright patches; for black, check that it reads as solid black without reflections. Common mistake: ignoring small wrinkles that become obvious in post-production. Take a test photo or short video clip and review it on a larger screen before you start the real shoot.
- Switch muslins safely: When changing colors, turn off and unplug the lights first. Remove the current muslin by releasing the bottom clamps, then lift it off the crossbar. Store it folded loosely to avoid deep creases. Hang the next muslin and re-tension. Common mistake: pulling the fabric forcefully, which can topple the stand. Label or color-code the storage bags for each muslin so you can grab the right one without unrolling all three.
Product facts that affect setup
-
Photography Video Studio Lighting Kit with 3pcs 10ft x 10ft Chromakey Black, White and Green Muslins Backdrops and Background Support System: Includes 3pcs 10ft x 10ft muslins (black, white, green) and a background support system with 10ft-wide stand and 8ft-high uprights. The 10ft width and 8ft height determine your minimum room size and the stand height you need to set before hanging any fabric.
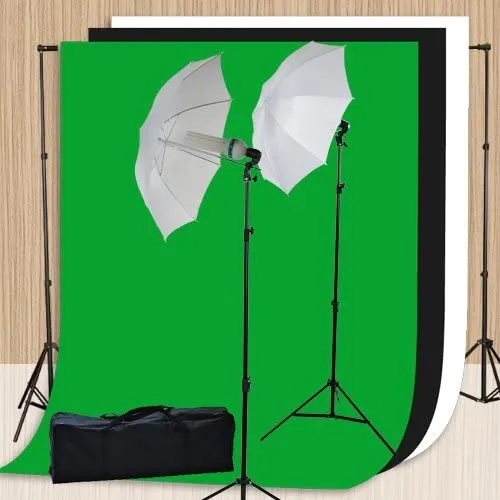
Photography Video Studio Lighting Kit with 3pcs 10ft x 10ft Chromakey Black, White and Green Muslins Backdrops and Background Support System
-
Photography Video Studio Lighting Kit with 3pcs 10ft x 10ft Chromakey Black, White and Green Muslins Backdrops and Background Support System: Comes with two 5500K 105W CFL bulbs and two white umbrella reflectors. The 5500K bulbs provide daylight-balanced light, which helps keep skin tones natural and makes chroma keying more predictable.
-
Photography Video Studio Lighting Kit with 3pcs 10ft x 10ft Chromakey Black, White and Green Muslins Backdrops and Background Support System: Light stands and umbrella holders are included, but the kit is rated for 110V only. Check your outlet voltage before plugging in; using 220V will damage the bulbs and pose a safety risk.