Setting up a dog agility course in your backyard is a fantastic way to keep your active dog physically fit, mentally stimulated, and deeply bonded with you. Whether you're a seasoned competitor or a beginner looking for fun, a home agility course offers convenience and flexibility that training facilities can't match.
In this comprehensive guide, we'll walk you through everything you need to know—from planning your space and choosing the right agility equipment for dogs to safety considerations and step-by-step setup instructions. By the end, you'll have a fully functional backyard agility course that your dog will love.
Why Build a Backyard Agility Course?
Agility training is more than just a fun activity; it's an excellent form of exercise that improves your dog's coordination, flexibility, and obedience. A backyard course allows you to practice at your own pace, without the pressure of a class environment. It's also a great way to socialize your dog with family and friends in a controlled setting.
Moreover, you can tailor the course to your dog's specific needs and skill level. Whether you have a high-energy Border Collie or a curious mixed breed, a custom backyard agility setup can be adjusted as your dog progresses. Plus, you'll save money on class fees and travel time in the long run.
- Convenient access for daily training sessions
- Customizable to your dog's size and ability
- Strengthens the bond between you and your dog
Planning Your Space and Layout
Before you start buying or building equipment, take a good look at your backyard. Measure the available space and consider the terrain. Ideally, you want a flat, grassy area free of obstacles like trees, flower beds, or garden hoses. A standard agility course requires about 50 by 70 feet, but you can adapt to smaller spaces by using fewer obstacles or arranging them in a compact pattern.
Sketch a rough layout on paper, placing obstacles in a logical flow. Start with simple jumps, then add tunnels, weave poles, and a pause table. Make sure there's enough room between obstacles for your dog to transition smoothly. Also, consider the path you'll take as the handler—you'll need to run alongside your dog, so leave space for yourself.
- Measure your yard and mark the course boundaries
- Plan a route that flows naturally without sharp turns
- Ensure the ground is even and non-slip
Essential Agility Equipment for Dogs
Now comes the fun part: choosing your equipment. You don't need to buy everything at once; start with a few key pieces and expand as your dog gains confidence. Here are the essentials for a backyard course:
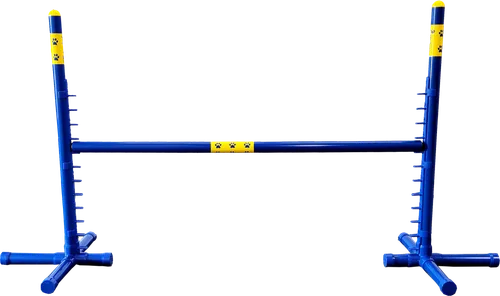
Jumps: Hurdle jumps are the backbone of any agility course. They teach your dog to clear obstacles cleanly. For beginners, use low jumps with PVC bars that can be adjusted as your dog improves. The Agility Deluxe Obstacle Course Number Set - Large can help you organize your course and mark jump heights.
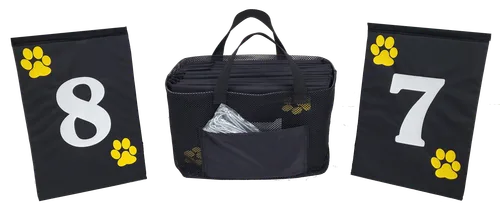
Agility Deluxe Obstacle Course Number Set - Large
Tunnels: A collapsible tunnel is a favorite for most dogs. It encourages them to navigate through enclosed spaces. Look for a durable, weather-resistant tunnel that can be anchored to the ground to prevent shifting.
Weave Poles: These are more advanced but essential for agility training. You can buy a set of six poles or make your own with PVC pipe. They help improve your dog's flexibility and focus.
Pause Table: This is a raised platform where your dog must pause for a set time. It teaches impulse control. You can build one from wood or purchase a sturdy commercial table.
Other useful items include a seesaw or teeter, a dog walk, and a tire jump. If you're just starting, focus on the basics and add more as you go.
- Start with jumps, tunnel, and weave poles
- Invest in durable, weather-resistant equipment
- Use adjustable items to grow with your dog's skill
DIY vs. Store-Bought Equipment
One of the biggest decisions you'll face is whether to build your own obstacles or purchase them. DIY agility equipment can be cost-effective and customizable. For example, you can create jumps using PVC pipes and connectors, build a pause table from plywood, or sew a tunnel from heavy fabric. There are countless online tutorials to guide you.
However, store-bought equipment often offers better durability, safety features, and professional standards. If you plan to train for competition, you'll need equipment that meets official specifications. For a backyard course, a mix of DIY and purchased items works well. For instance, you can make your own weave poles but buy a high-quality tunnel for safety.
When purchasing, consider the Agility Equipment Stake Anchors to secure obstacles to the ground, preventing them from tipping over during use. This is especially important for tunnels and jumps.

Agility Equipment Stake Anchors
- DIY saves money but requires time and skill
- Store-bought offers reliability and safety
- Secure all equipment with anchors for stability
Step-by-Step Setup Guide
Follow these steps to set up your backyard agility course efficiently:
Step 1: Prepare the Ground. Mow the grass short and remove any debris. If the ground is uneven, consider leveling it or using a rubber mat to create a flat surface.
Step 2: Set Up Jumps. Place your jumps in a straight line or a slight curve. Adjust the height to your dog's shoulder level. Use the Agility Deluxe Obstacle Course Number Set - Large to label each jump for organized training.
Step 3: Install the Tunnel. Unfold the tunnel and anchor it at both ends using the Agility Equipment Stake Anchors. Make sure it's straight and secure.
Step 4: Position Weave Poles. Set the weave poles in a straight line, spaced about 24 inches apart. Anchor them firmly to prevent movement.
Step 5: Add the Pause Table. Place the table in a central location. Ensure it's stable and has a non-slip surface.
Step 6: Walk the Course. Walk through the course yourself to check for any hazards. Ensure there are no sharp edges or unstable elements.
Once everything is set, start with a simple sequence and gradually add more obstacles.
- Always secure equipment to prevent accidents
- Test each obstacle before letting your dog use it
- Start with a simple course and add complexity
Safety Tips and Precautions
Safety should always be your top priority when setting up and using an agility course. Here are some essential tips:
First, always supervise your dog during training. Never leave them unattended with the equipment. Second, ensure all equipment is age-appropriate and sized correctly for your dog. For example, a small dog should not attempt high jumps or wide weave poles.
Third, check the equipment regularly for wear and tear. Replace any broken parts immediately. Fourth, keep the training area free of distractions and hazards like sharp tools or toxic plants.
Finally, warm up your dog before each session with a brisk walk or gentle play. This helps prevent injuries. Also, keep training sessions short and positive—15 to 20 minutes is plenty for most dogs.
- Inspect equipment before each use
- Use proper warm-up and cool-down routines
- Adjust difficulty based on your dog's fitness
Training Tips for Beginners
If your dog is new to agility, start with basic obedience training. Teach them to respond to commands like 'sit,' 'stay,' and 'come.' Then introduce each obstacle gradually, using treats and praise to build confidence.
For jumps, start with the bar on the ground and gradually raise it. For tunnels, let your dog explore the entrance before encouraging them to go through. Use a favorite toy or treat to lure them.
Weave poles are the most challenging. Begin with poles spaced wide apart and guide your dog through slowly. As they get the hang of it, tighten the spacing.
Remember to keep training fun and never force your dog. If they seem stressed, take a break and try again later. Patience is key.
- Use positive reinforcement techniques
- Break each obstacle into small steps
- End each session on a high note
Maintaining Your Course
Regular maintenance ensures your course stays safe and functional. After each use, check for loose screws, frayed fabric, or cracked PVC. Clean the equipment periodically to remove dirt and moisture that can cause slipping.
During winter, store portable equipment indoors to prevent weather damage. If you have permanent installations, cover them with tarps when not in use.
Also, consider upgrading your equipment as your dog's skills improve. For example, you might add a tire jump or a dog walk later on.
- Clean equipment after each session
- Store items properly during off-season
- Replace worn parts promptly
Setting up a dog agility course in your backyard is a rewarding project that brings endless fun and fitness to you and your dog. By following this guide, you'll create a safe, engaging environment that strengthens your bond and keeps your pup mentally sharp. Start small, stay consistent, and watch your dog's confidence soar. For quality equipment and accessories, explore ActiveDogs' selection of agility gear and training tools.