Quick Answer
To stitch the Baby Announcement Ultrasound Keepsake, start by gathering your supplies, then follow the painted canvas and stitch pamphlet to complete the design, and finish by blocking and framing or turning it into a keepsake.
Why This Project Is a Thoughtful Gift
The Baby Announcement Ultrasound Keepsake is a unique way to celebrate a new arrival. Because it's a stitch-painted canvas, the design is already marked, making it accessible for beginners while still offering a satisfying project for experienced stitchers.
The canvas measures 5.25 x 4.5 inches on 18 mesh, a fine gauge that produces a detailed, polished finish. The compact size means it's portable and can be completed in a reasonable time, making it a practical choice for a handmade gift.
What's in the Kit
The canvas comes with a StitchPerfect painted design, one of seven stitch pamphlets, a WIP (Work In Progress) Project Card, and a reusable PVC protective project baggy. This means you have everything you need to start stitching right away, except for the yarn and needles.
The WIP Project Card helps you track your progress, and the PVC baggy keeps your canvas clean and safe when you're not stitching. These extras make the project especially beginner-friendly.
Stitching Steps
- Gather Your Supplies: Collect your needlepoint yarn, a size 20 or 22 tapestry needle, embroidery scissors, and a frame or stretcher bars. Use the stitch pamphlet to select the yarn colors if not provided. Check that your yarn is suitable for 18 mesh canvas; if unsure, consult your local needlepoint shop.
- Prepare the Canvas: Place the canvas in a frame or on stretcher bars to keep it taut. If you prefer, you can stitch in hand, but a frame helps maintain even tension. Ensure the canvas is centered and smooth to avoid distortion.
- Read the Stitch Pamphlet: Review the included stitch pamphlet to understand the recommended stitches for different areas of the design. The pamphlet may suggest a mix of tent stitches and decorative stitches. Mark the sections on the canvas with a removable marker to keep track of where each stitch goes.
- Start Stitching: Begin with the main subject, such as the baby's profile or the ultrasound image. Work in small sections, using a tent stitch (like basketweave) for large areas and decorative stitches for details. Keep your stitches consistent in tension to avoid puckering.
- Finish and Block: Once all stitching is complete, remove the canvas from the frame. Block the finished piece by gently stretching and pinning it to a board to straighten the mesh. Allow it to dry completely before framing or finishing.
- Display or Gift: Frame the finished keepsake or turn it into a small pillow, ornament, or wall hanging. It makes a heartfelt gift for new parents. Consider adding a personal note or the baby's birth date on the back.
Product Spotlight
-
Preorder - Baby Announcement Ultrasound Keepsake: This is a StitchPerfect painted needlepoint canvas, meaning the design is already painted on the canvas. You don't need to count threads or follow a chart, which speeds up stitching and reduces mistakes.
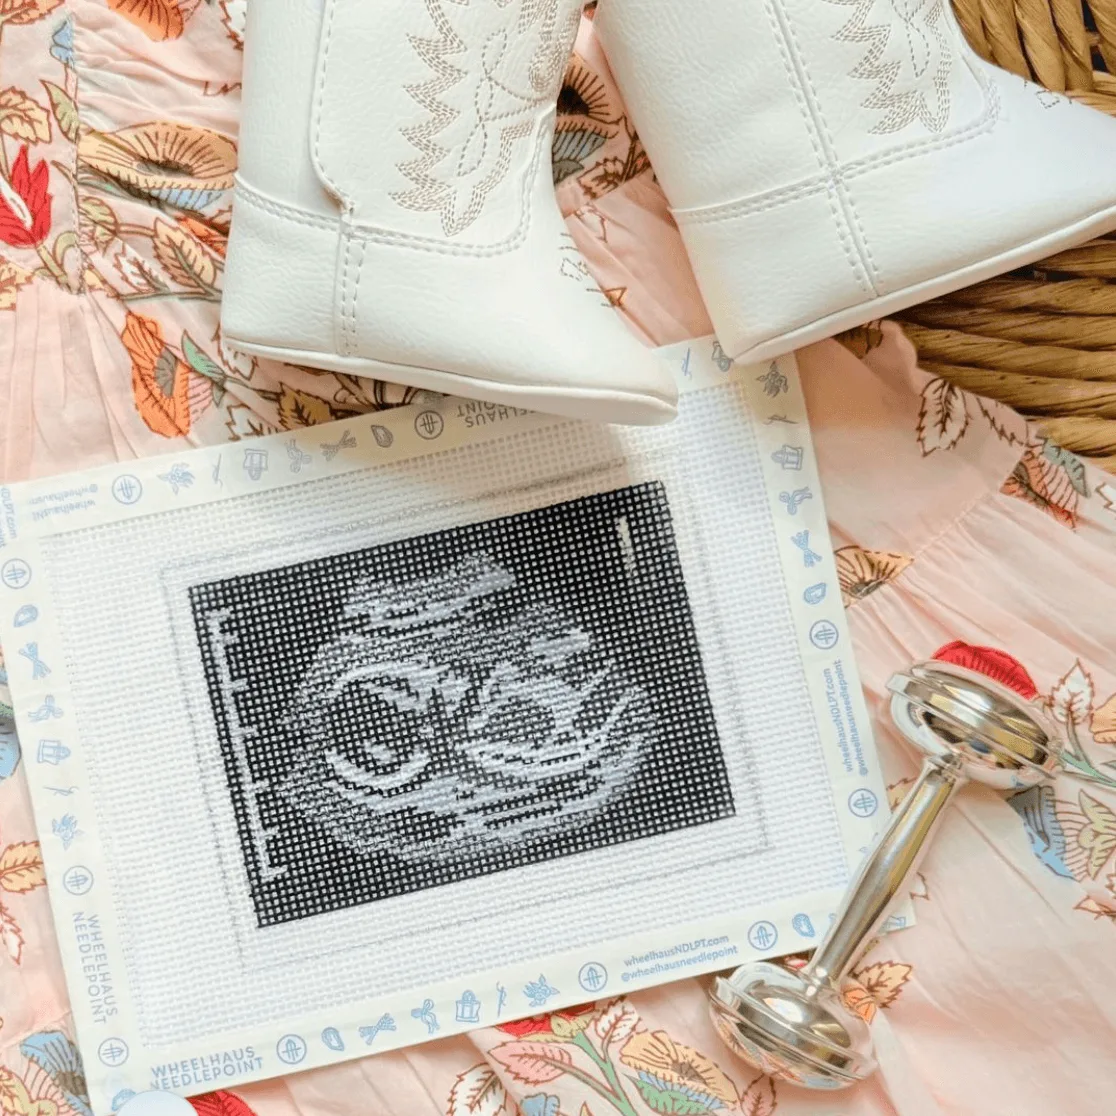
Preorder - Baby Announcement Ultrasound Keepsake
-
Preorder - Baby Announcement Ultrasound Keepsake: The canvas is 18 mesh, a finer gauge that captures more detail. The finer mesh gives the ultrasound design a crisp, detailed look, ideal for a keepsake that will be displayed.
-
Preorder - Baby Announcement Ultrasound Keepsake: It includes one of seven stitch pamphlets, a WIP Project Card, and a reusable PVC protective project baggy. These extras help you learn new stitches and keep your project organized, making it a great choice for beginners.