Quick Answer
The #70 BERNINA Lap-Seam Foot creates a flat, durable seam ideal for reversible clothing and light to medium-weight fabrics. Follow the steps below to set up and sew a perfect lap seam.
Why Use a Lap-Seam Foot Instead of a Standard Presser Foot
A standard presser foot can make it tricky to keep seam allowances even when sewing a flat fell seam. The #70 foot has a built-in guide that automatically folds and stitches a 3 mm lap seam, saving time and ensuring consistency. It works on both 5.5 mm and 9 mm machines, so it fits most BERNINA models.
Step-by-Step Guide to Using the #70 BERNINA Lap-Seam Foot
- Step 1: Attach the Foot and Prepare Your Fabric: Remove your current presser foot and snap on the #70 Lap-Seam Foot. Place two fabric pieces right sides together, aligning the raw edges. Set your stitch to a straight stitch (length 2.5-3 mm) and needle position to center. Check that the foot is securely attached and the fabric edges are even. A common mistake is using a zigzag stitch, which won't work with the lap seam guide.
- Step 2: Sew the First Seam: Sew a standard seam with a 1.5 cm (5/8 inch) seam allowance. Remove the fabric from the machine and press the seam open flat with an iron. This creates the foundation for the lap seam. Don't skip pressing the seam open—it helps the fabric fold neatly in the next step. If the seam is bulky, trim the seam allowance slightly.
- Step 3: Trim and Fold the Seam Allowance: Trim one side of the seam allowance to about 3 mm from the stitch line. Fold the longer seam allowance over the trimmed one, encasing it. Press the fold flat. The folded edge should be about 3 mm wide, matching the foot's guide. Make sure the trimmed edge is completely covered by the fold. A common mistake is trimming too much, leaving a gap that weakens the seam.
- Step 4: Position the Fold Under the Foot: Place the folded seam under the #70 foot, with the folded edge aligned against the guide on the foot's right side. Lower the presser foot and adjust the needle position so it stitches close to the folded edge (usually a left needle position works best). If the fabric shifts, use a few hand pins or a fabric clip to hold the fold in place. Avoid pulling the fabric while sewing, as this can distort the seam.
- Step 5: Stitch the Lap Seam: Sew slowly along the folded edge, keeping the fold against the guide. The foot will maintain a consistent 3 mm seam width. Backstitch at the beginning and end to secure the stitches. Press the completed seam flat. Check the underside of the seam—the trimmed edge should be fully enclosed. If the seam is puckered, reduce the stitch length or use a walking foot for slippery fabrics.
Product Details
-
#70 BERNINA Lap-Seam Foot: For lap seams with a width of 3 mm, for light to medium-weight materials This means the foot is designed for a specific seam type and fabric weight; avoid using it on heavy denim or thick layers, as the seam may not lie flat.
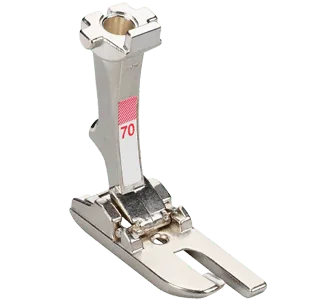
#70 BERNINA Lap-Seam Foot