When it comes to demolition and breaching, a pry bar is one of the most versatile tools you can own. Whether you're a professional contractor, a tactical operator, or a DIY enthusiast, knowing how to use a pry bar effectively can save you time, effort, and prevent costly damage to surrounding surfaces. In this guide, we'll explore the best techniques for using a pry bar in demolition and breaching scenarios, with a focus on minimizing surface damage.
Pry bars come in various sizes and designs, each suited for different tasks. From removing baseboards to forcing open doors, the right technique can make all the difference. We'll also highlight some high-quality tools from Blaze Defense Systems, such as the RESCUE HAWK Breaching Tool w/ Sheath, to help you get the job done efficiently and safely.
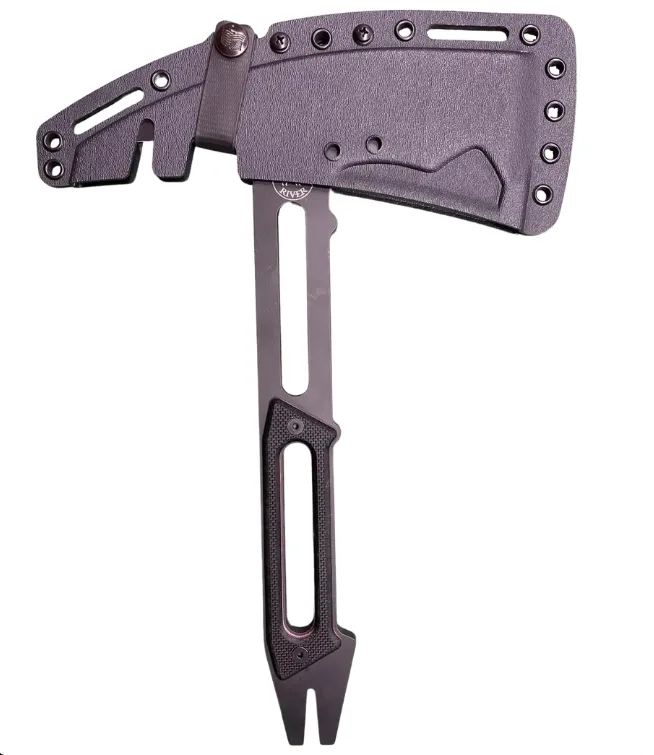
RESCUE HAWK Breaching Tool w/ Sheath
Choosing the Right Pry Bar for the Job
Before you start prying, it's crucial to select the appropriate pry bar for your specific task. Pry bars are available in lengths from 6 inches to over 36 inches, with variations in the shape of the pry end and the material. For demolition work, a longer bar (24 inches or more) provides greater leverage, making it easier to break apart materials like drywall, wood, and even light concrete. For more precise breaching operations, such as opening a locked door or removing a panel, a shorter bar (12-18 inches) offers better control and reduces the risk of over-prying and damaging the surrounding area.
Material matters too: high-carbon steel bars are durable and resistant to bending, while titanium bars are lighter but more expensive. Consider the environment you'll be working in. For tactical breaching, a compact and robust tool like the RESCUE HAWK Breaching Tool w/ Sheath is an excellent choice. It combines a pry bar, hammer, and nail puller in one, making it a versatile addition to any breaching kit.
- For heavy demolition: use a 24-36 inch pry bar for maximum leverage.
- For breaching doors: a 12-18 inch pry bar gives better control.
- Choose high-carbon steel for durability in tough conditions.
Basic Pry Bar Techniques for Demolition
When using a pry bar for demolition, the key is to work with the grain of the material and to use controlled, steady pressure. Start by positioning the flat end of the pry bar under the edge of the material you want to remove. For example, when removing baseboards, slide the bar behind the board and gently twist to create a gap. Then, use a piece of scrap wood as a fulcrum to protect the wall from damage. This technique, known as 'prying with a fulcrum,' distributes the force and reduces the risk of denting or cracking the surface.
For larger demolition tasks, such as tearing down drywall, use the pry bar to create a hole, then insert the bar and pull away from the frame. Always wear safety glasses and gloves to protect against flying debris and sharp edges. Practice on scrap material first to get a feel for the tool's leverage and your own strength.
- Always use a fulcrum (like a scrap block) to protect surfaces.
- Work slowly and steadily; rushing can cause slips and damage.
- Wear protective gear: gloves, safety glasses, and sturdy boots.
Breaching Techniques with a Pry Bar
In tactical and emergency breaching, a pry bar can be used to force open doors, windows, and other barriers. The most common method is the 'door pop': insert the pry bar between the door and the frame near the lock, then apply downward pressure to lever the door open. To avoid damaging the door or frame, place a wedge or a piece of rubber between the bar and the surface to distribute the force. This is especially important when you need to preserve the integrity of the entry point for later use.
Another technique is the 'pry and twist' method, which works well on padlocks and hasps. Insert the bar into the shackle and twist to break the lock. For more challenging barriers, a tool like the RESCUE HAWK Breaching Tool w/ Sheath offers additional features such as a hammer head and a nail puller, making it a multi-functional breaching tool. Always assess the situation and use the least destructive method that will achieve your objective.
- Use rubber wedges to protect door frames.
- Apply force at the weakest point (near the lock).
- For padlocks, twist the bar to snap the shackle.
Protecting Surfaces: Tips and Tools
One of the biggest concerns when using a pry bar is damaging the surfaces you're working on. To minimize this, always use a fulcrum or a protective pad. A simple piece of plywood or a rubber mat can be placed under the pry bar to distribute pressure and prevent gouging. Additionally, consider using a pry bar with a curved or flattened end, which is less likely to dig into soft materials like wood or drywall.
For breaching tasks where surface preservation is critical, investing in high-quality tools is worth it. The RESCUE HAWK Breaching Tool w/ Sheath is designed with a rounded pry end that reduces surface damage, and its ergonomic handle provides a secure grip even in wet conditions. Regular maintenance, such as oiling the bar and keeping the edges sharp, will also improve performance and reduce the need for excessive force.
- Use protective pads or scrap wood as buffers.
- Keep the pry bar edge sharp to cut rather than crush.
- Lubricate the bar to reduce friction and effort.
Safety Considerations for Pry Bar Use
Safety should always be your top priority when using a pry bar. Always wear ANSI-approved safety glasses to protect your eyes from flying debris, and heavy-duty gloves to prevent cuts and blisters. Be mindful of your body position: keep your feet shoulder-width apart and use your legs, not your back, to generate force. This reduces the risk of strain or injury.
When breaching, be aware of what's on the other side of the barrier. In tactical situations, ensure that the area is clear and that you have a backup plan if the pry bar fails. Never use a pry bar as a hammer unless it's specifically designed for that purpose, as this can damage the tool and cause it to fail. The RESCUE HAWK Breaching Tool w/ Sheath is one tool that is designed for both prying and striking, making it a safe and versatile choice.
- Always wear safety glasses and gloves.
- Use proper lifting techniques to avoid back injuries.
- Inspect your pry bar for cracks or damage before each use.
Mastering pry bar techniques for demolition and breaching requires practice, the right tool, and a focus on surface protection. By choosing the appropriate pry bar, using fulcrums, and following safety protocols, you can accomplish your tasks efficiently without unnecessary damage. For a versatile and reliable option, consider the RESCUE HAWK Breaching Tool w/ Sheath from Blaze Defense Systems. Explore it in our store and equip yourself with a tool that meets the demands of both demolition and tactical breaching.