Quick answer
To make consistent jump rings with the Jump Ring Maker 2, mount the mandrel in the base, coil wire with a Foredom SR motor and H.30 handpiece, then slice the coil with the stainless steel blade arbor. Choose the mandrel that matches your desired inner diameter.
Why the mandrel and blade setup matters
The Jump Ring Maker 2 comes with 20 mandrels ranging from 2.5 mm to 12 mm in 0.5 mm increments. The mandrel diameter sets the inner diameter of your finished ring, so picking the right one before you coil saves you from cutting a batch you cannot use. The stainless steel blade arbor is held in the cutting box, which keeps the cut square to the coil. A square cut means the ring ends meet cleanly when you close them, which matters for soldered or woven chains.
When to use the JRM2 and when to cut by hand
The JRM2 is built for repeatable batches: if you need ten or fifty identical rings, the coil-and-cut method gives you uniform sizes with less hand fatigue than sawing a single coil with a jeweler's saw. For one or two rings in a hurry, hand cutting may be faster because you skip the setup. Also, the JRM2 is designed for use with a Foredom SR motor and H.30 handpiece; if you have a different flexshaft motor, check compatibility before relying on this workflow.
Step-by-step: coil, cut, and size jump rings
- Select the mandrel: Choose the mandrel that matches your desired inner ring diameter. The mandrel size equals the inner diameter, so a 6 mm mandrel makes rings with a 6 mm inner hole. Common mistake: measuring the outer diameter of an existing ring and picking that mandrel; that gives you a smaller inner hole than you need. Write down the mandrel size on the coil so you do not mix up batches.
- Mount the mandrel and base: Secure the mandrel in the mandrel base and set the base in the HDPE organizing base. Make sure the mandrel is fully seated and the base is stable. Checkpoint: try to wiggle the mandrel; any movement will cause an uneven coil.
- Load the wire: Feed the wire through the hole at the end of the mandrel (or trap it under the first wrap) and hold tension by hand or with pliers. Start with a slow speed on the Foredom SR motor. Common mistake: letting the wire cross over itself; keep each wrap tight against the previous one. Keep the wire taut; loose wraps make rings that are not round.
- Coil the wire: With the H.30 handpiece in the holder, run the motor slowly and guide the wire evenly along the mandrel until you have the number of wraps you need. Stop and cut the wire, leaving a short tail. Checkpoint: the coil should look like a tight spring with no gaps.
- Set up the cutting box: Slide the coil off the mandrel and place it in the cutting box. Insert the stainless steel blade arbor through the coil and tighten the box. The blade should align with the cut slot. Common mistake: over-tightening the box, which can deform the coil; snug is enough.
- Cut the coil into rings: Use the Foredom SR motor with the H.30 handpiece to drive the blade arbor, or cut by hand if you prefer. Advance the coil after each cut to keep ring widths consistent. Checkpoint: measure the first few rings with calipers; if they vary, check that the coil is not shifting in the box. Cut a test ring and close it to check the gap before cutting the whole coil.
- Finish and organize: Deburr cut ends with a file or rubber wheel if needed, then sort rings by size into the compartments of the HDPE base. Label the compartments with the mandrel size. Common mistake: mixing sizes; the 0.5 mm increments are hard to tell apart by eye.
Product facts
-
Jump Ring Maker 2 (JRM2): Includes 20 mandrels from 2.5 mm to 12 mm in 0.5 mm increments. You can make jump rings in a wide range of inner diameters without buying separate mandrels.
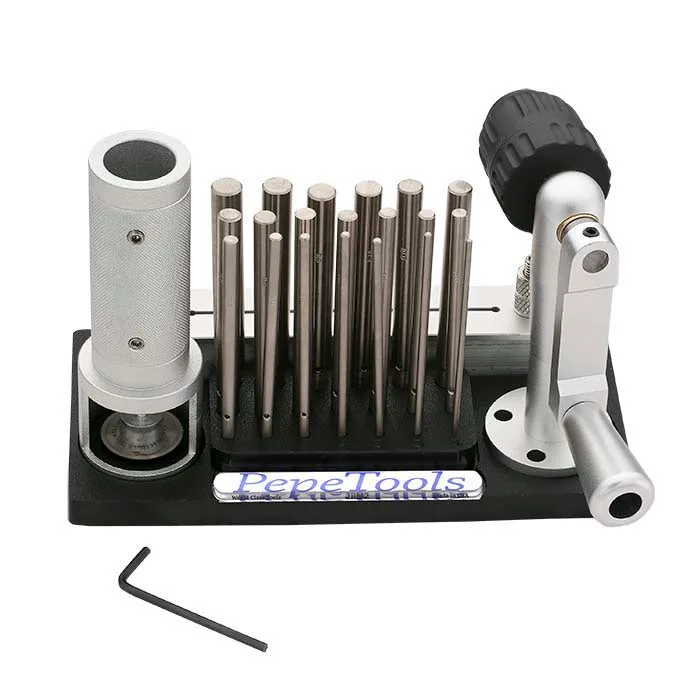
Jump Ring Maker 2 (JRM2)
-
Jump Ring Maker 2 (JRM2): Use only with Foredom H.30 handpiece and a Foredom SR motor. Confirm your flexshaft setup matches before starting, or the handpiece holder will not fit.