Quick answer
Assemble each Terror Tot in this order: clean every contact point, dry-fit the wings and limbs, pin the smallest joints, then glue and base one model at a time. Work slowly because these are small metal sculpts with thin wing and claw joins.
Why metal Terror Tots need a slower assembly routine
The Malifaux Classics Terror Tots are metal sculpts from the First Edition era, so they behave differently from modern plastic kits. Metal parts have no push-fit pegs, and the smallest joins—wings, claws, and horns—carry real weight. A dry fit before glue is not optional; it tells you whether a contact point needs filing or pinning.
Because the set includes three distinct poses, treat each Tot as its own mini-project. Finish one model completely before opening the next, or you will mix up similar-looking wing and arm pieces.
When to pin and when glue alone is enough
Pinning is the safest choice for any join smaller than a match head, especially where a wing meets the back. For larger body-to-leg joins, a clean file and a small amount of cyanoacrylate glue can hold well if the surfaces mate flush.
If you are new to metal miniatures, practice pinning on a spare piece of metal or a larger joint first. The goal is a straight hole on both sides, not a deep one.
Step-by-step Terror Tots assembly
- Clean every part before dry-fitting: Use a fine file and a hobby knife to remove mold lines and flash from each metal piece, paying attention to wing edges and claw tips. Common mistake: filing after gluing, which can snap a thin join. Checkpoint: every contact surface should look bright and flat before you test-fit. Clean all three Tots' parts first so you never handle a glued model with a file.
- Dry-fit each Tot and mark the joins: Press the wings, arms, and horns into place without glue. Note any gap or tilt, and mark the best orientation with a pencil dot on the body. Common mistake: assuming the largest contact point is the correct angle. Checkpoint: the model should stand without support before you commit to glue. If a join rocks or gaps, file the contact point again rather than filling the gap with extra glue.
- Pin the smallest joins: For each wing root and thin claw, drill a shallow hole in both parts with a pin vise, insert a short piece of paper clip or brass rod, and test the fit. Common mistake: drilling too deep and breaking through the surface. Checkpoint: the pin should hold the parts aligned with light pressure before glue. Pin wings first; they are the most fragile and hardest to repair after painting.
- Glue one subassembly at a time: Apply a small drop of cyanoacrylate to one side of the join, press the parts together, and hold for the glue's recommended set time. Work from the body outward: torso and legs, then arms, then wings. Common mistake: gluing all limbs at once and losing alignment. Checkpoint: each subassembly should stay in place when you let go. Let each glued join cure fully before adding the next part.
- Base each Tot for stability: Test-fit the finished model on its base and mark the foot contact points. Pin or glue the feet to the base, then add texture around the contact points. Common mistake: basing before the legs are fully cured, which can tilt the model. Checkpoint: the Tot should stand without leaning when you set it on the table. Base one Tot at a time and let the base material dry before handling the next.
Product facts
-
Malifaux Classics: Terror Tots (3 Pack): This is a three-model metal set with distinct poses for the youngest Nephilim. Each pose has its own balance point, so base and pin one Tot at a time rather than treating the trio as a single assembly job.
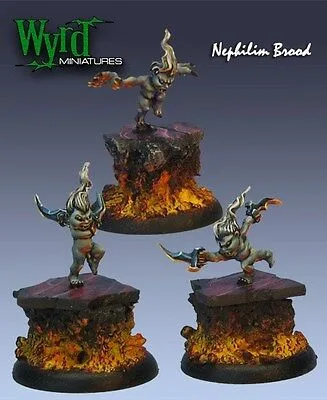
Malifaux Classics: Terror Tots (3 Pack)