Start with the camera base, not the brand name
A universal PTZ bracket is only universal in the sense that it fits many small-based PTZ cameras. Before you drill anything, check the underside of your camera. The Brainwavz metal PTZ wall mount is designed for cameras with a small base, including models from PTZOptics, HuddleCam, AVIPAS, Lumens, and small-based Sony, Panasonic, Cisco, Polycom and Vaddio cameras. If your camera has a large or irregular base, this bracket may not be the right starting point.
The supplied information does not include a model-by-model compatibility list, so treat the brand examples as a guide rather than a guarantee. Compare the footprint of your camera’s base with the bracket’s dimensions: 230mm x 144mm x 3mm. If the base sits comfortably within that area and the mounting screw aligns, you have a workable fit. If not, look for a camera-specific mount instead.
Bracket dimensions and build
-
Metal PTZ Camera Wall Mount Bracket, Universal, Suitable for HuddleCam, PTZOptics, AVIPAS, Lumens Camera: Dimensions: 230mm x 144mm x 3mm; material: solid painted metal; weight: 760g. These are the only supplied size figures. Use them to check that the bracket’s footprint suits your camera base and wall space before ordering.
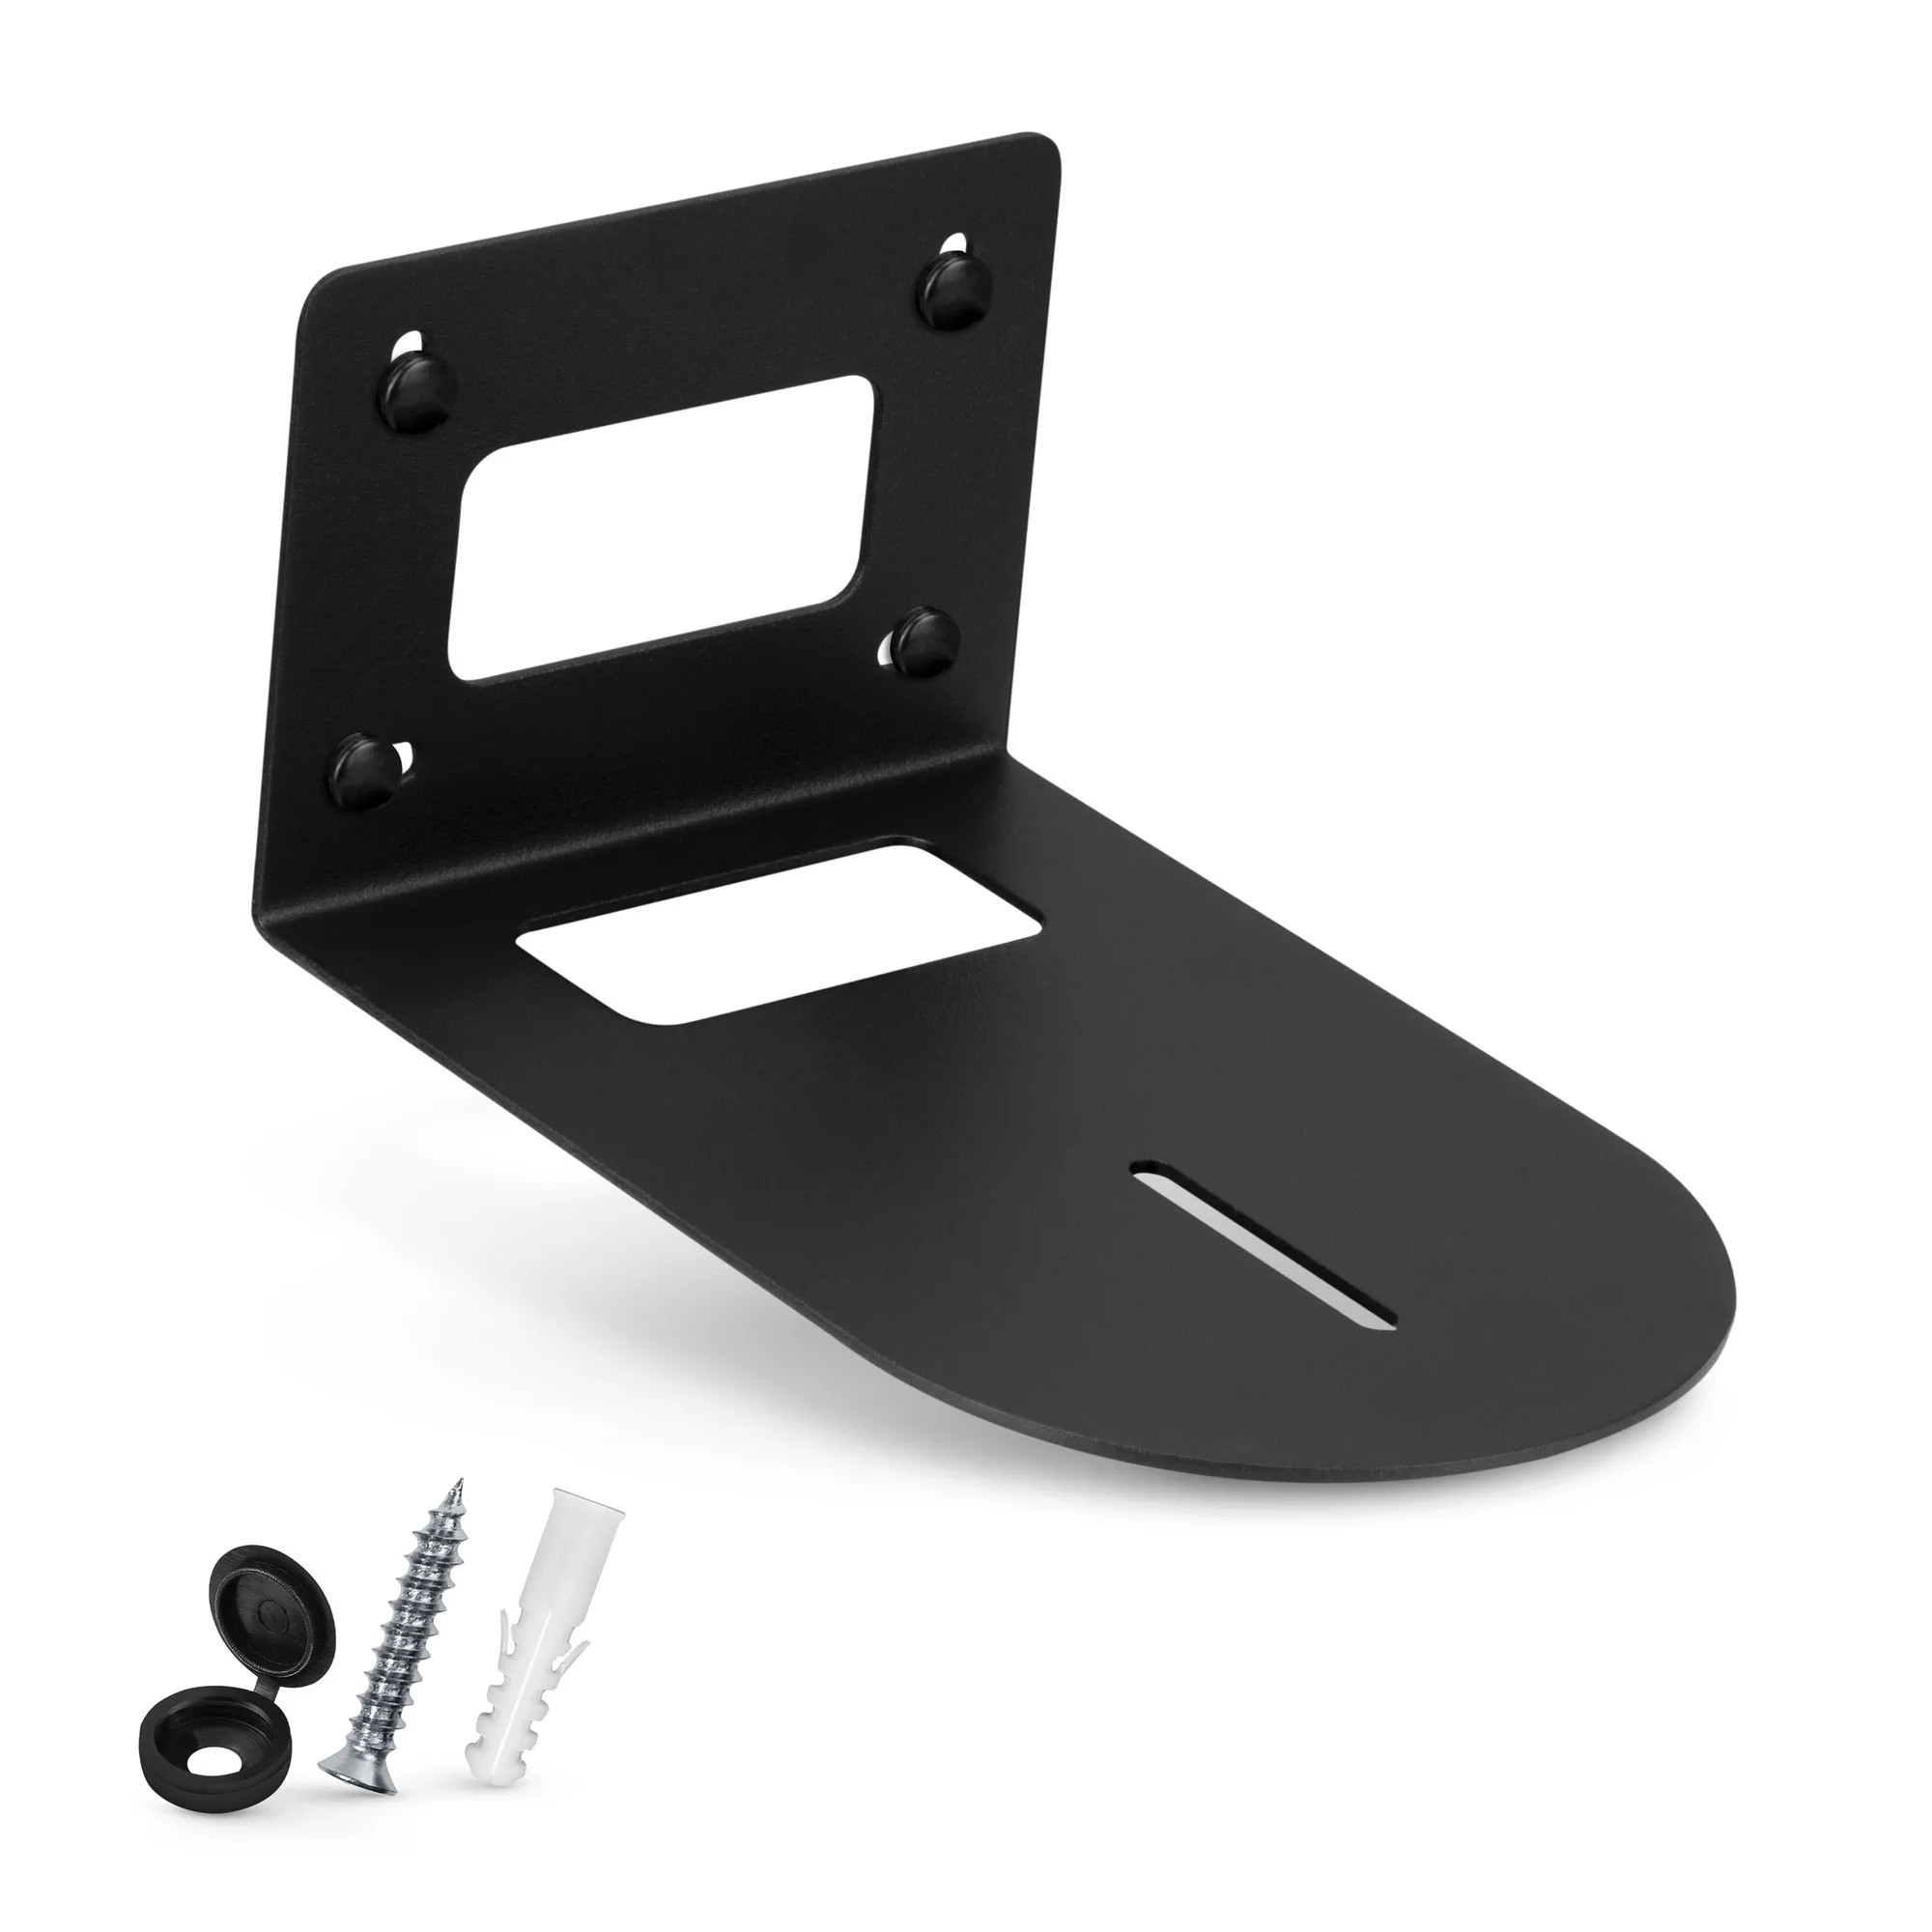
Metal PTZ Camera Wall Mount Bracket, Universal, Suitable for HuddleCam, PTZOptics, AVIPAS, Lumens Camera
-
Metal PTZ Camera Wall Mount Bracket, Universal, Suitable for HuddleCam, PTZOptics, AVIPAS, Lumens Camera: Made from a single sheet of solid metal, bent into shape and finished with smooth painted edges. A one-piece metal design gives a rigid mounting surface, which matters when a PTZ camera moves during pan and tilt.
How to install the bracket on a wall or wood surface
The supplied instructions confirm screw mounting into walls and wood surfaces. They do not specify a drill bit size, screw torque or wall-type exceptions, so use the included hardware and your own judgment for the wall you have.
- Check the package contents: You should have 1 x shelf (bracket), 4 x screws, 4 x wall plugs and 4 x decorative washer/screw caps. Confirm these are present before you start.
- Plan the cable route first: The bracket has two large cut-outs. The rear panel is designed for walls with embedded or routed cables, and the base cut-out allows power and network cables to pass through. Decide which cut-out suits your cable path before fixing the bracket.
- Mark and drill the mounting holes: Use the slotted screw holes to position the bracket accurately. The slots allow small adjustments, so you can correct the alignment before fully tightening.
- Fix the bracket with the supplied screws and wall plugs: Screw the bracket into the wall or wood surface. The included wall plugs are supplied for this purpose; if your wall is a different material, check that the fixings are appropriate.
- Fit the decorative caps: Once the bracket is secure, press the decorative washer/screw caps over the screw heads for a clean finish.
- Attach the camera and route cables: Mount your PTZ camera to the bracket using its own mounting screw or base fixing. Feed the power and network cables through the chosen cut-out. The supplied information does not describe a specific camera-to-bracket screw, so use the hardware that came with your camera.
Cable access: plan for power and network before you drill
PTZ cameras need both power and a network connection, and the bracket’s two large cut-outs are there to keep those cables tidy. The rear panel cut-out is intended for walls where cables are embedded or routed behind the surface. The base cut-out is for passing cables straight through the bottom of the bracket. If your cables come out of the wall in a different position, check that the cut-outs line up before you commit to screw holes. The slotted holes give you some adjustment, but they are not a substitute for planning the cable path first.
What comes in the box
- Metal PTZ Camera Wall Mount Bracket, Universal, Suitable for HuddleCam, PTZOptics, AVIPAS, Lumens Camera: Contents: 1 x Shelf, 4 x Screws, 4 x Wall Plugs, 4 x Decorative Washer/Screw Cap. The bracket is supplied with wall and wood fixings, so you do not need to source separate screws for a standard installation.
- Metal PTZ Camera Wall Mount Bracket, Universal, Suitable for HuddleCam, PTZOptics, AVIPAS, Lumens Camera: Available in Black and White. Choose the finish that blends with your wall or ceiling rather than drawing attention to the mount.
HuddleCam and PTZOptics fit: what to check
HuddleCam and PTZOptics both make PTZ cameras with small bases, and the bracket is described as suitable for models from these brands. However, the supplied information does not list specific model numbers, so you should confirm two things: that your camera’s base fits within the 230mm x 144mm bracket area, and that the camera’s mounting thread or base plate can be fixed to the bracket. If your camera has a recessed or non-standard base, a universal bracket may not sit flush.
For AV installation, the bracket’s solid metal construction and cable cut-outs are the main practical advantages. The 760g weight and 3mm metal sheet give it a stable feel, but the supplied information does not state a maximum camera weight. If your PTZ camera is unusually heavy, check with the camera manufacturer or choose a mount with a published load rating.
Ceiling-to-wall mounting: what this bracket does and does not do
The product is a wall mount bracket. It is not described as a ceiling mount or as a conversion kit for a ceiling-mounted camera. If you are moving a camera from a ceiling to a wall, you can use this bracket for the wall end, but you will need to remove the old ceiling mount and check that the camera base is compatible. The supplied information does not include a ceiling adapter or a drop-pipe fitting.
- Wall mounting: Supported: screw fixing into walls and wood surfaces with the included hardware.
- Cable routing: Supported: two large cut-outs for rear or base cable entry.
- Ceiling mounting: Not confirmed by the supplied information. This is a wall bracket, not a ceiling bracket.
- Load rating: Not stated in the supplied information. Check your camera weight and seek a rated mount if needed.
Installation checkpoints before you tighten everything
Once the bracket is on the wall, do a dry fit before you fully tighten the screws. Check that the camera base sits flat on the bracket, that the mounting screw engages, and that the power and network cables pass freely through the cut-out you chose. The slotted holes let you nudge the bracket left, right, up or down, so use that adjustment to get the camera level. When you are satisfied, tighten the screws and fit the decorative caps.
The supplied information does not include a template or a recommended drill bit size, so mark the holes using the bracket itself as your guide. If you are unsure about your wall construction, consult a qualified installer rather than relying on the included wall plugs for an unfamiliar surface.