Needle decompression is a life-saving procedure for tension pneumothorax, a condition where air accumulates in the pleural space, causing lung collapse and hemodynamic compromise. The ARS (Alternative Rescue System) technique, using a 10-gauge 3.25-inch catheter, has become a standard in emergency settings due to its reliability and safety. This guide provides a comprehensive, step-by-step approach for medical professionals, from indications to aftercare, ensuring you are prepared for this critical intervention.
Whether you are a seasoned emergency physician or a paramedic in the field, mastering needle decompression is essential. This article will walk you through the entire process, including equipment selection, patient positioning, anatomical landmarks, and troubleshooting. We'll also highlight key products from our store that can enhance your preparedness, such as the Celox - EMS 8 in. x 8 in. Hemostatic Gauze and the Headrest IFAK Kit, which are essential for managing bleeding and providing comprehensive care.
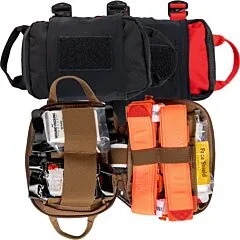
Headrest IFAK Kit
Understanding Tension Pneumothorax and the Role of Needle Decompression
Tension pneumothorax occurs when air enters the pleural space but cannot escape, leading to increased intrathoracic pressure, mediastinal shift, and decreased venous return. This can rapidly progress to cardiac arrest if not treated promptly. Needle decompression is the immediate, life-saving intervention that releases the trapped air, converting the tension pneumothorax to a simple pneumothorax, which can then be managed with a chest tube.
The ARS technique specifically refers to the use of a 10-gauge, 3.25-inch catheter, which is longer than the traditional 14-gauge, 2-inch catheter, to ensure adequate penetration of the chest wall in patients with thicker tissue. This is particularly important in larger patients or those with muscular builds, where standard catheters may fail to reach the pleural space. Understanding the indications and contraindications is crucial: it is indicated for any patient with suspected tension pneumothorax and respiratory distress, while it is contraindicated in patients with a known simple pneumothorax or those with no signs of tension.
- Signs of tension pneumothorax: severe respiratory distress, absent breath sounds on affected side, tracheal deviation, subcutaneous emphysema, and hypotension.
- Immediate action: perform needle decompression if tension pneumothorax is suspected, even if the diagnosis is not confirmed.
Essential Equipment for Needle Decompression
The primary equipment for ARS needle decompression includes a 10-gauge, 3.25-inch catheter-over-needle, an antiseptic solution, sterile gloves, and a one-way valve or flutter valve to allow air to escape without re-entering. It is also essential to have a securement device to keep the catheter in place until a chest tube can be inserted. Many medical professionals prefer to use a commercial ARS needle decompression kit, which contains all necessary components in a sterile, ready-to-use package.
In addition to the decompression kit, having a comprehensive trauma kit on hand is crucial. For example, the Headrest IFAK Kit is designed to be mounted on a headrest for quick access in tactical or emergency situations, and it includes essential items for airway management and hemorrhage control. Similarly, the Celox - EMS 8 in. x 8 in. Hemostatic Gauze is invaluable for controlling severe bleeding that may accompany chest trauma. Ensuring you have these supplies readily available can make a significant difference in patient outcomes.
- Always check the expiration date on the catheter and ensure the packaging is intact.
- Consider having a backup catheter available in case of accidental contamination or malfunction.
Step-by-Step Procedure: How to Perform Needle Decompression with ARS
Step 1: Identify the correct insertion site. The recommended site is the second intercostal space at the midclavicular line on the affected side. Alternatively, the fourth or fifth intercostal space at the anterior axillary line may be used, especially in patients with thicker chest walls. Palpate the ribs to locate the intercostal space, ensuring you insert the needle just above the rib to avoid the neurovascular bundle.
Step 2: Prepare the patient and equipment. Position the patient supine or semi-recumbent, and clean the site with an antiseptic solution. Using sterile gloves, open the ARS kit and assemble the catheter-over-needle, attaching the one-way valve if not pre-attached. Step 3: Insert the needle. With a firm, controlled motion, insert the needle perpendicular to the chest wall, advancing until a 'pop' is felt as the needle enters the pleural space. This indicates that the catheter is in place. Step 4: Advance the catheter. While holding the needle steady, slide the catheter over the needle into the pleural space, then withdraw the needle completely. The catheter should remain in place, with the one-way valve allowing air to escape. Step 5: Secure the catheter. Use tape or a commercial securement device to keep the catheter from dislodging. Listen for a hiss of air, which confirms successful decompression. Finally, reassess the patient's breath sounds and vital signs to confirm improvement.
- If you do not feel a 'pop' or hear air escaping, the catheter may not be in the pleural space. Do not remove it immediately; instead, reassess the landmarks and consider re-insertion if needed.
- In obese patients, the 3.25-inch catheter may still be insufficient. If so, consider using a longer catheter or alternative approach.
Troubleshooting and Common Pitfalls
One of the most common pitfalls is inadequate catheter length, leading to failure to reach the pleural space. The ARS 10-gauge 3.25-inch catheter is designed to address this, but in extremely large patients, even this may not be sufficient. In such cases, consider using an alternative site or a longer catheter. Another issue is catheter dislodgement, which can occur during patient transport. Always secure the catheter firmly and reassess its position frequently.
Additionally, be aware of the risk of iatrogenic injury, such as lung laceration or bleeding, if the needle is inserted too deeply or at the wrong angle. To minimize this, always insert the needle perpendicular to the chest wall and avoid advancing too far. If the patient does not improve after decompression, consider the possibility of a blocked catheter or a massive hemothorax, and prepare for definitive airway management and chest tube insertion.
- Monitor the patient closely for re-accumulation of air, which may require repeat decompression.
- Document the procedure, including time, site, and patient response, for medical records.
Post-Decompression Care and Next Steps
After successful needle decompression, the patient's condition should improve rapidly, with decreased respiratory distress and improved breath sounds. However, needle decompression is only a temporary measure. The definitive treatment for tension pneumothorax is chest tube insertion, which should be performed as soon as possible. In the meantime, continue to monitor the patient's vital signs and oxygen saturation, and provide supplemental oxygen as needed.
Proper aftercare also includes managing any associated injuries, such as bleeding or fractures. Having a well-stocked trauma kit is essential. For instance, the Celox - EMS 8 in. x 8 in. Hemostatic Gauze is effective in controlling severe bleeding, and the Headrest IFAK Kit provides a comprehensive set of tools for emergency care. Ensuring you have these supplies on hand can help you manage the patient's overall condition effectively.
- Prepare for chest tube insertion by having the necessary equipment ready.
- Reassess the patient regularly for signs of re-tension, such as increased respiratory distress or decreased breath sounds.
Needle decompression using the ARS technique is a critical skill for any medical professional. By following this step-by-step guide, you can perform the procedure safely and effectively, potentially saving a life. To ensure you are always prepared, consider equipping your medical kit with the Celox - EMS 8 in. x 8 in. Hemostatic Gauze and the Headrest IFAK Kit, both available at Products With A Mission. These products are designed to enhance your emergency response capabilities.