Start with the resin in front of you
Desert Torsos with Heads 'A' Male are hand cast resin conversion bits for heroic scale troops, sculpted by Victoria Lamb. Because the heads are cast with the torsos, you can plan skin and cloth together rather than painting a separate head and hoping it matches the neck.
One compatibility note should shape your build before any paint goes on: the set is not recommended for use with third party plastic arms with big shoulder pads. If you plan to add arms, check that join early, because a poor fit at the shoulder will interrupt the cloth shading you paint across the torso.
What the set gives your paint plan
-
Desert Torsos with Heads 'A' Male: Hand cast resin conversion bits for heroic scale troops, sculpted by Victoria Lamb. Hand cast resin rewards a clean, patient prep stage and a primer coat that preserves the sculpted cloth and facial detail.
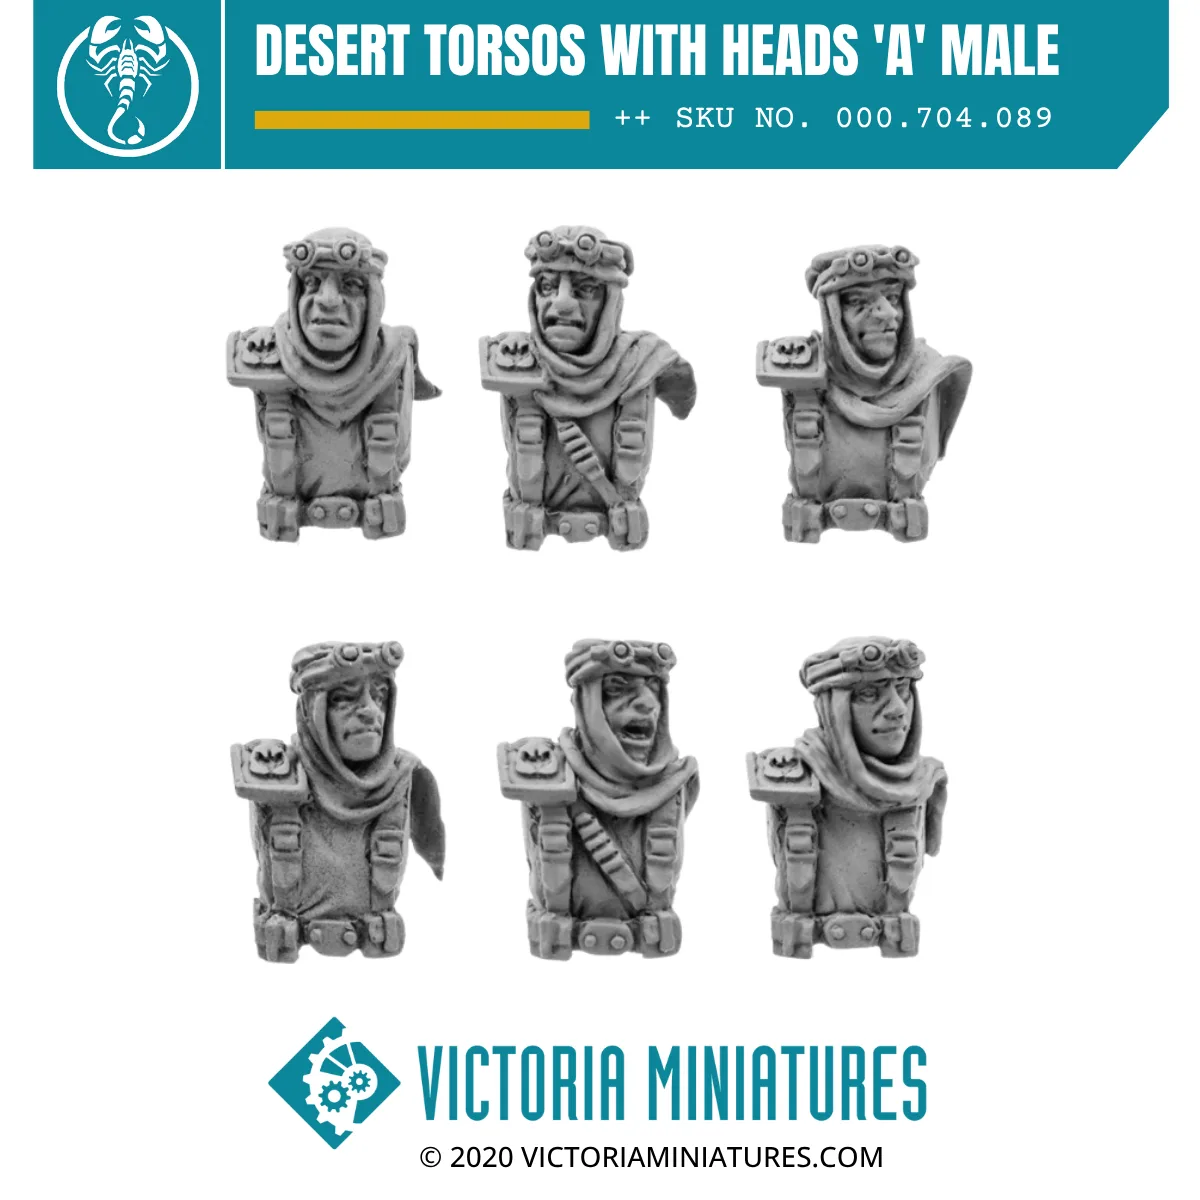
Desert Torsos with Heads 'A' Male
-
Desert Torsos with Heads 'A' Male: Compatible with Victoria Miniatures Male conversion bits. Sticking to that compatibility range keeps arm and equipment joins tidy, so your cloth shading runs across the torso without gaps or mismatched shoulders.
-
Desert Torsos with Heads 'A' Male: Not recommended for use with third party plastic arms with big shoulder pads. Decide on arms before you paint. A bulky third party shoulder pad can spoil the silhouette and force you to repaint the shoulder area.
A paint order that keeps skin and cloth readable
Paint the whole torso as one piece, but treat skin and cloth as two separate value scales so the face does not get lost against the uniform.
- Prep and prime: Clean up the cast resin and prime in a light, even coat. The supplied information does not include a manufacturer prep or washing procedure, so follow your own established resin routine rather than assuming a specific step is required.
- Block in the skin: Lay down a mid-tone skin base on the face and any exposed neck. Keep it slightly lighter than you think you need; desert settings read better with sun-hit skin than with deep shadow.
- Block in the cloth: Choose a desert cloth base a step or two darker than the skin. That separation is what stops the face from blending into the uniform at arm's length.
- Shade the skin: Work a darker skin tone into the eye sockets, under the chin and along the nose. Keep the transitions small; the head is cast with the torso, so there is no separate head to rotate for a better angle.
- Shade the cloth: Deepen the folds and the underside of the torso with a darker version of the cloth base. Let the sculpt do the work rather than painting in folds that are not there.
- Drybrush the cloth: Once the shading is dry, drybrush a lighter cloth tone across the raised areas. This is the step that gives desert cloth its sun-bleached look and pulls the torso together.
- Tidy the skin last: Re-establish the brightest skin highlights on the cheekbones, brow and nose after the cloth work, so any stray drybrush dust on the face gets corrected.
Skin tone choices for sun-exposed troops
For desert troops, a warm mid-tone base with a slightly cooler shadow reads as sun on skin without turning orange. Keep the highlight small and placed where the light would actually fall: brow, cheekbone, nose bridge and chin.
Because these are heroic scale torsos with the heads attached, the face is viewed from the same angle as the chest. That means the skin highlight and the cloth highlight should agree on a light direction. Pick one direction before you start and keep it consistent across both.
Desert cloth shading that survives the tabletop
Desert cloth is mostly about value, not hue. A pale sand, khaki or dusty tan base with a darker shade in the recesses and a light drybrush on the raised folds will read clearly from a distance.
Drybrushing is the most efficient way to bring out the cloth on a hand cast resin torso. Load the brush lightly, wipe most of the paint off, and build the highlight in two or three passes rather than one heavy coat. The sculpted folds will catch the paint and the recesses will stay dark.
Checks before you commit to a final coat
- Does the face separate from the uniform?: Squint at the model. If the skin and cloth sit at the same value, lighten the skin or darken the cloth before you add final highlights.
- Are the arm joins settled?: The set is compatible with Victoria Miniatures Male conversion bits and is not recommended with third party plastic arms with big shoulder pads. Test your intended arms before the final cloth highlight, because a late arm swap means repainting the shoulder.
- Is the drybrush catching only the raised folds?: If paint is pooling in the recesses, your brush is too wet. Reload less and build the highlight more slowly.