The L shape is the first thing to get right
The Perifo L-shaped ceiling base kit (3 spots) is not a straight track with a bend added later. The kit includes two 59.1 inch rails and connectors that create an L shape that turns to the left. If you plan your ceiling layout as if the rails run in a straight line, you will likely end up with a corner in the wrong place and spots that do not cover the work zones you intended.
Before you commit to a mounting position, sketch the L on paper using the two rail lengths. Mark which end will hold the power supply unit (PSU). The PSU sits at the end of one rail, so that end needs to be reachable for whatever connection your installation requires. The catalog does not specify the PSU cable length or the exact clearance needed, so confirm those details before drilling.
What the kit actually contains
-
Perifo L-shaped ceiling base kit (3 spots): Includes three cylinder spotlights, two 59.1 inch rails, a PSU at the end of one rail, and connectors to create an L shape that turns to the left. Knowing the rail count and turn direction prevents layout mistakes before you mount anything.
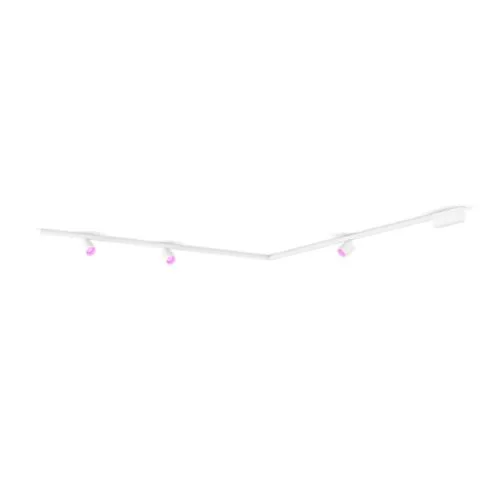
Perifo L-shaped ceiling base kit (3 spots)
Placement mistakes that leave dark corners
- Treating three spots as three equal work zones: Three spots along an L-shaped track do not automatically cover a sink, a stove, and an island evenly. The corner spot often ends up closer to one arm of the L, so light pools there while the far end of the other arm stays dim. Plan which two work zones need the most light and accept that the third spot will be more ambient.
- Ignoring the left-turn direction when positioning the corner: Because the connectors turn left, the corner has a fixed orientation. If you mirror your sketch without checking, the long arm may end up over a walkway instead of a counter. Walk the ceiling with your sketch before drilling.
- Mounting the PSU end where you cannot reach it: The PSU sits at the end of one rail. If that end lands above a cabinet run or far from a power source, you may face a problem the catalog does not solve. Check reachability and connection before finalizing the layout.
- Spacing spots too far apart for task lighting: The kit gives you three spots, but the catalog does not specify a recommended spacing. As a rule of thumb for task lighting, keep spots closer together over work surfaces and farther apart over open floor. Adjust based on the rail length you have.
Angle adjustment: small changes, big difference
The cylinder spotlights can be aimed, but the catalog does not list a specific beam angle or rotation range. That means you should test angles before finalizing. A common mistake is aiming all three spots straight down. On an L-shaped track, straight-down spots emphasize the corner and leave the ends of the arms underlit.
Instead, aim the spot nearest the corner slightly outward along each arm, and aim the third spot toward the main work surface. Small adjustments of a few degrees can fix uneven spot lighting without moving the track. If the spots feel too hot or too dim in one area, check that no spot is aimed directly at a reflective surface or into a shadowed corner.
Troubleshooting uneven light without guessing
- One spot seems brighter than the others: Check that all three spots are the same model and that none is obstructed by a beam or cabinet. The catalog does not list dimming or brightness specifications, so if the difference persists, consult the manufacturer's documentation rather than assuming a fault.
- The corner is too bright: Aim the corner spot slightly away from the corner or swap its aim with a spot over a less critical area. If the track position itself is the cause, you may need to adjust the layout, which is easier before final mounting.
- Spots do not reach the end of the rail: The spots attach to the rails, but the catalog does not specify how far along the rail they can be positioned. Confirm the attachment range before you buy if even coverage to the rail ends is essential.
- The L shape does not fit your ceiling plan: The kit turns left only. If your layout needs a right turn, this kit is not the right starting point. Check the connector orientation against your sketch before purchasing.
Installation is not a DIY detail to skip
This is a ceiling-mounted smart track lighting kit that connects to a power supply. The catalog does not include installation instructions, wiring steps, or a statement about whether a qualified installer is required. Do not treat the absence of instructions as permission to wire it yourself. If you are not confident with mains electrical work, hire a qualified electrician. The kit's PSU and connectors are part of a system that must be installed correctly for safety and function.
Before installation, confirm that your ceiling can support the track and that the PSU location has access to the power source your electrician specifies. The catalog does not list weight, compatibility with dimmers, or supported control systems, so verify those with the manufacturer or your installer if they matter to you.
What the catalog does not settle
The supplied information does not include recommended spot spacing, beam angle, dimming compatibility, or installation instructions. It also does not state whether the kit can be extended with additional rails or spots. If your kitchen layout depends on those details, treat them as open questions to confirm before purchase. Planning around the confirmed facts—three spots, two 59.1 inch rails, a left-turning L, and a PSU at one end—will help you avoid the most common setup mistakes.