Start with what the Osmo kit confirms
The Osmo USA Pet Nail Grinder Kit is a grooming tool intended for trimming and smoothing pet nails. It is offered in the Standard option, and the SKU is NGK001-CXXX-DT. That is the confirmed scope: a grinder kit for pet nail grooming. The listing does not include a speed chart, bit guide, or step-by-step operating instructions, so the routine below focuses on calm handling and observation rather than manufacturer-specific settings.
Confirmed product details
-
Pet Nail Grinder Kit: Brand: Osmo USA; Product: Pet Nail Grinder Kit; Available option: Standard; SKU: NGK001-CXXX-DT. These identifiers help you confirm you are buying the intended kit and the standard configuration.
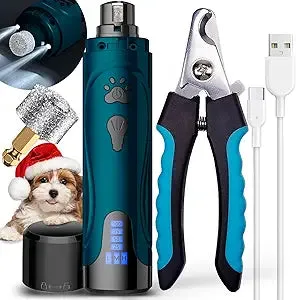
Pet Nail Grinder Kit
-
Pet Nail Grinder Kit: Intended for pet nail grooming use, specifically trimming and smoothing pet nails. This tells you the tool's purpose, but not the exact technique or settings for your dog.
A calm introduction for anxious dogs
Anxious dogs do better when the grinder is introduced slowly and without forcing a full nail session on day one. The steps below are general handling guidance, not manufacturer instructions. Because the listing does not supply a startup protocol, treat each step as a checkpoint and stop if your dog remains fearful.
- Let your dog see and sniff the grinder while it is off: Place the tool on the floor or a stable surface and allow approach on your dog's terms. Pair it with treats or praise. Do not turn it on yet.
- Turn it on briefly at a distance: If the grinder has a power switch, switch it on for a second or two while your dog is a few feet away, then turn it off. Repeat over several short sessions until the sound draws curiosity rather than fear.
- Touch the body of the tool to a paw without grinding: With the grinder off, gently rest the handle or body against a paw, then reward. This builds tolerance for handling before any nail contact.
- Try one nail, then stop: On a later session, hold a nail and touch the grinding area briefly. The goal is a single positive repetition, not a full paw. End while your dog is still calm.
Pet nail grinding steps for a cooperative dog
Once your dog accepts the sound and handling, you can move to actual nail grinding. The following sequence is a practical, low-stress order. It does not replace professional grooming advice, and the kit listing does not confirm specific bit types or speed settings, so use your own judgment and stop if anything seems off.
- Choose a quiet, non-slip spot: A stable surface and good lighting help you see the nail and keep the dog from sliding. Have treats within reach.
- Secure your dog gently: Use a helper or a non-restrictive hold that keeps your dog from pulling away suddenly. Never force a struggling dog; switch to a desensitization session instead.
- Hold one paw and isolate a nail: Support the paw from underneath and hold the nail steady between your fingers. Expose only the tip you intend to work on.
- Touch the grinder to the nail tip briefly: With the grinder running, make short, light contact with the tip of the nail. Do not press hard or hold the tool in one spot. The goal is to remove small amounts and check progress.
- Check the nail after each touch: Look at the nail tip after a second or two of grinding. Stop before you reach the quick, the sensitive inner part of the nail. If you see a dark spot or the dog reacts, stop.
- Move around the nail tip: Angle the nail slightly to reach the sides and underside of the tip. Keep contact brief and check frequently so you do not take off too much at once.
- Finish with a reward and a break: After one paw or a few nails, stop and reward. Anxious dogs may need several short sessions to complete all nails.
What the listing does not tell you
The Osmo USA Pet Nail Grinder Kit listing confirms the brand, the Standard option, the SKU, and the intended use for trimming and smoothing pet nails. It does not include a speed chart, bit replacement guide, cleaning instructions, or safety warnings. That means you should not assume a particular grinding speed or bit is recommended by the manufacturer. If your dog has thick nails or you are unsure about the quick, consult a veterinarian or professional groomer before grinding. For anxious dogs, the absence of a detailed protocol is a reason to go slower, not faster.
Checkpoints before you buy or start
Use these checkpoints to decide whether this kit fits your situation and to prepare for a safe session. They are based on the confirmed listing and general handling principles, not on supplied operating instructions.
- Confirm you are buying the Standard option: The listing shows only the Standard option. Check the SKU NGK001-CXXX-DT if you need to match a specific kit.
- Have a plan for the quick: The listing does not explain how to identify or avoid the quick. Learn where it is on your dog's nails or ask a professional before your first session.
- Decide on a backup if your dog panics: If your dog cannot tolerate the sound or vibration after several short introductions, stop and consider a professional groomer or a different approach.
- Check the tool before each use: The listing does not include maintenance steps. Inspect the grinding area for damage or debris before turning it on, and follow any instructions that come with the kit.