Quick answer
The My Babiie raincover is designed to fit the MB30, MB160, MB170, MB200, MB450 and MB500 pushchairs. To fit it, drape the cover over the pushchair, secure the Velcro fastenings, and check that the cover is snug without blocking airflow or your child’s view.
Why a tailored raincover makes a difference
A raincover that is specifically designed for your pushchair model gives you a much better fit than a universal cover. The My Babiie raincover is made for the MB30, MB160, MB170, MB200, MB450 and MB500, so it follows the shape of the seat and canopy rather than hanging loosely. That means fewer gaps for rain to sneak in and less flapping in the wind.
However, a tailored cover is only effective if it is fitted correctly. A cover that is too tight can restrict airflow, while one that is too loose can let water pool or blow out of position. The steps below help you get the balance right every time.
When to use your raincover (and when not to)
Use the raincover whenever there is a chance of rain, drizzle or even light snow, as it keeps your child and the pushchair fabrics dry. It is also useful in windy conditions when you want to protect your child from the elements.
Do not leave the raincover on in dry, warm weather or when your child is likely to overheat. Always check that your child is comfortable and that the cover is not trapping too much heat. If the rain stops, remove the cover to allow air to circulate.
Step-by-step: fitting your My Babiie raincover
- Prepare your pushchair: Remove any toys, blankets or accessories that could get in the way. Make sure the seat is in the upright or reclined position you want, and that the canopy is fully extended if you need extra coverage. Checkpoint: the pushchair should be clear of loose items before you start.
- Drape the cover over the pushchair: Unfold the raincover and start from the top, pulling it gently over the canopy and down over the seat. Make sure the front of the cover aligns with the footrest area. Common mistake: pulling too hard can tear the material or strain the seams. Work slowly and let the cover settle into place.
- Secure the Velcro fastenings: Locate the Velcro straps and fasten them around the pushchair frame or under the seat, following the natural shape of the cover. Adjust the tension so the cover is snug but not stretched tight. Checkpoint: the cover should not sag or flap loosely, but you should still be able to slip a finger under the edge for airflow.
- Check visibility and airflow: Make sure the cover does not obstruct your child’s view or block the ventilation areas. If your pushchair has a peek-a-boo window, ensure it is not covered. Common mistake: covering ventilation holes can cause condensation and overheating. Always leave vents unobstructed.
- Test the fit while moving: Give the pushchair a gentle push and turn to see if the cover stays in place. If it shifts, readjust the Velcro straps for a tighter fit. Checkpoint: the cover should remain stable during normal use, even on uneven pavements.
- Remove and store after use: When the rain stops, undo the Velcro and lift the cover off. Shake off any water and allow it to dry completely before folding and storing. Common mistake: storing a wet cover can lead to mildew. Always dry it fully before packing away.
Product facts
-
Raincover for MB30, MB160, MB170, MB200, MB450, MB500 Pushchairs: Tailor-made compatibility for MB30, MB160, MB170, MB200, MB450 and MB500 pushchairs. You get full coverage without compromising on style, and the cover is less likely to slip out of place.
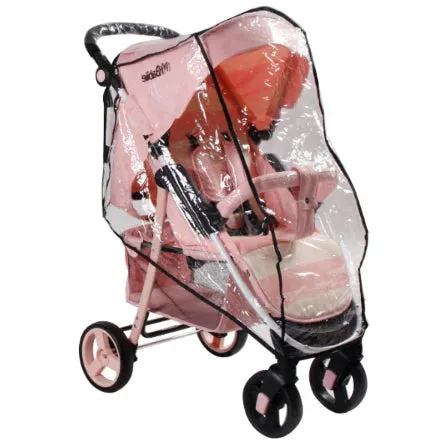
Raincover for MB30, MB160, MB170, MB200, MB450, MB500 Pushchairs
-
Raincover for MB30, MB160, MB170, MB200, MB450, MB500 Pushchairs: Velcro fastening for easy attachment and removal. The Velcro ensures a snug, stable fit even in breezy or rainy conditions, and lets you take the cover on and off quickly.