Why a rear pouch belongs in your high-cut helmet setup
A high-cut helmet leaves more of the sides open, which is great for hearing and headset fit but shifts the weight balance forward once you add a night vision mount and battery pack. A rear pouch gives you a dedicated place to add counterweight and organize cables, so the helmet sits more evenly on your head.
The Agilite Rear Pouch is designed for exactly this role. It integrates with the Mohawk, Mohawk Air, and Gen4 Lo-Pro helmet covers and uses Velcro plus milspec bungee cord to stay put. The semi-rigid exterior adds impact protection for rear accessories, and the central loop area gives you a spot for ID patches.
What the Rear Pouch gives you
-
Rear Pouch: Integrates seamlessly with the Mohawk, Mohawk Air and Gen4 Lo-Pro helmet covers. These are the covers the pouch is designed to work with, so you can plan your setup around a known fit.
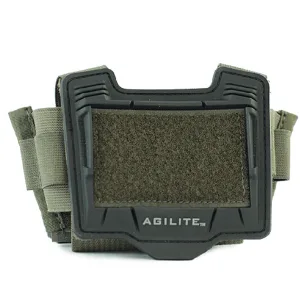
Rear Pouch
-
Rear Pouch: Secured by Velcro, Velcro under tabs and milspec bungee cord. Three retention methods help keep the pouch stable during movement and when adding or removing counterweight.
-
Rear Pouch: Features a versatile rear flex cell that fits all common NVG battery packs and counterweights. The flex cell is the part that holds your counterweight, so you can balance the helmet without a separate pouch.
-
Rear Pouch: Has strategically placed exit holes for all cables and a lower stow area for comms PTT cables when not in use. Cable routing keeps your setup tidy and reduces snags, and the stow area gives unused cables a home.
How to mount the Rear Pouch on your helmet
The Rear Pouch is designed to be donned and doffed in around 60 seconds, so you can add or remove it depending on your mission set. Follow these steps to get a secure fit.
- Confirm cover compatibility: The pouch integrates with Mohawk, Mohawk Air, and Gen4 Lo-Pro helmet covers. If you run a different cover, check the Velcro layout before assuming a fit.
- Position the pouch on the rear Velcro: Place the pouch on the rear of the cover, aligning it with the Velcro field. Center it left to right so the weight sits evenly.
- Secure the Velcro under tabs: Press the under tabs into place to lock the pouch to the cover. These tabs add retention beyond the main Velcro field.
- Route the milspec bungee cord: Use the bungee cord as a secondary retention method. The supplied information does not specify a routing pattern, so follow the cover’s bungee channels and keep tension firm but not excessive.
- Add your counterweight or battery pack: Slide your NVG battery pack or counterweight into the rear flex cell. The cell fits all common sizes, so seat it fully so the semi-rigid exterior can protect it.
- Route cables through the exit holes: Feed cables through the strategically placed exit holes. Tuck any unused comms PTT cable into the lower stow area.
- Check balance and retention: Put the helmet on and move your head side to side and front to back. The pouch should stay put and the helmet should feel balanced. Adjust the counterweight position if needed.
Placement and balance tips for night vision
- Keep the weight low and centered: The rear flex cell sits at the back of the helmet. Centering the counterweight left to right helps avoid a sideways pull, and keeping it low reduces the leverage on your neck.
- Match counterweight to your NVG setup: The pouch fits all common NVG battery packs and counterweights, so you can tune the amount of weight to balance your specific night vision device. Start with the battery pack you actually use, then add or remove weight until the helmet sits level.
- Use the loop panel for ID, not weight: The central loop area is for ID patches. Keep it clear of heavy items so the pouch exterior can do its job protecting rear accessories.
- Leave slack in routed cables: Cables routed through the exit holes should have enough slack for head movement. The lower stow area can hold excess PTT cable when you are not using it.
Color and compatibility choices
The Rear Pouch comes in Ranger Green, Coyote Tan, and Black, so you can match your helmet cover and unit SOP. If you are building a low-visibility setup, Ranger Green or Coyote Tan may blend better; Black is a straightforward tactical option.
Compatibility is limited to the Mohawk, Mohawk Air, and Gen4 Lo-Pro helmet covers per the supplied information. If you use a different cover, the Velcro and bungee attachment may not line up, so verify before you rely on this pouch for counterweight.
What the supplied information does not cover
The supplied information does not include a specific counterweight limit, exact bungee routing instructions, or care and cleaning steps for the Rear Pouch. It also does not state whether the pouch fits helmet covers other than the Mohawk, Mohawk Air, and Gen4 Lo-Pro. For those details, contact Agilite customer care before making changes to your setup.