What You Get with the Sky Ridge 270 Awning Passenger Side
The Sky Ridge 270 Awning Passenger Side (product ID 1926309) provides 80 square feet of covered space for shade, lounging, or cooking. It includes two robust powder-coated mounting brackets, a tie-down strap, eight guy-ropes, eight stakes, and mounting hardware. The awning walls are sold separately.
This awning is designed for a one-person setup and teardown. Its self-contained unit uses rugged, lightweight extruded aluminum with alloy hinges. The telescopic legs have twist-lock fixtures adjustable in height. Follow the supplied product instructions for the specific height range.
Key Features for Setup
-
SKY RIDGE 270 AWNING PASSENGER SIDE WITH MOUNTNG BRACKETS: Easily mounts to virtually any roof rack or bed rack You don't need a specific rack system; the included brackets work with most setups.
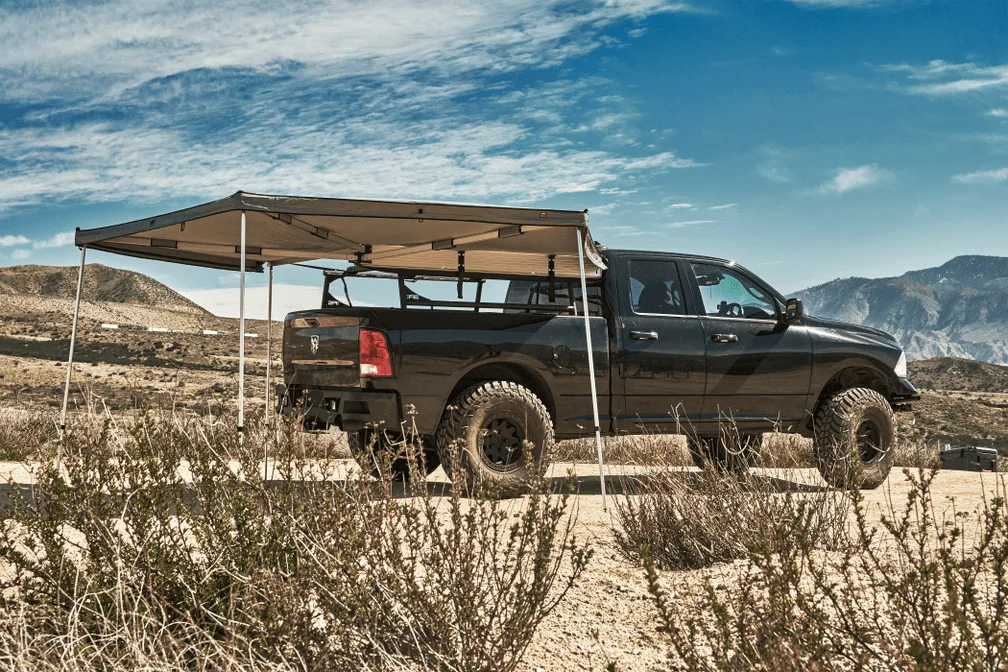
SKY RIDGE 270 AWNING PASSENGER SIDE WITH MOUNTNG BRACKETS
-
SKY RIDGE 270 AWNING PASSENGER SIDE WITH MOUNTNG BRACKETS: Free standing awning with telescopic legs with twist-lock fixtures, minimum 55" maximum 102" height You can adjust leg height to clear your vehicle or to create a comfortable standing area.
-
SKY RIDGE 270 AWNING PASSENGER SIDE WITH MOUNTNG BRACKETS: Heavy duty travel cover is made of sturdy, uv resistant 1000g pvc coated tarpaulin material with heavy duty zippers The cover protects the awning during travel; proper zipper care ensures long life.
-
SKY RIDGE 270 AWNING PASSENGER SIDE WITH MOUNTNG BRACKETS: Includes stakes and tie-down straps to secure the awning for use in windy and inclement conditions Use the supplied tie-downs and stakes to stabilize the awning when wind picks up.
Mounting the Awning
The awning mounts to your roof rack or bed rack using the two included powder-coated brackets. The brackets attach to the awning's extruded aluminum frame, then bolt onto your rack. Ensure the brackets are positioned so the awning opens on the passenger side of your vehicle.
- Position the brackets: Slide the brackets onto the awning's aluminum rail. Align them with the mounting points on your rack.
- Secure the brackets: Use the supplied mounting hardware to bolt the brackets to your rack. Tighten evenly to avoid twisting the awning frame.
- Check clearance: Open the awning partially to confirm it clears your vehicle's roof, roof lights, or antenna. Adjust bracket position if needed.
Setting Up the Awning
With the awning mounted, setup is straightforward and can be done by one person.
- Unzip the travel cover: Open the heavy-duty zipper on the PVC-coated tarpaulin cover. Fold the cover back and secure it with the attached straps.
- Deploy the awning: Pull the awning out from its housing. The design unfolds around the side of your vehicle. Follow the supplied product instructions for the specific coverage angle.
- Extend the telescopic legs: Twist the leg locks to release, pull each leg to your desired height, then twist to lock. Start with legs at full extension, then adjust for level ground. Follow the supplied product instructions for the specific height range.
- Secure with guy-ropes and stakes: Attach the eight guy-ropes to the awning's loops and stake them into the ground. Use the tie-down strap for extra stability in wind.
Tips for a Stable Setup
Always stake down the awning, especially in windy conditions. The included stakes and ropes are designed for this purpose. If you expect strong wind, add extra tie-downs or use the optional wall kit (sold separately) for additional anchoring.
When adjusting leg height, keep the awning fabric taut but not overstretched. Over-tightening can strain the alloy hinges. On uneven ground, extend legs to different heights to level the shade.
For storage, clean the awning fabric and let it dry completely before folding to prevent mildew. The 280gsm poly cotton rip-stop fabric is waterproof (2500mm coating) but should be stored dry.
What About the Optional Wall Kit?
The Sky Ridge 270 Awning Passenger Side accepts an optional wall kit (sold separately). Walls add privacy, wind protection, and bug control. They attach to the awning's edge and can be staked down. If you plan to use walls, consider them during setup to ensure the awning is positioned for easy wall attachment.