Start with what continuous light solves for video
Continuous lighting stays on while you record, so you can see the shadows and highlights on your subject before you press record. That is the main practical difference from flash, and it is why a kit like the Photo Studio Fil Video Lighting Kit T69-S is built around always-on bulbs rather than strobes.
The T69-S pairs two 45W daylight bulbs rated at 5500K with shoot-through umbrellas, light stands, and a background support system. The goal of this guide is to help you place those pieces for a simple talking-head or product video without overcomplicating the setup.
What the T69-S kit gives you to work with
-
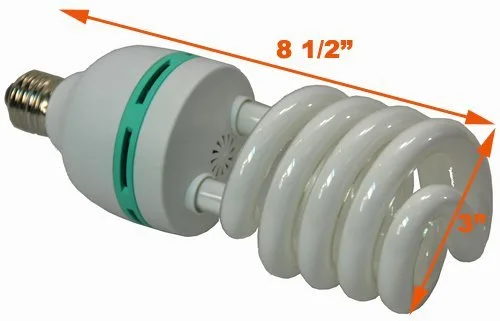
Photo Studio Fil Video Lighting Kit T69-S: 2 x 45W perfect daylight bulbs 5500K These are the light sources for your video. The 5500K rating is a daylight-balanced color temperature, which helps you plan white balance before you shoot.
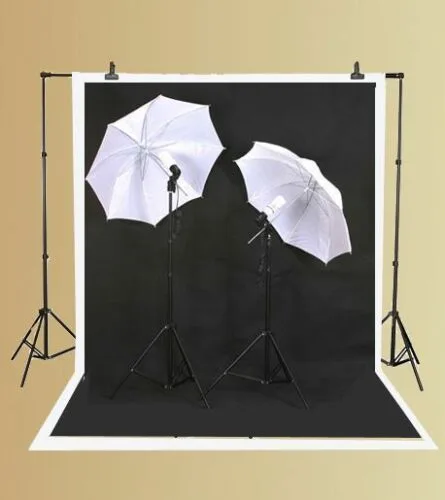
Photo Studio Fil Video Lighting Kit T69-S
-
Photo Studio Fil Video Lighting Kit T69-S: 2 x 32" shoot-through umbrellas Shoot-through umbrellas soften the light by spreading it through fabric. They are the main modifiers in this kit, so your placement decisions will revolve around them.
-
Photo Studio Fil Video Lighting Kit T69-S: 2 x 6 1/2 feet light stand for lights The stands set the height of your lights. Because the kit supplies two stands, you can plan a two-light setup without adding extra support.
-
Photo Studio Fil Video Lighting Kit T69-S: 1 telescopic cross bar open up to 6ft wide and 7ft height This is the frame for your backdrop. It defines how much background width and height you can cover behind your subject.
A practical order for setting up the T69-S for video
The kit is described as lightweight, portable, and easy to assemble and set up. The steps below follow a logical build order, but they are general guidance rather than manufacturer instructions. Check your own space and subject before committing to a final position.
- Build the background frame first: Open the telescopic cross bar and set the height and width you need. The kit supports up to 6ft wide and 7ft high, so decide how much of the frame will appear in your shot before you hang the muslin. A wider frame than your shot needs can waste space and make the setup harder to move.
- Hang the black or white muslin: The kit includes two 6' x 9' cotton muslin backdrops in black and white. Choose one based on the look you want: white for a bright, open background or black for a darker, more focused frame. The 6' x 9' size gives you coverage that matches the cross bar's maximum width, but the fabric may extend beyond the frame depending on how you drape it.
- Place the light stands and umbrellas: Mount each 45W bulb in its adapter and umbrella holder, then attach the shoot-through umbrella. Position the two stands on either side of your subject, angled toward the face or product. Because the kit supplies two lights, a common starting point is one light slightly closer or brighter than the other to create some shape rather than flat, even light.
- Check the light on camera before you record: Turn both lights on and look at your camera's preview. Adjust the distance of each stand until the light on your subject looks even enough for your purpose. Shoot-through umbrellas spread light widely, so moving a stand closer will make that side brighter and softer; moving it farther away will make it dimmer and slightly harder.
Why the 5500K bulbs matter for video white balance
The two 45W bulbs are rated at 5500K, which is a daylight color temperature. For video, that means you can set your camera's white balance to a daylight preset and expect the light on your subject to look neutral, provided there is not a strong mix of other light sources in the room.
If you are shooting near a window with warm afternoon light or under tungsten room lights, the 5500K bulbs will look cooler by comparison. The kit does not include color correction gels or filters, so the practical approach is to control the other light in the room or adjust white balance in camera to match the dominant source.
Two-light placement choices and what they change
With two lights and two shoot-through umbrellas, you have a few common arrangements. The right one depends on whether you want even, flat light or a bit of shadow for depth.
- Symmetrical two-light setup: Place one stand on each side of the subject at roughly the same distance and height. This gives even coverage across the face or product, which is useful for straightforward instructional videos or catalog-style shots. The tradeoff is that flat light can make a face look less defined.
- Key and fill setup: Move one light closer or slightly higher to act as the main (key) light, and keep the second light farther away or lower as a fill. This creates gentle shadow on one side of the subject, which can add depth. The kit's two stands and umbrellas support this arrangement without extra parts.
- Background separation: If you are using the muslin backdrop, you can aim one light more toward the background and one toward the subject. This can help separate the subject from the background, but it also means less light on the subject itself. Watch the preview to make sure the face or product is still properly exposed.
What the kit does not confirm about video use
The supplied information describes the T69-S as working great with digital cameras and suitable for all levels of photographers, but it does not specify camera compatibility, sync ports, or whether the bulbs are dimmable. Treat those as open questions rather than assumed features.
The kit also does not list a carrying case dimension or a maximum load for the stands beyond the included components. If you plan to add heavier modifiers or a different backdrop, check the limits of the stands and cross bar before relying on them.
For video, the most important limitation to plan around is that the kit provides two fixed-output 45W bulbs. There is no confirmed dimmer or color control, so exposure and white balance adjustments happen at the camera or by moving the lights. That is workable for many simple setups, but it is a different workflow from a dimmable LED panel.
Checkpoints before you record
- Frame the backdrop: Confirm the muslin covers the area behind your subject and that the cross bar is not visible in the shot unless you want it to be.
- Check both bulbs are on: The kit includes two 45W bulbs. Make sure both are seated and working before you start, since losing one changes your light balance.
- Look for mixed color temperature: Turn off or block warm room lights and close curtains if daylight is not the look you want. The 5500K bulbs are designed to read as daylight, and mixing them with other sources can create a color cast.
- Test white balance: Set your camera's white balance to match the 5500K bulbs and record a short test clip. Adjust if the image looks too cool or too warm.
- Secure the stands and frame: The kit is lightweight and portable, which also means it can be knocked over. Keep stands and the backdrop frame out of walking paths and check that the cross bar is stable before you shoot.