Quick Answer
If you hear clunking over bumps or feel vague steering, a worn front lower control arm is likely the culprit. Replacing it on a Tesla Model S is a manageable DIY job with the right tools and a torque wrench. Use a quality replacement like the Meyle Front Lower Control Arm, and follow the steps below to restore tight, quiet handling.
Your Tesla Model S is known for its smooth, quiet ride, so a sudden clunk or rattle from the front end is hard to ignore. Often, the culprit is a worn front lower control arm—a critical suspension component that connects the wheel hub to the chassis. Ignoring it can lead to uneven tire wear and compromised handling.
While the job sounds intimidating, replacing the control arm is a straightforward DIY project for someone with basic mechanical skills. This guide walks you through the symptoms, tools, and step-by-step process to swap out the front lower control arm on your Model S, using quality parts and safe practices.
Recognizing Worn Control Arm Symptoms
The front lower control arm on a Tesla Model S uses bushings and ball joints that wear over time, especially with high mileage or rough roads. Early detection can save you from more expensive repairs down the line. Pay attention to these common signs:
If you notice any of these symptoms, inspect the control arm bushings for cracks, tears, or excessive play. A visual check with the car lifted can confirm the diagnosis.
- Clunking or popping noise over bumps or when turning—often described as tesla model s suspension noise.
- Vague or loose steering feel, with the car wandering at highway speeds.
- Uneven or accelerated tire wear, especially on the inner edge of the front tires.
- Visible cracks or separation in the rubber bushings when inspected.
Tools and Parts You'll Need
Before you start, gather all necessary tools and a quality replacement part. For the front lower control arm, we recommend the Meyle Front Lower Control Arm for Tesla Model S 2012+ and Model X 2016+. It's a direct-fit aluminum arm with durable bushings, and it fits multiple Model S and Model X years. Having the right tools makes the job safer and faster.
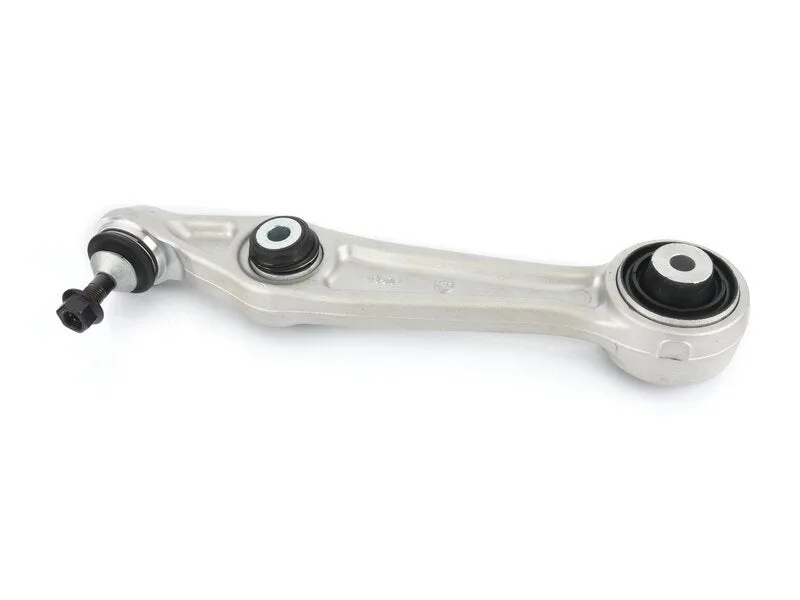
Meyle Front Lower Control Arm for Tesla Model S 2012+ and Model X 2016+
You'll also need a safe way to lift and support the car. Never work under a car held only by a jack; use jack stands on a flat, solid surface.
- Socket set (metric), including 14mm, 17mm, 19mm, and 21mm sizes.
- Torque wrench capable of 150 ft-lbs or more.
- Breaker bar or impact wrench for stubborn bolts.
- Jack and jack stands, or a lift.
- Penetrating oil, anti-seize, and thread locker.
- Replacement control arm (e.g., Meyle Front Lower Control Arm).
Step-by-Step Replacement Guide
Follow these steps carefully. Work on one side at a time, and never loosen both control arms simultaneously. Always use jack stands and wear safety glasses.
After replacement, it's highly recommended to get a professional alignment to ensure proper handling and tire wear.
- 1. Lift and secure the car: Raise the front of the Model S and support it with jack stands. Remove the front wheel on the side you're working on.
- 2. Remove the underbody shield: If present, remove the bolts holding the front underbody shield to access the control arm bolts.
- 3. Loosen the ball joint nut: Apply penetrating oil, then loosen the nut connecting the control arm to the steering knuckle. Do not remove it completely yet.
- 4. Separate the ball joint: Use a ball joint separator or a few sharp hammer taps on the knuckle to pop the ball joint loose. Remove the nut.
- 5. Remove the control arm mounting bolts: Support the arm, then remove the bolts securing it to the subframe. Note their positions for reinstallation.
- 6. Install the new control arm: Position the new Meyle control arm, insert the mounting bolts finger-tight, then attach the ball joint to the knuckle and torque to spec.
- 7. Torque all fasteners: With the suspension loaded (car on ramps or with a jack under the lower arm), torque the mounting bolts to factory specs. This prevents bushing twist.
- 8. Reinstall the wheel and lower the car: Double-check all bolts, reinstall the wheel, and lower the vehicle.
- 9. Test drive and align: Take a short, cautious test drive, then schedule a professional alignment.
Step-by-Step Replacement Guide
- Lift and secure the car: Raise the front of the Model S and support it with jack stands. Remove the front wheel on the side you're working on. Checkpoint: Ensure the car is stable on jack stands before crawling underneath.
- Remove the underbody shield: If present, remove the bolts holding the front underbody shield to access the control arm bolts. Common mistake: Forgetting to reinstall the shield can lead to debris damage.
- Loosen the ball joint nut: Apply penetrating oil, then loosen the nut connecting the control arm to the steering knuckle. Do not remove it completely yet. Checkpoint: Leave the nut on a few threads to prevent the ball joint from popping out unexpectedly.
- Separate the ball joint: Use a ball joint separator or a few sharp hammer taps on the knuckle to pop the ball joint loose. Remove the nut. Common mistake: Striking the ball joint threads directly can damage them; always hit the knuckle.
- Remove the control arm mounting bolts: Support the arm, then remove the bolts securing it to the subframe. Note their positions for reinstallation. Checkpoint: Keep bolts organized; they may be different lengths.
- Install the new control arm: Position the new Meyle control arm, insert the mounting bolts finger-tight, then attach the ball joint to the knuckle and torque to spec. Common mistake: Tightening bolts before the suspension is loaded can cause bushing failure.
- Torque all fasteners: With the suspension loaded (car on ramps or with a jack under the lower arm), torque the mounting bolts to factory specs. This prevents bushing twist. Checkpoint: Use a torque wrench; guessing can lead to premature wear or failure.
Product Facts
- Meyle Front Lower Control Arm for Tesla Model S 2012+ and Model X 2016+: Fits Tesla Model S Feb 2012 - Mar 2016, Model S Apr 2016 - Jan 2021, and Model X Sep 2015 - Feb 2021. Fitting Position: Front Axle Right, Front Axle Left, Lower Rear. Material: Aluminium. Thread Size: M14x1,5. Bore Ø: 14.4 mm. Length: 348 mm. This arm is a direct-fit replacement for many Model S and Model X years, with aluminum construction for weight savings. The precise thread and bore dimensions ensure proper fit with OEM hardware.
- https://evannexrxz.com/products/vaico-front-brake-pad-set-for-tesla-model-3-performance-0912577cf7045b97e2665837-2708657Vaico Front Brake Pad Set for Tesla Model 3 Performance: Installation position: Front axle. Fitment: TESLA MODEL 3 (5YJ3) EV AWD. X ref: 8008242-00-C; 8008242-00-D; V58-0147. If your Model 3 Performance needs brake pads, this set is a direct fit for the front axle. It's a good time to inspect brakes while the car is lifted, though it's not required for a Model S control arm job.
Replacing the front lower control arm on your Tesla Model S is a satisfying DIY repair that restores handling and eliminates annoying clunks. With the right tools and a quality part like the Meyle control arm, you can complete the job in a few hours. Always prioritize safety and consider a professional alignment afterward to get the most from your repair.