Quick answer
Sew the Vitamin Sea To the Beach panel into a simple wall hanging or small quilt by stabilizing the panel first, then adding narrow borders that echo its red, white, and blue palette. The 24" x 44" size keeps the project manageable for a weekend.
Why stabilize the panel before adding borders
Printed panels are often printed on a tighter weave or with a slightly different hand than standard quilting cotton, so they can stretch or distort when handled. Pressing a lightweight fusible interfacing to the wrong side gives the panel body and helps it hold its shape through border attachment and quilting. Skip this step and your borders may ripple or the panel may bow along the edges.
Use a dry iron and a pressing cloth to avoid scorching the print. If you plan to wash the finished piece, prewash the border fabrics but not the panel unless the manufacturer's care label recommends it—prewashing a panel can shrink it unevenly.
Choosing border widths that flatter a 24" x 44" panel
A narrow first border (1½" to 2" finished) frames the panel without crowding the artwork. A wider second border (3" to 4" finished) adds presence for a wall hanging. For a small quilt, you can add a third border or cornerstones to extend the size. Keep the total border width proportional: too wide and the panel looks lost; too narrow and the piece looks like a framed picture rather than a quilt.
The panel's red, white, and blue scheme pairs well with solid navy, a red-and-white stripe, or a low-volume print with small stars or anchors. Avoid a busy novelty print that competes with the detailed lighthouse, whale, and sailboat motifs.
Quilting and finishing options for a beach-themed piece
For a wall hanging, simple wavy lines or a meander in a light thread lets the panel artwork stay readable. For a small quilt, crosshatch or a grid in the border areas and stitch-in-the-ditch around the panel works well. If you want a softer look, tie the quilt with perle cotton instead of machine quilting.
Binding in a coordinating solid or a red-and-white stripe finishes the coastal look. A hanging sleeve on the back makes it easy to display the piece seasonally.
Step-by-step sewing plan
- Press and measure the panel: Press the panel from the wrong side with a dry iron. Measure the printed area and the overall dimensions; the panel is 24" x 44", but the printed design may not extend to the edges. Trim only if the edges are uneven, and keep the selvage intact until you are ready to cut. Checkpoint: the panel should lie flat without ripples before you cut.
- Apply fusible interfacing: Fuse a lightweight interfacing to the wrong side of the panel following the manufacturer's instructions. Use a pressing cloth and avoid dragging the iron, which can distort the print. Common mistake: skipping the pressing cloth can leave shiny marks on the fabric.
- Square up the panel: Use a large square ruler and rotary cutter to trim the panel to straight edges, removing the selvages. Measure the finished width and length and record these numbers for border math. Checkpoint: opposite sides should be equal; if not, re-trim.
- Cut and attach the first border: Cut two side borders and two top/bottom borders from your chosen fabric. Sew the side borders first, press seams toward the border, then add the top and bottom borders. Use a ¼" seam allowance and pin generously to prevent stretching. Common mistake: sewing too fast can stretch the panel edge; slow down and let the feed dogs do the work.
- Add a second border if desired: Repeat the border process with a wider fabric strip. Press seams away from the panel. Measure the quilt top after each border to keep it square. Checkpoint: lay the top flat on a table; it should not cup or wave.
- Layer, baste, and quilt: Cut backing and batting at least 4" larger than the quilt top on all sides. Baste with spray adhesive or pins. Quilt with wavy lines, a grid, or stitch-in-the-ditch around the panel. For a wall hanging, a simple meander in the borders is enough. Common mistake: insufficient basting leads to tucks and pleats on the back.
- Bind and add a hanging sleeve: Trim excess batting and backing, then bind the edges with your chosen binding. For a wall hanging, cut a sleeve 9" wide by the finished width of the quilt, fold in half, and stitch to the top back before binding. Hand-sew the bottom of the sleeve to the backing. Checkpoint: the sleeve should be slightly shorter than the quilt width to avoid showing at the sides.
Panel details to know
-
Vitamin Sea To the Beach Panel 24" x 44": The Vitamin Sea collection includes 23 seaworthy prints with lighthouses, whales, starfish, anchors, sailboats, and crabs in a red, white, and blue color scheme. You can pull border and binding fabrics from the same collection for a coordinated coastal look without guessing at colors.
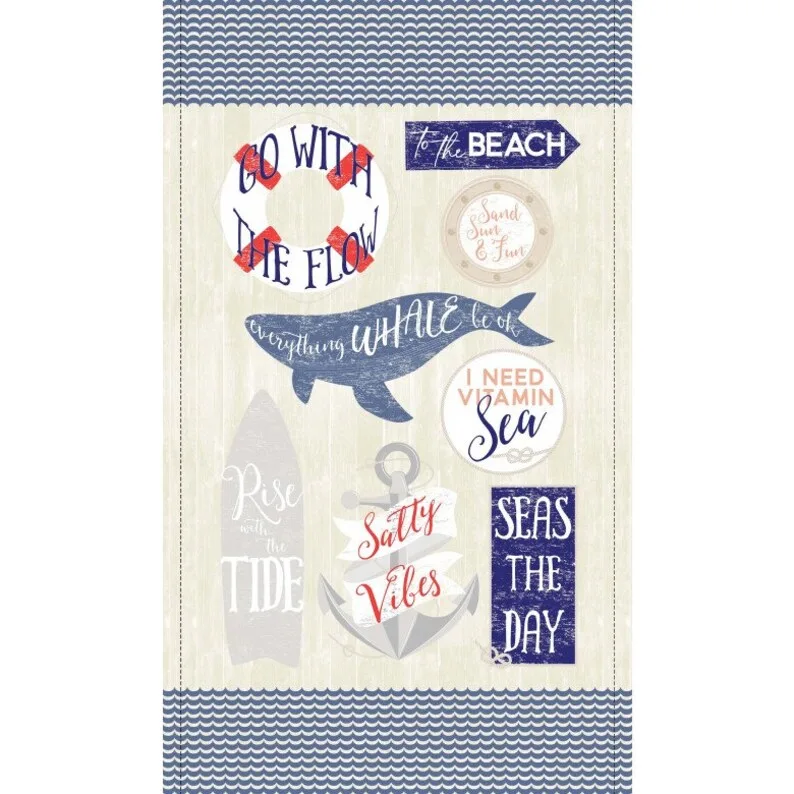
Vitamin Sea To the Beach Panel 24" x 44"