Pyrography, the art of decorating wood or leather with burn marks, has seen a resurgence among crafters and artisans. While traditional solid-point burners are great for bold strokes, a wire-tip burning kit offers unmatched precision for fine details. Whether you're personalizing a leather journal or adding intricate patterns to a wooden box, mastering a wire-tip burner can elevate your work to a professional level.
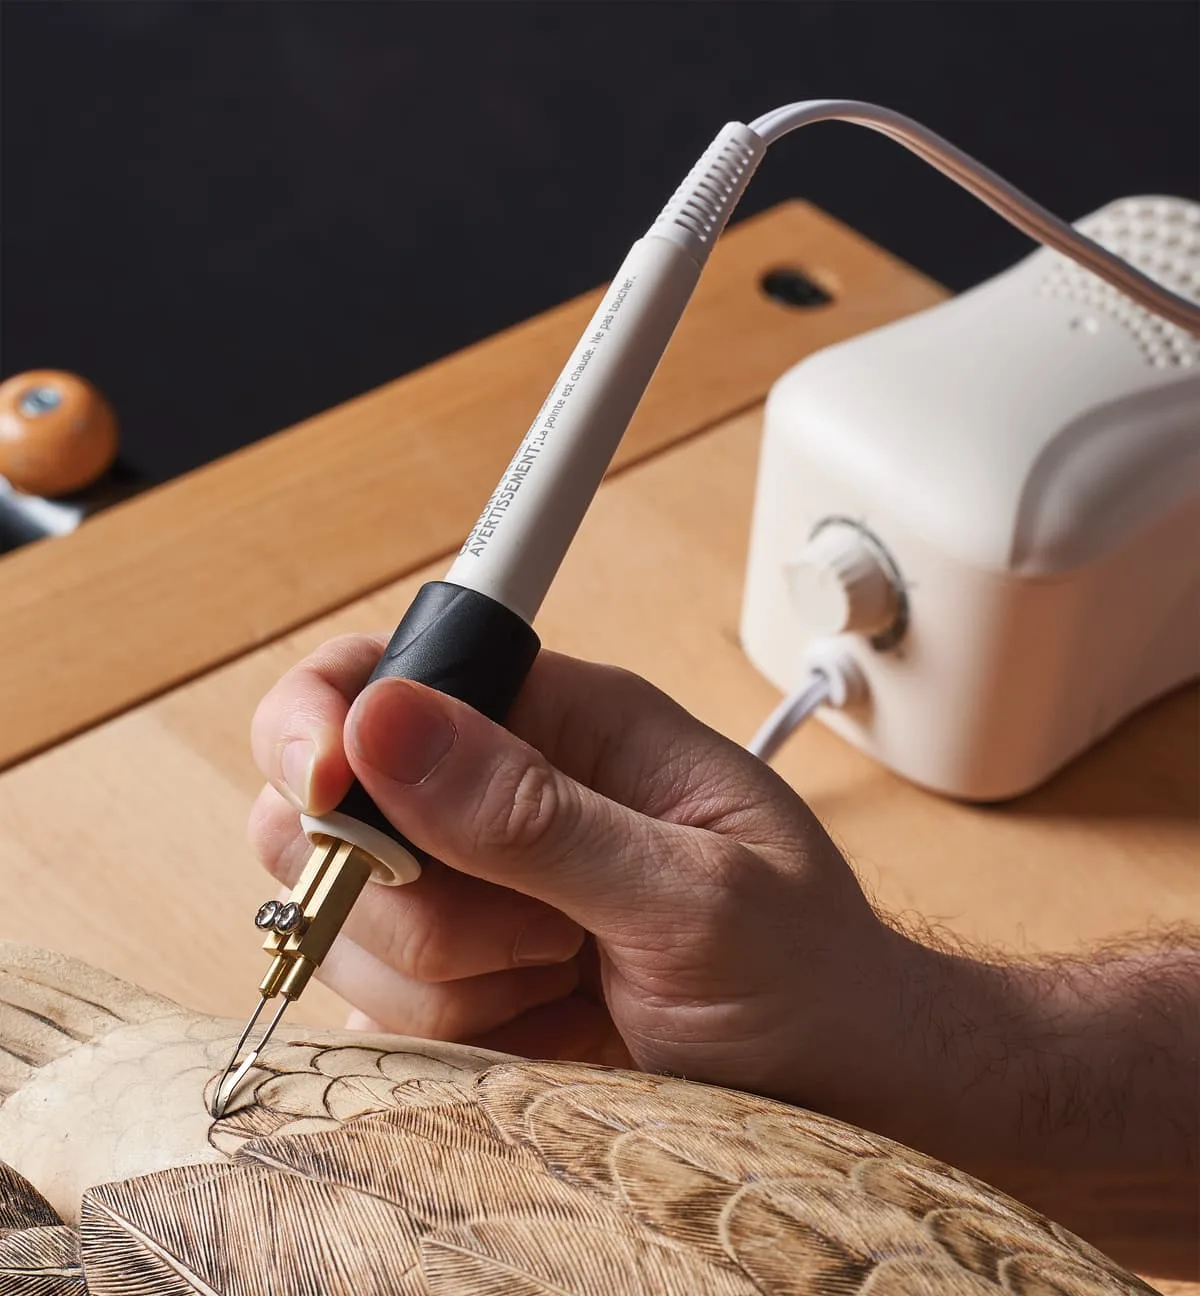
wire-tip burning kit
In this guide, we'll walk you through the basics of using a wire-tip burning kit, from setup to technique, and share tips for achieving crisp, clean lines on both leather and wood. If you're new to pyrography, this is the perfect starting point.
What Is a Wire-Tip Burning Kit?
A wire-tip burning kit uses a thin wire that heats up electrically, allowing for precise control over temperature and line thickness. Unlike solid-point burners, which have a fixed tip shape, wire tips can be bent into various shapes to create different effects. This flexibility makes them ideal for fine detail work, such as shading, cross-hatching, and lettering.
The kit typically includes a handheld pen with interchangeable wire tips, a power supply with adjustable temperature controls, and a stand to hold the hot tool safely. Some kits also come with a variety of tip shapes, from fine points to flat blades, giving you a range of options for different techniques.
- Wire tips heat up quickly and cool down fast, offering responsive control.
- Adjustable temperature settings allow you to work on different materials safely.
- Bent wire shapes can create unique textures and patterns.
Getting Started: Safety and Setup
Before you begin, ensure your workspace is well-ventilated and free of flammable materials. Always place the hot pen in its stand when not in use, and never leave it unattended. It's also wise to wear safety glasses to protect your eyes from any flying debris or sparks.
To set up your wire-tip burning kit, start by attaching the desired wire tip to the pen. Tighten it securely, but avoid over-tightening, as this can damage the threads. Connect the power supply, set the temperature to a low setting (around 200°F or 93°C) for practice, and allow the tip to heat for a minute or two. Test the heat on a scrap piece of wood or leather to gauge the burn intensity.
- Always work in a well-ventilated area to avoid inhaling fumes.
- Keep a fire extinguisher or water nearby as a precaution.
- Practice on scrap material before starting your final piece.
Techniques for Wood Burning Fine Details
Wood is a forgiving surface for pyrography, but fine details require a steady hand and the right technique. For crisp lines, hold the pen like a pencil and use a light, consistent pressure. Move the tip slowly and steadily, letting the heat do the work rather than pressing hard. For shading, use a side-to-side motion with a broader tip or adjust the temperature to create lighter or darker tones.
One of the advantages of a wire-tip burner is its ability to create very fine lines, perfect for intricate designs like floral patterns or portraits. To achieve even finer details, you can bend the wire tip into a sharp point. Remember to sand the wood surface smooth before burning to ensure an even burn and prevent the tip from snagging on rough grain.
- Use a fine wire tip for delicate work like lettering or line art.
- Test different temperatures to find the ideal heat for your wood type.
- Keep a pencil sketch on the wood as a guide, erasing as you go.
Leather Burning Techniques
Leather burning, also known as leather pyrography, requires a slightly different approach. Leather is more sensitive to heat than wood, so it's crucial to use lower temperatures and work quickly to avoid scorching. Always use a piece of vegetable-tanned leather, as it responds best to burning and produces a clean, dark line.
When burning on leather, use a light touch and avoid lingering in one spot. Move the tip in smooth, continuous strokes to create consistent lines. For shading, you can use a broader tip or increase the temperature slightly, but always test on a hidden area first. After burning, you can condition the leather with a leather balm to keep it supple and enhance the contrast of the burn.
- Vegetable-tanned leather is the best choice for pyrography.
- Lower temperatures and quicker strokes prevent scorching.
- Apply leather conditioner after burning to protect and enhance the work.
Maintaining Your Wire-Tip Burning Kit
Proper maintenance ensures your wire-tip burning kit lasts for years. After each use, allow the tool to cool completely, then gently clean the wire tip with a soft cloth or fine sandpaper to remove any carbon buildup. Avoid using water or harsh chemicals, as they can damage the heating element.
Store your kit in a dry place, and periodically check the connections for any looseness. If you notice the wire tip becoming brittle or misshapen, replace it with a new one to maintain consistent performance. Many kits come with spare tips, but you can also purchase replacements separately.
- Clean the wire tip after each session to prevent residue buildup.
- Inspect the power cord and connections for wear and tear.
- Replace worn tips promptly to ensure safe and effective burning.
A wire-tip burning kit is a versatile addition to any crafter's toolbox, offering precise control for fine details on both leather and wood. With practice and the right techniques, you'll be able to create stunning, personalized pieces. If you're ready to start, explore the Wire-Tip Burning Kit available at Lee Valley Tools, and take your pyrography to the next level.