Quick answer
To sew a 12" Sawtooth Star block with English paper piecing, you'll need paper pieces for the center square, star points, and corner squares, plus acrylic templates if you cut your own fabric. Follow the sequence below to avoid twisted seams and misaligned points.
Why the 12" Sawtooth Star works well for EPP
The Sawtooth Star is a classic quilt block that translates naturally to English paper piecing because its straight seams and distinct shapes reduce the complexity of curved or inset pieces. The 12-inch finished size gives you a block that pairs easily with other 12-inch blocks or stands alone as a centerpiece.
Because the star points are isosceles triangles and the corners are smaller squares, you can prep all pieces before sewing. The main challenge is keeping the points sharp and the center square aligned. Paper pieces hold the fabric firmly, so you can achieve precise corners even if you are new to EPP.
Choosing paper pieces vs. acrylic templates
Paper pieces are pre-cut and ready to baste fabric around. They are ideal if you want to start sewing immediately and prefer not to cut your own templates. Acrylic templates let you cut your own paper or fabric shapes, which is useful if you need a different size or want to reuse the template for multiple blocks.
The 12" Sawtooth Star Block from Paper Pieces includes both paper pieces and acrylic templates sold separately. If you buy only the paper pieces, you will have enough for one block. If you plan to make multiple blocks, consider the acrylic template so you can cut your own paper pieces from card stock.
Step-by-step instructions for EPP Sawtooth Star
- 1. Prepare your fabric and paper pieces: Cut fabric pieces for the center square, four star points, and four corner squares. Add a 3/8 to 1/2 inch seam allowance around each paper piece. Baste the fabric to the paper pieces using thread or glue. Common mistake: using too small a seam allowance, which makes it hard to fold fabric over the paper edges. Check that the seam allowance is even on all sides before basting.
- 2. Sew the star points to the center square: Place a star point triangle right sides together with one edge of the center square. Whipstitch along the edge, starting and stopping at the paper edges. Repeat for the remaining three star points. Common mistake: sewing beyond the paper edge, which can cause puckers when you open the seam. Keep your stitches just inside the paper edge and do not cross the corners.
- 3. Add the corner squares: Sew a corner square to each side of the star points. The corner squares fit between the points, so align the edges carefully. Whipstitch from the paper edge to the paper edge. Common mistake: mixing up the orientation of the corner squares, which can shift the star points out of alignment. Lay out all pieces before sewing to confirm the layout.
- 4. Join the rows and finish the block: Sew the rows together: center row with the star points attached to the center square, and the top and bottom rows with corner squares. Press seams open or to one side. Remove the paper pieces after pressing. Common mistake: removing paper pieces before pressing, which can distort the seams. Leave the paper in until after you press the block.
Product details
-
12" Sawtooth Star Block: The 12" Sawtooth Star Block includes paper pieces and acrylic templates sold separately. For quantities and descriptions, please select Production Options above. This means you can choose between pre-cut paper pieces for convenience or an acrylic template if you plan to make multiple blocks and want to cut your own shapes.
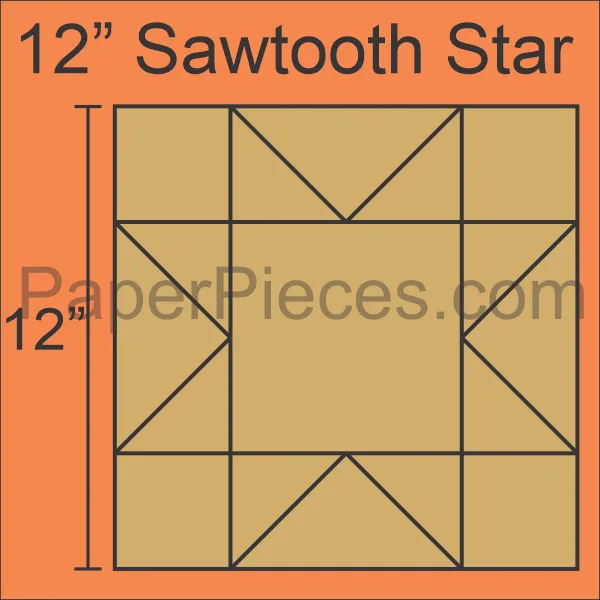
12" Sawtooth Star Block