What the Coiland RBA Build Tool Kit Includes
The Coiland RBA Build Tool Kit is an 8-piece set designed to give you the basic tools for rebuilding your RDA, RTA, RDTA, or other rebuildable atomizers. The kit comes in a compact zippered hard case, making it easy to keep everything organized and portable.
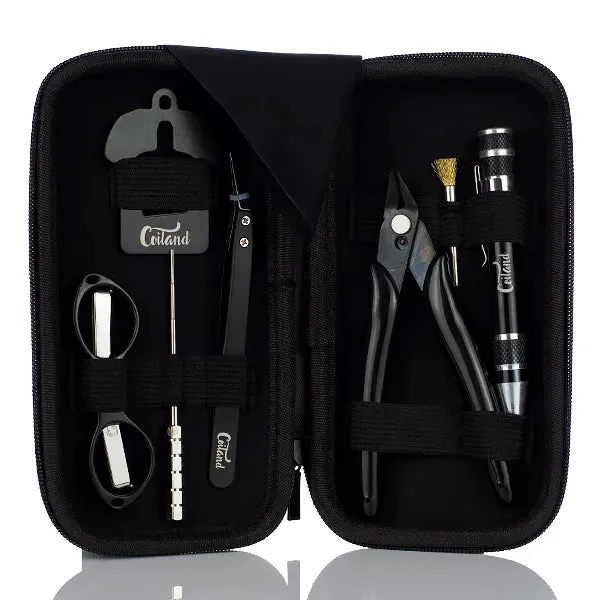
Inside the case, you'll find a screwdriver handle with multiple tips (PH00, PH0, and PH2 Phillips heads, plus 1.5mm, 2.0mm, 3.0mm, and 3.5mm flat heads), a 1.5mm to 3.5mm coil jig, bent tip ceramic tweezers, flush cutters, folding scissors, a brass brush, a cleaning cloth, and a short-fill bottle opening tool.
Coiland RBA Build Tool Kit at a Glance
-
Coiland RBA Build Tool Kit - 8 Piece: The kit includes 1 pair of folding scissors, 1 flush cutter, 1 bent tip ceramic tweezer, 1 1.5mm to 3.5mm coil jig, and a multi tip screwdriver. These are the essential tools for cutting wire, trimming leads, positioning coils, and winding consistent coils.
Coiland RBA Build Tool Kit - 8 Piece
-
Coiland RBA Build Tool Kit - 8 Piece: The kit also includes a vape juice bottle opening tool, brass brush, and cleaning cloth. These extras help with maintenance tasks like opening stubborn bottles and cleaning your atomizer or tools.
-
Coiland RBA Build Tool Kit - 8 Piece: All tools come in a compact zippered hard case. The case keeps your tools organized and protected, making the kit easy to carry or store.
How to Use the Coiland RBA Build Tool Kit
Follow these general steps to build a coil using the tools in this kit. Always refer to your atomizer's manual for specific build deck instructions.
- Prepare your workspace and tools: Unzip the hard case and lay out the tools you'll need: coil jig, flush cutters, ceramic tweezers, and the appropriate screwdriver bit. The included cleaning cloth can be used to wipe down your atomizer.
- Wind your coil using the coil jig: Select the desired rod size on the 1.5mm to 3.5mm coil jig. Insert your wire into the jig's hole and rotate the handle to wrap a tight, even coil. The jig helps you produce consistent inner diameters for your build.
- Install the coil in your atomizer: Place the wound coil into your RDA, RTA, or RDTA deck. Use the screwdriver with the appropriate flat head or Phillips bit to tighten the post screws. The ceramic tweezers can be used to adjust the coil position while it's still warm from dry firing.
- Trim excess wire leads: Use the flush cutters to snip the coil leads as close to the posts as possible. The folding scissors can also cut wire if needed, but the flush cutters give a cleaner cut.
- Dry fire and adjust the coil: Fire your mod briefly to heat the coil, then use the ceramic tweezers to gently squeeze or reposition the coil. Ceramic tweezers are non-conductive, so you can safely adjust the coil while firing.
- Clean up and store your tools: After building, use the brass brush to clean any residue from the coil jig or screwdriver bits. Wipe down tools with the cleaning cloth, then return everything to the zippered hard case.
Tips for Getting the Most from This Kit
The coil jig's 1.5mm to 3.5mm range covers most common coil inner diameters for rebuildable atomizers. Start with a 3mm coil if you're new to building, as this size works well for flavor and vapor production. For other sizes, follow the supplied product instructions.
The ceramic tweezers are especially useful for adjusting hot spots without shorting your coil. Use them after dry firing to gently pinch the coil until it glows evenly from the center out.
Keep the brass brush handy to remove oxidation from your coil jig or screwdriver bits. The cleaning cloth can also be used to wipe down your atomizer threads and contacts.