Quick answer
Assemble the Fumina Hoshino (The Second Scene) Figure-Rise Labo kit by carefully snapping parts, applying decals, and posing the figure for display. This guide walks you through each step to avoid common mistakes.
Understanding the Kit
The Fumina Hoshino (The Second Scene) Figure-Rise Labo is a model kit from The Gundam Galaxy, part of the Figure-Rise Labo series. It captures a specific scene from Gundam Build Fighters, focusing on a detailed figure rather than a mobile suit. The kit is designed for hobbyists and collectors, offering a different building experience compared to traditional Gundam model kits.
Because this is a figure kit, the assembly process emphasizes seam line removal and careful painting for the best display results. The plastic parts are molded in color, but painting the skin, hair, and uniform details can elevate the final look significantly.
Build Steps
- Step 1: Prepare Your Tools and Workspace: Gather side cutters, a hobby knife, sanding sticks or files, and tweezers for decals. A clean, well-lit workspace prevents losing small parts. Common mistake: using dull cutters that can stress the plastic and leave white marks. Check your nippers are sharp and your mat is clear before starting.
- Step 2: Cut and Clean Each Part: Cut parts from the runners using side cutters, leaving a small nub. Remove the nub with a hobby knife and sand the area smooth with fine-grit sandpaper. Common mistake: cutting too close to the part and gouging the plastic, which is hard to fix without putty. Sand in one direction to avoid scratching the surface.
- Step 3: Assemble the Torso and Head: Snap the torso pieces together, ensuring the fit is flush. Attach the head, aligning the face features carefully. Common mistake: forcing parts together without checking alignment, which can cause gaps or stress marks. Dry-fit parts before applying any cement or glue.
- Step 4: Build the Arms and Legs: Assemble each arm and leg, paying attention to the joint orientation. The kit may have limited articulation, so pose the limbs as you build. Common mistake: mixing up left and right parts, leading to reversed joints. Refer to the manual's part numbers to confirm left vs. right.
- Step 5: Apply Decals and Details: Use tweezers to apply the included water-slide or sticker decals. Dip them in water for a few seconds, slide them onto the part, and position them with a cotton swab. Common mistake: applying decals on a dusty surface, causing bubbles or poor adhesion. Clean the part surface with a microfiber cloth before applying decals.
- Step 6: Final Assembly and Posing: Attach all limbs and accessories to the torso. Pose the figure in a dynamic or scene-accurate stance. Common mistake: overextending a joint and snapping a peg, especially on the smaller hands or feet. Gently move joints and stop if you feel resistance.
Product Facts
-
Fumina Hoshino (The Second Scene) Figure-Rise Labo: The Fumina Hoshino (The Second Scene) Figure-Rise Labo kit is from The Gundam Galaxy and is categorized under Other Products. This means the kit uses a different part layout than standard Gundam model kits, so follow the manual closely and expect some smaller, delicate pieces.
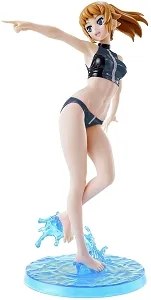
Fumina Hoshino (The Second Scene) Figure-Rise Labo