Quick Answer
To build the Muv-Luv Takemikaduchi Type 00R plastic model kit, start by organizing the 200 pre-colored pieces, then follow the manual step-by-step, using a hobby knife and nippers for clean cuts. No painting is required, but careful assembly ensures a sturdy, display-ready model.
Why This Kit Is a Good Starting Point
The Muv-Luv Takemikaduchi Type 00R plastic model kit is designed with 200 pre-colored pieces, so you can skip painting and focus on assembly. This makes it an excellent choice for beginners who want a detailed mecha model without the extra time and cost of painting supplies.
Because the kit is pre-colored, the plastic parts are molded in their final colors. However, you may still want to use panel line accent or a topcoat to enhance details, but these are optional and not required for a great-looking finish.
What You'll Need Before You Start
Gather a few basic tools: a hobby knife, plastic nippers, a cutting mat, and a small file or sandpaper for cleaning nubs. You might also want a pair of tweezers for small parts and a glass file for a smoother finish.
Work in a well-lit, clean area. Keep small parts in a tray or organizer so they don't get lost. The kit includes 200 pieces, so staying organized is key.
Step-by-Step Assembly Guide
- Prepare Your Workspace and Tools: Clear a flat, well-lit area and lay out your nippers, hobby knife, and cutting mat. Organize the runner bags by number so you can find parts quickly. Check that you have all 200 pieces and the manual before starting.
- Cut Parts from Runners: Use plastic nippers to cut each part from the runner, leaving a small nub. Then trim the nub with a hobby knife or file for a clean edge. Cut away from your body and keep fingers clear of the blade. Cut on a cutting mat to protect your surface and avoid damaging parts.
- Follow the Manual in Order: Assemble the parts in the sequence shown in the manual, usually starting with the torso and head. Do not skip ahead—each step builds on the previous one. If a part doesn't fit, check that you've trimmed all nubs and aligned the tabs correctly.
- Use the Right Pressure When Snapping: Press parts together firmly but gently. If a joint feels too tight, use a small file to widen the hole slightly. If it's too loose, apply a tiny drop of model glue or clear nail polish to thicken the peg. Test-fit joints before applying glue; you can always adjust later.
- Attach the Head and Backpack: Secure the head unit and any backpack or optional equipment as shown in the manual. Ensure they click into place without forcing, as delicate parts can break. If the head won't sit flush, check for leftover nubs on the neck joint.
- Final Pose and Display: Once assembled, pose the model in a dynamic stance. If you want, apply panel line accent or a matte topcoat for extra detail, but this is optional. Place it on a stand or shelf where it won't be knocked over. Handle the model by the torso when posing to avoid stressing joints.
Product Facts
-
MUV-LUV ALTERNATIVE 1/144 TAKEMIKADUCHI TYPE 00R PLASTIC MODEL KIT [ 2021 ]: The new Type 00R is comprised of 200 pre-colored pieces. Painting is not required. You can assemble the kit right out of the box without investing in paints, making it a budget-friendly and time-saving build.
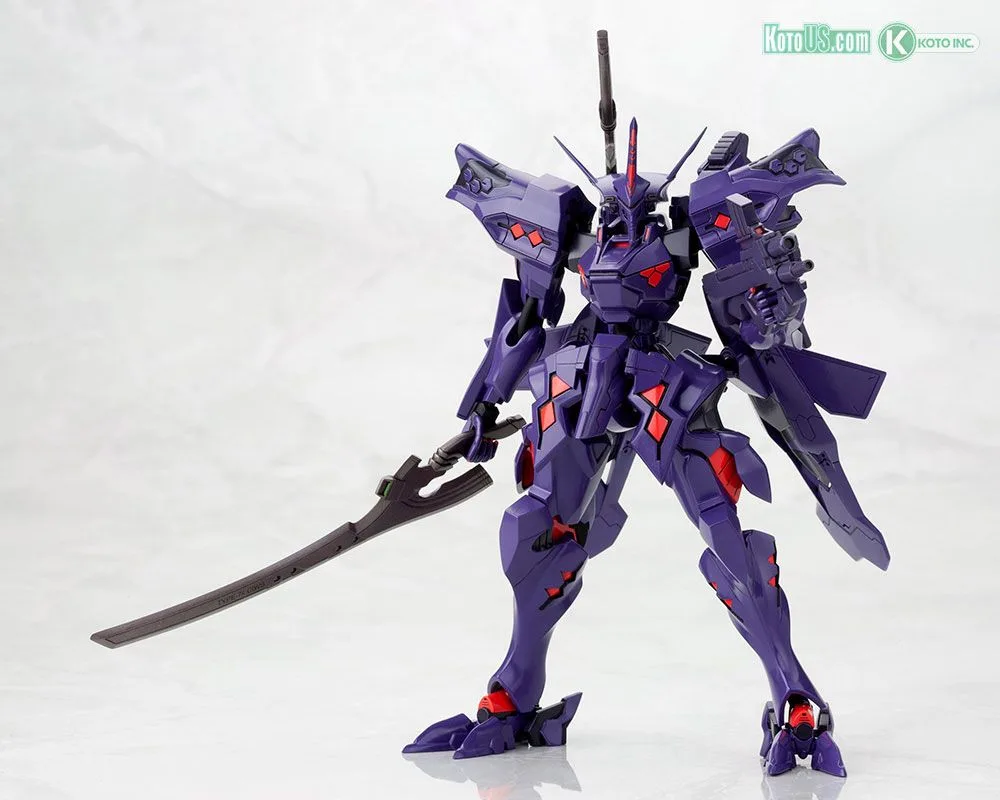
MUV-LUV ALTERNATIVE 1/144 TAKEMIKADUCHI TYPE 00R PLASTIC MODEL KIT [ 2021 ]
-
MUV-LUV ALTERNATIVE 1/144 TAKEMIKADUCHI TYPE 00R PLASTIC MODEL KIT [ 2021 ]: The elite TSF stands nearly 5 ½ inches tall (1/144 scale). This compact size fits well on a desk or shelf and matches other 1/144 scale kits, so you can display it alongside similar models.