Quick answer
Choose border and backing fabrics that pull one or two colors straight from the Yosemite PD17710 panel, not fabrics that compete with its scenery. For a panel this detailed, a tone-on-tone or low-volume print frames the artwork best. If you want a fast finish, use a 108" wide backing so you skip piecing the back entirely.
A National Parks quilt panel does most of the design work for you, which is exactly why fabric choice matters so much. The wrong border can flatten the scene or fight it; the right one makes the panel look intentional, like a framed print instead of a rectangle of fabric.
This guide walks through choosing border, corner, and backing fabrics for the Yosemite PD17710 panel, then covers how to quilt a fabric panel so the stitching supports the artwork rather than covering it up.
Start with the panel, not the fabric store
Lay the panel flat and look at it in daylight before you buy anything. Write down the two or three dominant colors in the scene, plus the lightest and darkest values. Those notes become your shopping list, and they keep you from falling for a pretty bolt that has nothing to do with the panel.
Check the panel's printed dimensions and whether it has a defined border or vignette edge. That edge tells you how wide your border can be before it starts crowding the image. If the panel has a busy edge-to-edge scene, a narrow border usually looks better than a wide one.
- Photograph the panel on a neutral floor and bring the photo shopping; store lighting shifts colors.
- Note the panel's finished size before you plan borders, so your math starts from real numbers.
Pick border fabric that frames instead of competes
The best panel quilt borders echo the panel's quieter colors. Tone-on-tone prints, small-scale textures, and blenders read as solid from a distance but add depth up close. A brown tone-on-tone canvas, for example, can pick up rock and tree tones in a scenic panel without introducing a new motif.
Avoid large-scale florals, novelty prints, or anything with a strong directional pattern next to a scenic panel. Two competing focal points make the quilt look busy, and the panel loses. If you want a print, keep it small and low contrast.
- Squint at your fabric pairings; if the border jumps forward, it is too strong.
- Buy a little extra border fabric so you can center or fussy-cut a stripe if you change your mind.
Use cornerstones and secondary borders to control scale
A single border can look flat on a large panel. Adding a narrow inner border, then a wider outer border, gives the eye a path and makes the quilt feel planned. Cornerstones in a contrasting but related color break up long border runs and hide seams that do not line up perfectly.
Keep the total border width proportional to the panel. A common mistake is making borders so wide that the panel becomes a small picture in a huge frame. If your borders together are wider than the panel's own border area, scale them back.
- Cut inner borders on the lengthwise grain if you want them to stay straight.
- Test border widths by folding fabric strips and laying them on the panel before cutting.
Choose backing that supports the front
Backing is where you can be practical. A wide backing fabric eliminates piecing and keeps the back smooth, which matters on a panel quilt where the front is the star. A winter-themed wide backing with a simple motif can work behind a national parks panel if the colors relate, but a neutral or tonal backing is the safer choice.
If you use standard-width fabric, plan a horizontal seam and allow extra for quilting draw-up. Press the seam open and trim selvages so it does not create a ridge you can feel through the quilt.
- Measure your quilt top after borders are attached, then add 8 inches to both dimensions for backing.
- Pre-wash only if you plan to wash the finished quilt; otherwise keep panel and backing consistent.
Plan quilting that lets the panel breathe
How you quilt a fabric panel depends on whether you want the panel to read as a picture or as a pieced quilt. For a scenic panel, outline quilting around major shapes, a simple meander in the border, and straight lines in the sashing keep the image visible. Dense allover quilting can obscure the print you paid for.
Match thread to the panel's dominant value rather than its exact color. A medium gray or taupe blends across many landscape tones. If you want the quilting to show, choose a thread one shade darker in the border only.
- Quilt a sample sandwich with your chosen thread and batting before committing to the full quilt.
- Leave the panel's focal area lightly quilted; save denser quilting for borders and corners.
Your step-by-step fabric plan for a Yosemite panel quilt
- Audit the panel's colors and size: Lay the Yosemite PD17710 panel flat in daylight, list two or three dominant colors plus lightest and darkest values, and record its printed dimensions. Checkpoint: if you cannot name the dominant color in one word, look again before shopping.
- Choose a border fabric that stays quiet: Pick a tone-on-tone, blender, or small-scale print in one of the panel's colors. Hold it against the panel and step back six feet. Mistake to avoid: buying a large-scale print that competes with the scenery.
- Decide border widths and cornerstones: Measure the panel, then plan an inner and outer border whose combined width stays proportional to the panel. Add cornerstones if the border run is long. Checkpoint: fold strips and audition widths before cutting.
- Select backing and calculate yardage: Measure the bordered top, add 8 inches to each dimension, and choose either a wide backing or standard yardage with a planned seam. Mistake to avoid: forgetting draw-up allowance and coming up short.
- Test quilting on a sample: Make a small sandwich with your panel scraps, batting, and thread. Try outline quilting in the scene and a simple design in the border. Checkpoint: if the quilting hides the print, loosen the density before quilting the real top.
Fabric facts that help you decide
- Canvas Coffee Bean 9030 36: Northcott quilting fabric in a brown, tone-on-tone canvas design, 100% cotton, sold by the yard. A tone-on-tone brown can frame a national parks panel and echo rock and tree tones without adding a competing motif.
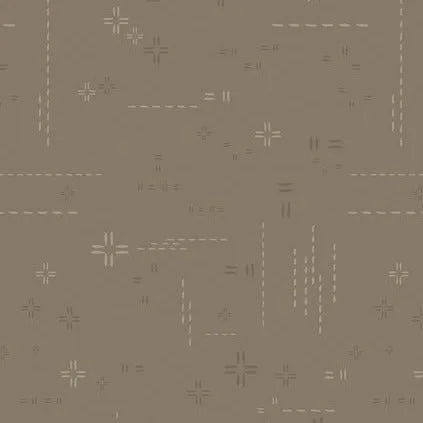
- Decostitch Timber Wolf 726: Art Gallery Fabrics Decostitch Elements in Timber Wolf, 100% cotton, sold by the yard. A textured neutral like this works as a border or cornerstone when you want subtle interest instead of a solid.
- First Frost Snowfall-Red-108" Wide Backing Fabric- 3 yards: 108" wide, 100% premium quilting cotton, white snowflakes on a red background, cut as a continuous 3 yard length. One length covers most quilt backs with no piecing, which saves time and keeps the back smooth behind a detailed panel.
Choosing fabric for a national parks panel quilt is mostly about restraint: let the panel lead, keep borders tonal and proportional, and pick a backing that finishes the job without fuss. Pull one or two colors from the scene, test your quilting on a sample, and the finished quilt will look deliberate from the front and the back.