Quick Answer
To install a free-standing bracket, position it at a 60-degree angle on your 4x4 legs and 4x6 beam, then secure it with the specified carriage bolts and screws. Order two brackets for a complete freestanding swing set.
Why the 60-Degree Angle Matters
The free-standing bracket is designed to support 4x4 legs and a 4x6 top beam at a 60-degree angle. This angle provides optimal stability for a freestanding swing set, ensuring it can withstand regular use without tipping. If you set the angle incorrectly, the bracket may not align properly with your lumber, leading to structural weakness.
Hardware You'll Need (Not Included)
The bracket itself does not come with hardware. You'll need to purchase separately: two 3/8 x 4-1/2 inch carriage bolts, two 3/8-inch lock nuts, two 3/8-inch washers, and 32 #14 x 2-inch pan head screws. Using the correct hardware is crucial for a secure fit; substituting with smaller or different fasteners can compromise the connection.
Step-by-Step Installation
- Gather Lumber and Hardware: Cut your 4x4 legs and 4x6 top beam to the desired dimensions. Have all required hardware on hand: 2 carriage bolts, 2 lock nuts, 2 washers, and 32 pan head screws. Check that your lumber is straight and free of cracks before starting.
- Position the Bracket at 60 Degrees: Hold the bracket against the leg and beam at a 60-degree angle. Ensure the bracket's mounting holes align with the center of the 4x4 leg and the 4x6 beam. Use a protractor or angle finder to verify the 60-degree angle; a common mistake is eyeballing it, which can lead to misalignment.
- Attach the Bracket to the Beam: Insert a carriage bolt through the bracket and the beam, then secure with a washer and lock nut on the opposite side. Tighten with a wrench. Do not over-tighten; the lock nut should be snug but allow slight movement for adjustments.
- Attach the Bracket to the Leg: Use the pan head screws to secure the bracket to the 4x4 leg. Drive screws at the marked locations, ensuring they penetrate the wood fully. Pre-drill pilot holes to prevent the wood from splitting, especially near the ends.
- Repeat for the Second Side: Install the second bracket on the opposite side of the swing set, mirroring the first installation. This completes the freestanding frame. Verify both brackets are at the same height and angle to keep the top beam level.
Product Facts
-
Free-Standing Bracket (each): Sold as one unit for the left or right side; order two for a freestanding swing set. Ensure you purchase two brackets to complete your setup, as one bracket alone cannot support a full swing set.
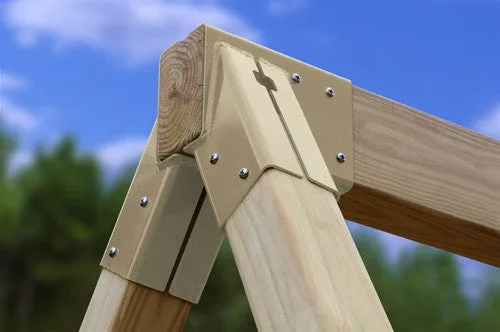
Free-Standing Bracket (each)