Quick answer
The BERNINA #10D Edgestitch Foot uses an adjustable guide to keep stitching perfectly parallel to fabric edges, making topstitching, edgestitching, and quilting lines consistent without measuring each time.
Why the adjustable guide matters
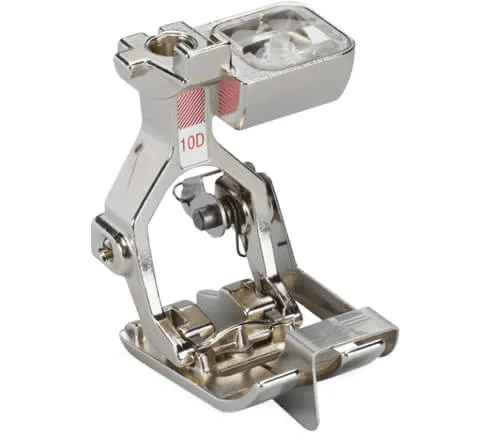
Unlike fixed-edge presser feet, the #10D has a movable guide that you set to your desired seam allowance. This means you can sew multiple parallel rows at the same distance from the edge without re-marking or guessing. The center blade helps align the fabric as it feeds, reducing wobble.
One trade-off: the guide can feel bulky on tight curves. For gentle curves or straight lines it works beautifully, but for sharp corners you may want to switch to a standard edgestitch foot without the guide.
What you can sew with the #10D
This foot excels at topstitching on collars, cuffs, and hems, edgestitching on bags and home decor, and creating evenly spaced quilting lines. It's also handy for sewing binding consistently close to the edge.
Because the guide adjusts from about 1/8" to 1" from the blade, you can use it for narrow or wide seam allowances. Just remember that the guide is best for straight or gently curved seams.
How to use the BERNINA #10D Edgestitch Foot
- 1. Attach the foot and select a straight stitch: Remove your standard presser foot and snap on the #10D. Set your machine to a straight stitch (center needle position). A stitch length of 2.5–3.0 mm works well for most fabrics. Make sure the needle clears the center blade; if it hits, lower the needle position slightly.
- 2. Adjust the guide to your desired seam allowance: Loosen the guide screw on the side of the foot. Slide the guide left or right so the distance from the center blade to the guide equals your target seam allowance (e.g., 1/4" for quilting). Tighten the screw firmly. Test on a scrap: sew a line and measure from the fabric edge to the stitch line. Adjust the guide if needed.
- 3. Align the fabric edge against the guide: Place your fabric under the foot so the raw edge rests against the guide. Lower the presser foot and begin sewing at a moderate speed. Let the guide ride along the edge—do not push or pull the fabric. If the fabric wanders, you may be pushing it sideways. Let the machine feed naturally.
- 4. Sew parallel rows without re-measuring: For multiple rows, sew the first line using the guide. Then reposition the guide to the new distance (e.g., 1/2" from the blade) and sew the next row using the previous stitch line as a reference. The guide keeps every row consistent. Always check the first few inches of each new row to confirm spacing before committing to a long seam.
- 5. Finish and remove the foot: When done, raise the presser foot, cut threads, and remove the #10D. Clean any lint from the guide mechanism before storing. Store the foot with the guide screw loosened slightly to avoid putting stress on the spring.
Featured product
-
#10D BERNINA Edgestitch Foot with Guide: The BERNINA #10D Edgestitch Foot with Guide features an adjustable seam guide for consistent stitch placement and a center guide blade for precise alignment. You can set the guide once and sew multiple rows at the same distance from the edge, saving time and ensuring professional-looking parallel stitching.
#10D BERNINA Edgestitch Foot with Guide