Quick Answer
A grooming dryer stand lets you position your pet dryer at the right height and angle, freeing both hands for brushing, styling, or trimming while the coat dries.
Why Use a Stand Instead of Holding the Dryer
Holding a heavy dryer for a full grooming session can tire your arms and limit your control over your pet. A stand transfers that weight to the floor and locks the dryer in place, so you can focus on the coat without fighting the tool.
The trade-off is that you lose the ability to instantly redirect airflow. You need to plan the drying zone and adjust the stand angle before starting. This works best when you dry in sections rather than trying to cover the whole body at once.
Choosing the Right Location
Place the stand on a flat, non-slip surface near your grooming table or mat. Ensure the base has enough clearance so the dryer hose doesn't kink or pull the stand over. If you're using a tube set, leave room for the flexible hose to run from the dryer to the nozzle without sharp bends.
Step-by-Step Setup & Use
- Assemble the Stand and Tube Set: Attach the dryer to the stand's mounting bracket and tighten all knobs. Connect the flexible hose from the dryer outlet to the grooming tube. Check that the hose isn't twisted and that the tube's nozzle is clean and free of debris. A loose bracket or twisted hose will cause the dryer to sag or the airflow to drop. Double-check every connection before turning on the dryer.
- Position the Stand at the Right Height: Loosen the height adjustment knob and raise or lower the arm so the nozzle points at the area you plan to dry first. For a large dog's back, aim the nozzle slightly downward from above. For the belly or legs, lower the arm and angle the nozzle horizontally. Setting the height too high or low forces you to bend or stretch, defeating the hands-free benefit. Adjust for each body section.
- Route the Hose to Avoid Kinks: Lay the hose in a gentle curve from the dryer to the tube. If the hose is too long, coil the excess loosely behind the stand—do not fold it sharply. A kinked hose reduces airflow and can overheat the dryer motor. Check the hose path before each use. A straight, smooth route keeps air volume high and the dryer running cool.
- Lock the Stand in Place: Tighten all adjustment knobs firmly. Give the stand a gentle shake to confirm it won't tip over when the hose moves. If the base wobbles, move it to a level surface or add a non-slip mat underneath. A stable stand prevents accidents. If the stand shifts during drying, stop and re-tighten the knobs before continuing.
- Dry in Sections, Moving the Stand as Needed: Start with one body area (e.g., the back), let the dryer run for 30–60 seconds, then brush or comb through the coat. When that section is dry, loosen the height and angle knobs, reposition the nozzle for the next area, and re-tighten. Repeat until the entire coat is dry. Drying the whole body at once leaves damp spots. Move the stand section by section for even, thorough drying.
Product Used in This Guide
-
Adjustable Grooming Dryer Stand & Tube Set for SHD & 2400T Dryers: The Tauro Pro Line Adjustable Grooming Dryer Stand & Tube Set is designed for hands-free operation and fits SHD and 2400T dryers. It holds the dryer securely at your chosen height, so you can brush, style, or trim while the coat dries, improving workflow and reducing arm fatigue.
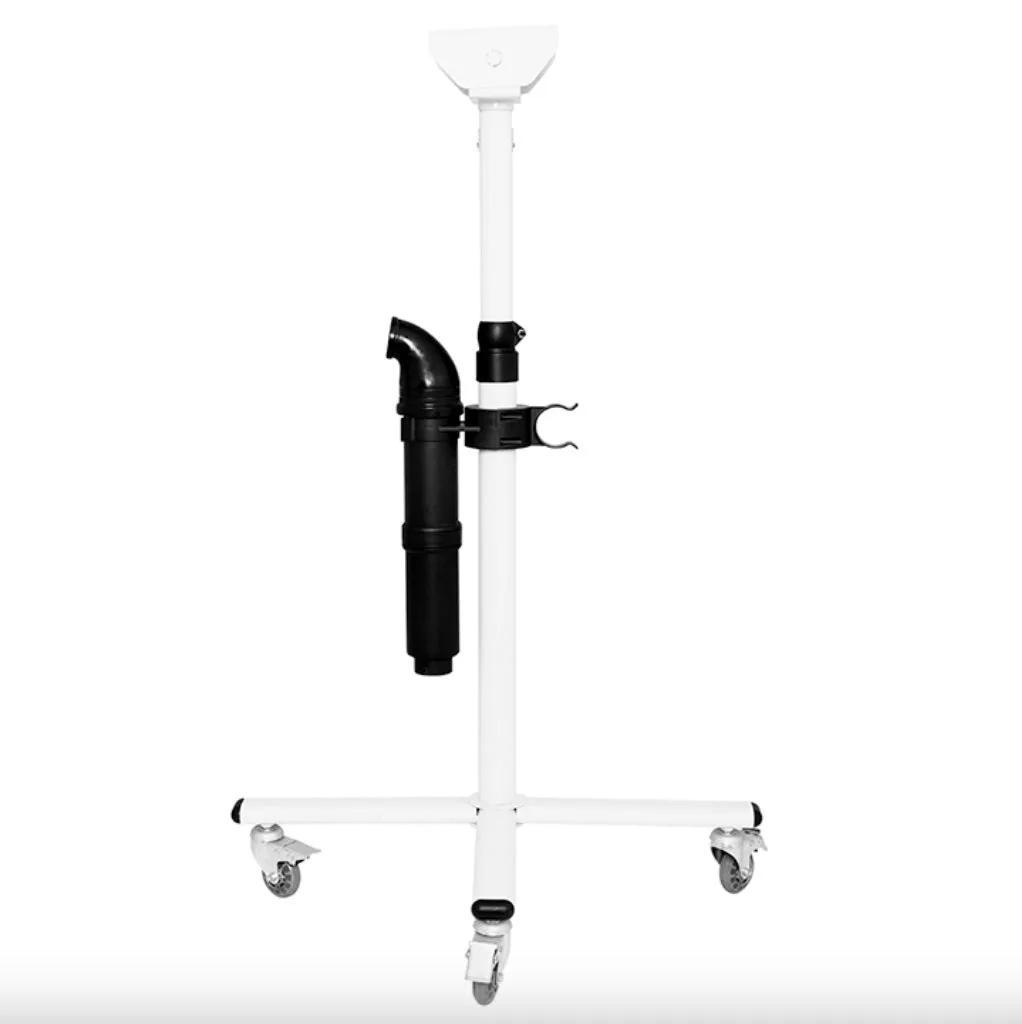
Adjustable Grooming Dryer Stand & Tube Set for SHD & 2400T Dryers