Quick Answer
To set up the Nikon PB-6 bellows for macro photography, mount the bellows between your camera and lens, adjust the extension to control magnification, and use a sturdy tripod to avoid camera shake.
Understanding Bellows Extension and Magnification
The Nikon PB-6 bellows focusing unit provides an extension range from 48mm to 208mm. More extension means higher magnification, but also less light reaching the sensor and a narrower depth of field. You'll need to compensate with longer exposures or additional lighting.
Because the bellows are manual, you'll be focusing by moving the standards along the rail. This requires patience and a steady hand, but it gives you precise control over the focus plane.
Trade-offs of Using Bellows vs. Macro Lenses
Bellows are more flexible than dedicated macro lenses because you can change lenses and extension as needed. However, they are bulkier and require more setup time. Also, the lack of electronic contacts on the bellows means you'll need to use manual exposure or rely on the camera's stop-down metering.
The PB-6 supports aperture priority auto exposure and TTL flash metering control, which helps, but you'll still need to be comfortable with manual techniques.
Step-by-Step Setup for the Nikon PB-6 Bellows
- Mount the Bellows to the Camera: Attach the rear standard of the PB-6 to your camera body using the appropriate mount adapter. Ensure it locks securely to avoid any movement. Check that the bellows is firmly attached before proceeding.
- Attach the Lens to the Front Standard: Mount your lens onto the front standard. Use a lens that works well with bellows, typically a prime lens with manual aperture control. Make sure the lens is compatible with bellows and that the aperture ring is set manually.
- Set the Lens Aperture: Set the lens to a small aperture (like f/8 or f/11) to increase depth of field. Remember that effective aperture changes with extension. Use stop-down metering or trial shots to determine the right exposure.
- Adjust the Bellows Extension: Slide the front standard along the rail to achieve the desired magnification. Start with a shorter extension and increase gradually. Be patient; small adjustments make big differences at high magnification.
- Focus Using the Rail: Move the entire bellows unit back and forth on the tripod to focus, rather than using the lens focus ring. This keeps the magnification constant. Use a focusing rail if available for finer control.
- Stabilize the Setup: Use a sturdy tripod and a remote shutter release to minimize vibration. At high magnifications, even slight movements cause blur. Consider using mirror lock-up or electronic shutter if available.
- Light and Expose: Add external lighting or use a flash with TTL metering to compensate for light loss. Bracket exposures to find the best setting. Review your images on the camera's LCD and adjust as needed.
Product Facts
-
Nikon PB-6 Bellows Focusing Unit with Front & Rear Standard & Rail Assembly - Used: The PB-6 bellows increases reproduction ratios to nearly 11x, depending on lens and mount configuration. This makes it possible to capture extreme close-ups that are difficult or impossible with standard macro lenses.
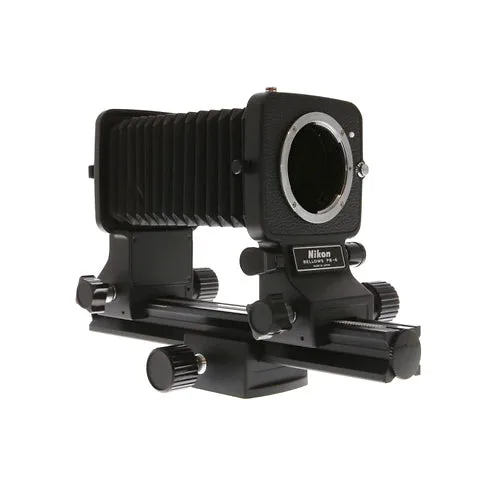
Nikon PB-6 Bellows Focusing Unit with Front & Rear Standard & Rail Assembly - Used
-
Nikon PB-6 Bellows Focusing Unit with Front & Rear Standard & Rail Assembly - Used: The bellows extension range is from 48 to 208mm. This range gives you flexibility to adjust magnification from moderate close-ups to high-magnification shots.
-
Nikon PB-6 Bellows Focusing Unit with Front & Rear Standard & Rail Assembly - Used: The PB-6 supports aperture priority auto exposure and TTL flash metering control. These features help you maintain proper exposure even when using the bellows, which can otherwise be challenging.