Start With Power and Storage
The Nikon Z9 Body (With Battery Charger) arrives as a body-and-charger kit, so your first task is to get the supplied EN-EL18d battery charged and the camera ready to write files. The record lists the battery as a 10.8 VDC, 3300 mAh rechargeable lithium-ion pack, and the included charger is described as a quick-charging, compact unit built for consistent charging. Charge the battery before you explore menus so the camera does not shut down mid-setup.
The Z9 has dual CFexpress Type B / XQD card slots. Decide now how you want to use them: one card for stills and one for video, or overflow from the first to the second. The supplied information does not specify a recommended card speed or capacity for each recording mode, so check Nikon's media compatibility list for the exact 8K and 4K modes you plan to use before buying cards.
Power and storage details from the catalog
-
Nikon Z9 Body (With Battery Charger): 1 x EN-EL18d Rechargeable Lithium-Ion, 10.8 VDC, 3300 mAh Confirms the battery type and capacity so you can plan charging time and spares.
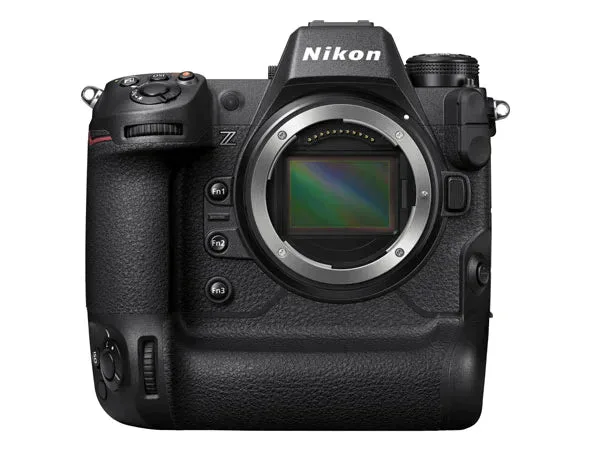
Nikon Z9 Body (With Battery Charger)
-
Nikon Z9 Body (With Battery Charger): Dual CFexpress Type B / XQD card slots Lets you set up separate stills and video cards or a backup workflow from day one.
A sensible first-run sequence
- Charge the EN-EL18d with the supplied charger: Use the included charger as described in the kit. The record does not give a charge time, so rely on the charger's indicator rather than guessing.
- Insert one or two CFexpress Type B / XQD cards: Format them in the camera after insertion. The Z9 has two slots, so decide whether the second card is backup, overflow, or dedicated to video.
- Set date, time, and time zone: Accurate metadata matters for sorting and geotagging. The Z9 has built-in GPS, Wi-Fi, and Bluetooth, but set the clock manually first.
- Adjust the EVF and monitor: The Quad-VGA 3.69M-dot OLED EVF has a 120Hz refresh rate. If you wear glasses or shoot in bright light, fine-tune diopter and brightness now.
- Configure audio inputs if you record video: The body provides 3.5mm TRS stereo microphone and headphone jacks. Set input levels and monitoring before your first take.
- Choose image quality and file format: The 45.7MP sensor produces large files. Select RAW, JPEG, or HEIF according to your storage and workflow; the record does not list every quality option, so review the camera menu.
Menu Settings Worth Changing Before Your First Shoot
The Z9 menu is deep, but a few settings have an outsized effect on your first results. Start with autofocus: the camera has 493-point phase-detection AF with 3D Tracking and AI-trained subject recognition for people, animals, birds, and vehicles. Set the AF area mode and subject detection to match your subject, and enable Starlight View if you often focus in very low light.
For stills, decide between the electronic shutter's speed and any rolling-shutter trade-offs. The record lists a shutter speed range from 1/32000 to 30 seconds, plus bulb and time modes. If you photograph action, explore the burst settings; the record notes blackout-free shooting up to 120 fps at 11MP JPEG, but check the exact frame rate and file size in the camera menu for your chosen quality.
For video, the Z9 records 8K UHD internally up to 60p in 12-bit N-RAW and supports ProRes RAW HQ, H.265, and H.264. Set your codec and resolution before recording, and confirm that your CFexpress cards are on Nikon's approved list for those modes. The supplied information does not specify minimum card write speeds, so verify compatibility with the media manufacturer.
Key specifications that affect setup choices
- Nikon Z9 Body (With Battery Charger): 45.7MP stacked CMOS sensor (8256 x 5504 effective) High resolution means larger files; plan card capacity and computer storage accordingly.
- Nikon Z9 Body (With Battery Charger): 493-point phase-detection AF with 3D Tracking Explains why subject detection and AF area settings deserve early attention.
- Nikon Z9 Body (With Battery Charger): 8K UHD internal recording at up to 60p in 12-bit N-RAW Confirms the camera's top video mode so you can match cards and workflow.
Connections and Workflow Setup
The Z9 offers USB-C, HDMI Type-A, Ethernet, and a 10-pin remote terminal, plus built-in Wi-Fi and Bluetooth. If you plan to tether or transfer files, set up the connection method that suits your studio or location. The record mentions compatibility with Nikon Imaging Cloud and NX Studio, but does not detail every transfer step; consult Nikon's documentation for the exact procedure.
For audio, the 3.5mm microphone and headphone jacks are standard TRS connections. If you use an on-camera mic or a wireless receiver, test levels and monitoring before a paid shoot. The record does not list phantom power or XLR support, so do not assume those features.
Battery charger tips for the supplied kit
- Use the included charger: The kit includes a charger designed for Nikon batteries. The record describes it as quick-charging and compact, but does not give a charge time or specify compatibility with other battery models.
- Charge before first use: A new battery may arrive partially charged. Charge it fully before a shoot to avoid surprises.
- Plan spare batteries for long days: The EN-EL18d is a 3300 mAh pack. The record does not state battery life in shots or minutes, so bring a spare if you shoot all day, especially in cold conditions.
- Store the charger with the kit: Keep the charger and cable together so you can top up between shoots.
What the supplied information does not cover
The catalog record does not include a step-by-step menu walkthrough, a recommended card list, or detailed operating instructions for every setting. Treat this guide as a starting framework, and use the camera's built-in help or Nikon's manual for exact menu paths and compatibility details. Where a specification is absent, such as exact battery life or card speed requirements, do not guess; verify with Nikon or your media manufacturer.