What makes the Yachiyo kit beginner-friendly
The PLAMATEA Yachiyo model kit is designed so you can recreate the character with a simple assembly. The various parts are separated into different colored runners and pre-painted parts, which means you do not need to paint the kit to get a recognizable result. That said, a few deliberate steps during assembly and a little panel lining will make the finished model look sharper on the shelf.
This guide walks through a sensible build order, where panel lining fits in, and how to use the included parts for posing and display. It sticks to what the supplied product information confirms, so you can plan your build without guesswork.
Yachiyo kit specs that shape your build plan
-
Apocalypse Hotel - PLAMATEA Yachiyo Model Kit: The model stands at approximately 150mm (5.91in) tall and features various points of articulation. The 150mm height gives you a clear sense of scale for shelf space, and the articulation means you can adjust the pose after assembly rather than committing to one stance.
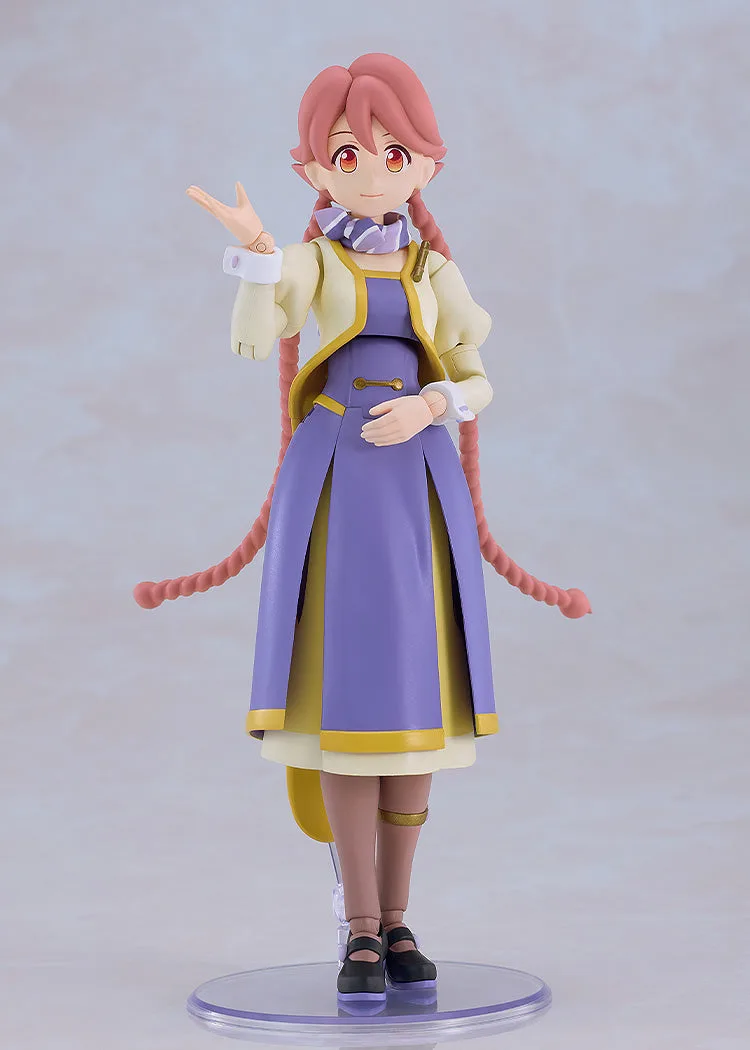
Apocalypse Hotel - PLAMATEA Yachiyo Model Kit
-
Apocalypse Hotel - PLAMATEA Yachiyo Model Kit: The various parts of the model have been separated into different colored runners and pre-painted parts, making it easy to recreate the character with a simple assembly. You can build straight from the runners without painting, which keeps the first build approachable and lets you focus on clean assembly and optional panel lining.
A practical assembly order for the Yachiyo kit
Follow the kit's own instructions for part numbers and orientation. The sequence below is about when to handle details and options, not a replacement for the manual.
- Prepare your workspace and check the runners: Sort the colored runners and pre-painted parts before you start. Keep the pre-painted face plates aside so they do not get scratched while you handle other parts.
- Assemble the main body and limbs: Build the torso, arms, and legs from the colored runners. Because the parts are already colored, you can assemble them as-is and decide later whether to add panel lines.
- Test the articulation before finalizing: The kit features various points of articulation. Move the joints gently after assembly to confirm the range you plan to use for your pose, then set the figure aside.
- Add panel lines if you want extra definition: Panel lining works best on bare plastic before you attach delicate parts like the face plates or shampoo hats. Apply lines along molded details, then clean up any excess according to your liner's instructions.
- Attach the face plate and optional parts: Choose one of the included face plates and add the hand parts or shampoo hat you want for display. Save the remaining options for future posing.
- Mount on the articulated stand: The articulated stand is included. Use it to support dynamic poses or to keep the figure stable on a shelf.
Face plates, decals, and display options
- Apocalypse Hotel - PLAMATEA Yachiyo Model Kit: Includes one pre-painted face plate, with decals to create various other expressions from the anime. A face plate for recreating moments when hot water erupts from her mouth is also included. You get a ready-to-use face plus decals and a second special face plate, so you can change the character's expression without painting.
- Apocalypse Hotel - PLAMATEA Yachiyo Model Kit: Her tank mode can be recreated with the use of interchangeable parts. Tank mode is an alternative display option, so you can decide after the main build whether to keep her in humanoid form or swap parts for a different look.
- Apocalypse Hotel - PLAMATEA Yachiyo Model Kit: Two types of shampoo hats are included: one that can be hung on her hook and another that can be placed on her head. These accessories give you small display choices that pair well with the included hand parts and stand.
Where panel lining fits into this build
Panel lining adds contrast to the molded details, but it is optional. Because the kit already uses colored runners and pre-painted parts, you can treat panel lining as a refinement step rather than a requirement. Work on the main body parts before attaching the face plates, since a slip of the liner near a pre-painted face is harder to fix.
Use a liner suited to the plastic and follow its instructions for drying and cleanup. The supplied product information does not specify a particular liner type or cleanup method, so check your own materials before applying anything to the kit.
Posing tips using the included articulation and stand
The kit's articulation and articulated stand give you room to adjust the pose, but the supplied information does not list specific joint ranges. Move joints gently and stop if something feels tight.
- Start with a stable standing pose: Assemble the figure and set it on its feet first to check balance before adding the stand or accessories.
- Use the stand for dynamic angles: The articulated stand can support poses that would not balance on their own. Adjust the stand arms to hold the figure securely.
- Swap hands to match the scene: Interchangeable hand parts let you change gestures. Choose hands that fit the pose and the accessory you are using.
- Try tank mode as an alternative display: If you want a different look, the interchangeable parts allow tank mode. Keep the swapped parts together so you can return to humanoid form later.
What to confirm when your kit arrives
The supplied information does not include care, safety, or compatibility instructions beyond the parts list and features described here. When your kit arrives, read the included manual for assembly order, part numbers, and any specific handling notes. Check that the runners, face plates, decals, hand parts, shampoo hats, and stand are all present before you start, and keep the manual for reference if you later switch between display modes.