Start with the connection and software order
The Rowsfire B107 B737 Light OVHD OVERHEAD Panel is a plug-in-and-configure piece of hardware, not a plug-and-play toy. It runs from a single USB connection with no additional external power source, so your first checkpoint is simply getting the panel recognized by your PC before you open the simulator.
The panel operates through MobiFlight combined with the Rowsfire App. MobiFlight is activated earlier in the workflow, with initial compatibility focused on PMDG aircraft models. That means your practical setup order is: connect USB, confirm the panel is seen, launch MobiFlight, then start MSFS 2020/2024 or X-Plane 12 and load your aircraft. Doing it in that order avoids the common confusion of binding switches before the panel is talking to the sim.
What the B107 gives you to light and mount
-
Rowsfire B107 B737 Light OVHD OVERHEAD Panel for MSFS 2020/2024, Xplane 12: Built-in backlighting ensures clear visibility of labels in various lighting conditions. This is the feature that makes the panel usable in a dim room; confirm it is working before you spend time on switch bindings.
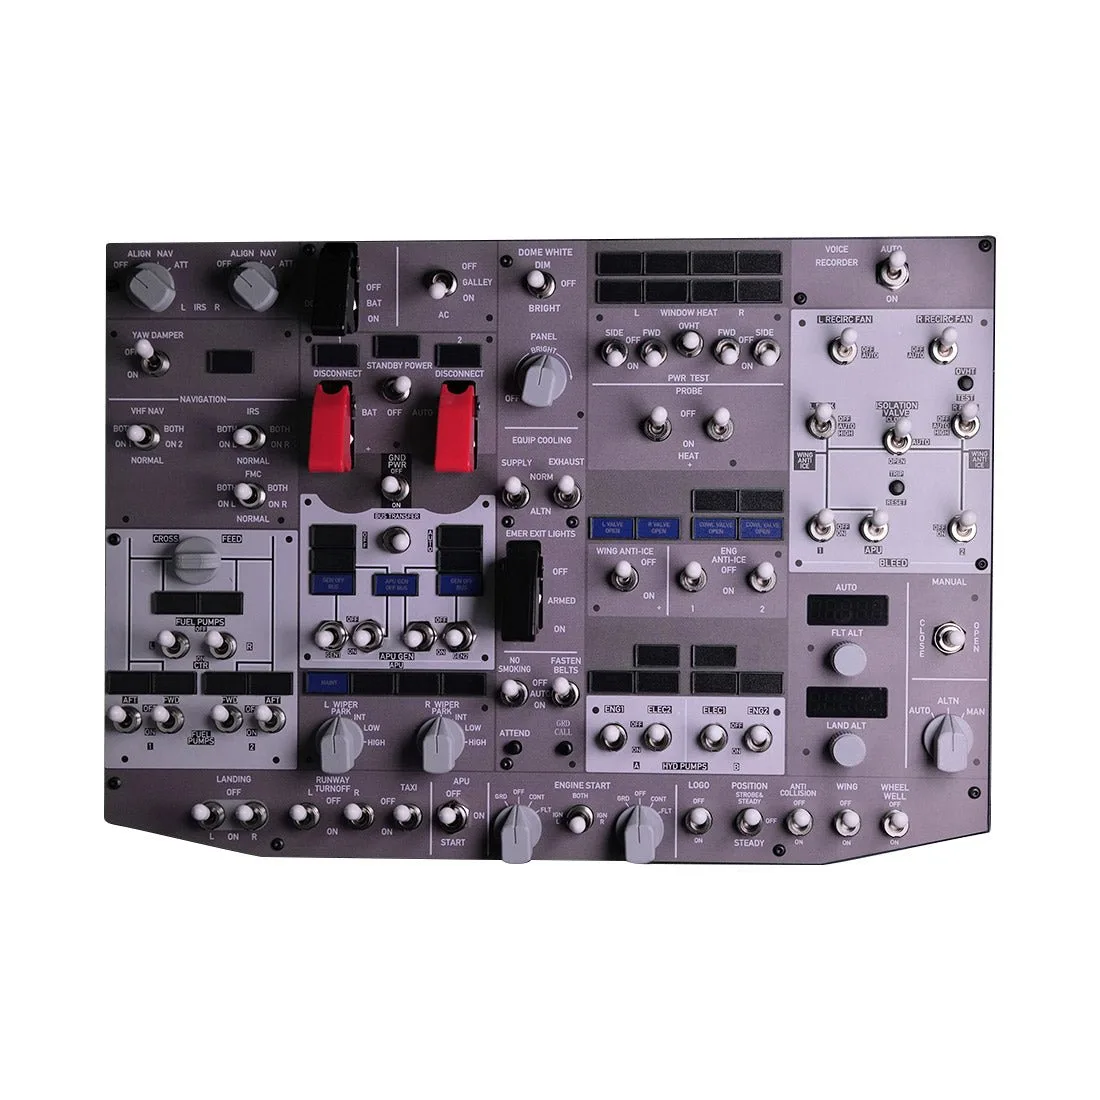
Rowsfire B107 B737 Light OVHD OVERHEAD Panel for MSFS 2020/2024, Xplane 12
-
Rowsfire B107 B737 Light OVHD OVERHEAD Panel for MSFS 2020/2024, Xplane 12: The front panel uses 4 mm thick acrylic with high-definition printing and a protective laminated surface. The laminated surface is what you are cleaning and protecting during care, so avoid abrasive cloths or solvents that could dull the print.
-
Rowsfire B107 B737 Light OVHD OVERHEAD Panel for MSFS 2020/2024, Xplane 12: An aluminum alloy frame provides a refined metal appearance and solid structural support. The metal housing adds weight and rigidity, which affects how you mount it and how carefully you handle it during installation.
-
Rowsfire B107 B737 Light OVHD OVERHEAD Panel for MSFS 2020/2024, Xplane 12: Overall dimensions are 405 × 285 × 60 mm, with a weight of approximately 2.8 kg. Check your desk or rig space against these numbers before ordering; this is a substantial panel, not a small button box.
-
Rowsfire B107 B737 Light OVHD OVERHEAD Panel for MSFS 2020/2024, Xplane 12: The rear includes a 100 × 100 mm VESA mounting interface, and a data cable is included. A standard VESA pattern gives you arm or bracket options, and the included cable means you do not need to source a proprietary connector.
Lighting and backlight checks before your first flight
The supplied information confirms built-in backlighting and high-power LEDs, but it does not list a separate backlight brightness control or a specific key binding for lighting. Treat the steps below as checks, not as a manufacturer procedure.
- Power up in a dim room: Connect the single USB cable and look at the panel labels with the room lights low. The backlight should make the printed labels readable; if it does not, stop and check the USB connection and software before changing anything else.
- Confirm the panel in MobiFlight: Open MobiFlight and verify the B107 is detected. MobiFlight is part of the supported workflow, so a missing device here explains most lighting and switch problems later.
- Load a supported aircraft first: Initial compatibility is focused on PMDG 737 models. Test lighting and switches on a PMDG aircraft before trying other add-ons, so you are not troubleshooting two variables at once.
- Check switch feel against the sim: High-performance switches, high-power LEDs, and travel-type buttons are used throughout, and selected switches feature automatic return behavior to mirror real aircraft logic. Confirm those return-to-center switches behave as expected in the sim before you rely on them in flight.
- Leave the protective film decision until after testing: The printed panel is covered with a factory-applied protective film to reduce surface marks during handling and installation. If you choose to remove it, press the panel gently and then turn the nut to avoid scratching the panel while loosening the nut.
X-Plane 12 and other aircraft: what is confirmed
The listing names MSFS 2020/2024 and X-Plane 12, and states that continued updates are planned for ZiBoMOD, iFly, and Laminar Research aircraft. That is a forward-looking statement, not a guarantee of current functionality for every add-on. If your xplane 12 737 overhead workflow depends on a specific aircraft, verify support for that aircraft before you buy rather than assuming the panel is fully mapped on day one.
The same caution applies to the Rowsfire App side of the dual software drive. The supplied information describes MobiFlight combined with the Rowsfire App and notes that MobiFlight is activated earlier, but it does not provide a step-by-step Rowsfire App configuration sequence. Do not invent one; use MobiFlight as your primary setup path and treat the app as the companion layer described by the listing.
Metal housing care that protects the panel
The aluminum alloy frame and laminated acrylic front are durable, but they are not indestructible. These habits keep the backlit overhead panel looking and working as intended.
- Handle by the frame, not the acrylic: The metal enclosure enhances structural integrity and provides a clean, professional cockpit appearance. Lift and reposition the panel by the aluminum frame so you are not flexing the 4 mm acrylic front.
- Keep the protective film on during installation: The factory-applied film is there to reduce surface marks during handling and installation. Leave it in place until the panel is mounted and you have finished moving it around.
- Clean the laminated surface gently: The front panel has a protective laminated surface over high-definition printing. Use a soft, non-abrasive cloth; the supplied information does not specify cleaning agents, so avoid harsh solvents that could attack the laminate.
- Respect the weight when mounting: At approximately 2.8 kg, the panel needs a mount or desk position that can carry it. The 100 × 100 mm VESA interface on the rear is the intended mounting point; use it rather than resting the full weight on the front panel.
- Keep the USB path strain-free: Operation requires only a single USB connection with no additional external power source. Route the included data cable so it is not pulling on the connector when you slide or adjust the panel.
Age range and who this panel suits
The listing states Ages: 16+. This is a simulation control panel with small switches and a metal housing, not a children's toy, so the age guidance matches the intended user. If you are buying for a younger flight-sim enthusiast, treat the 16+ rating as a firm boundary rather than a suggestion.
The B107 makes most sense for a builder who already has a 737 cockpit layout and wants a backlit overhead panel with a metal housing and a standard VESA mount. If you are still deciding between panel types, the size and weight here are the practical limits: 405 × 285 × 60 mm and about 2.8 kg before packaging.