Quick answer
To build the SDGG Gogg, Agguy, and Zock kit set, follow a three-phase process: prepare parts and tools, assemble each mobile suit in order, then apply finishing touches. This guide covers each step with common mistakes to avoid.
Why build the Zeon amphibious trio?
The SDGG Gogg, Agguy, and Zock set packs three iconic Zeon underwater mobile suits into one box. Each model has a distinct silhouette—Gogg's bulky arms, Agguy's rounded claws, Zock's massive cannon head—so you get variety in a single build session. The BB Senshi line uses snap assembly and color-separated plastic, making it accessible for beginners while still offering a satisfying project for experienced builders who want a quick, collectible set.
What to expect from the kit
Each model is molded in multiple colors, so painting is optional. The parts are small and the instruction sheet is shared across all three kits, so keep the runners organized. Because the set includes three separate models, you'll spend more time on cleanup and assembly than a single SD kit, but the result is a cohesive display of Zeon amphibious MS.
Step-by-step assembly guide
- Step 1: Organize runners and tools: Lay out the runners for all three kits. Use a side cutter to remove parts, a hobby knife to clean nubs, and a file or sanding stick to smooth surfaces. Separate parts by kit—Gogg, Agguy, Zock—to avoid mixing. Common mistake: mixing parts between kits. Double-check the runner labels against the instruction sheet.
- Step 2: Assemble the Gogg (MSM-03): Start with the Gogg. Build the torso and head first, then attach the arms and legs. The arms are large and heavy; ensure the shoulder joints click fully to avoid sagging later. Checkpoint: test the arm articulation before attaching the hands. If the joint is loose, apply a thin layer of clear nail polish to tighten it.
- Step 3: Assemble the Agguy (MSM-04 Acguy): Build the Agguy next. Its rounded body and claw arms are straightforward. Pay attention to the monoeye sticker alignment—it sits inside a recessed area. Use tweezers for precise placement. Common mistake: misaligning the monoeye sticker. Place it slowly and adjust before pressing down.
- Step 4: Assemble the Zock (MSM-10): Build the Zock last. Its head is the largest part and contains the main cannon. Attach the legs and arms after the head. The leg joints are tight; if they feel stuck, gently sand the peg. Checkpoint: ensure the head cannon can rotate freely. If it binds, check for excess plastic on the peg.
- Step 5: Apply panel lining and decals (optional): Use a fine-tipped panel liner pen to add depth to the grooves. Apply the included stickers for eyes and markings. For a cleaner look, use waterslide decals if you have them. Common mistake: applying panel liner to snap-fit joints. Let the liner dry completely before moving parts to avoid smudging.
- Step 6: Display the trio: Pose each mobile suit on a shelf or in a display case. The Gogg and Agguy can stand on their own; the Zock may need a base due to its top-heavy head. Use a simple action base if needed. Checkpoint: test stability before final display. If a model tips, adjust the pose or add a small clear stand.
Kit overview
-
SDGG 238 Gogg & Agguy & Zock: This set includes three model kits: MSM-03 Gogg, MSM-04 Acguy, and MSM-10 Zock, all in the BB Senshi line-up. They are snap-assembly plastic kits with a super stylized appearance. You get three distinct Zeon mobile suits in one purchase, saving money compared to buying them individually, and the snap-fit design means no glue is required.
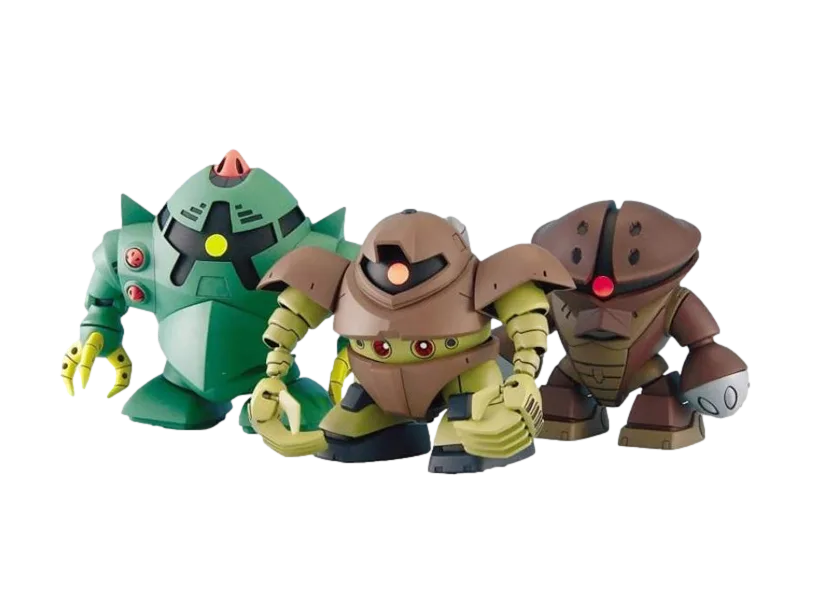
SDGG 238 Gogg & Agguy & Zock