Quick Answer
Most skipped stitches come from one of four things: a dull, bent, or wrong needle; incorrect threading or bobbin seating; tension that is too loose for the thread and fabric; or a needle that is too fine for the material. Change the needle first, rethread top and bottom, then test on a scrap of the same fabric. If the skip persists after those three steps, the machine likely needs a service check rather than more at-home adjustments.
A skipped stitch is frustrating because it rarely announces itself. You sew a seam, flip it over, and find one stitch missing, then another, and suddenly the seam line looks dotted instead of solid. The good news is that skipped stitches are almost never random. They follow a pattern, and that pattern points to the cause.
This guide walks through the most common reasons a sewing machine skips stitches and pairs each one with a specific fix. Work through the checks in order, because the cheapest and most likely causes come first. If you reach the end and the problem remains, you will know it is time to stop adjusting and book a service.
Start With the Needle
The needle is the first suspect in nearly every skipped stitch case. A needle that is slightly bent, dull, or has a burr will fail to carry the thread cleanly through the fabric, so the hook misses it and no stitch forms. Run your finger down the needle shaft; if you feel a rough spot or see a bend, replace it. Needles are consumables, not permanent parts, and a fresh one costs far less than a ruined project.
Needle type matters as much as condition. A universal needle can struggle with knits, dense quilting layers, or coated fabrics because the point does not part the material cleanly. For stretch fabrics, a ballpoint or stretch needle lets the fibers move aside instead of snagging. For heavy layers, a larger size gives the hook more room to catch the thread. If you are unsure which needle suits your fabric, test on a scrap before committing to the real seam.
- Replace the needle after roughly 8 to 10 hours of sewing, or immediately after any pull or jam.
- Match needle size to fabric weight: lighter fabric, smaller number; heavier layers, larger number.
- Insert the needle fully into the clamp and tighten the screw firmly, but do not overtighten.
Check Threading and Bobbin Seating
A thread that slips out of the tension discs or misses a guide will arrive at the needle with too little tension, and the loop that should form around the bobbin case never completes. Rethread the top from scratch with the presser foot up so the discs are open and the thread seats properly. It is easy to think you have threaded correctly when one guide was skipped, so do the full path again rather than assuming.
On the bobbin side, a bobbin that is wound unevenly, inserted backwards, or sitting slightly out of its case will cause intermittent skips. Remove it, check the direction against your machine's diagram, and reinsert it until it clicks or seats flush. If the bobbin thread pulls out with heavy resistance or none at all, the bobbin tension needs attention. Keep spare bobbins on hand so a damaged one does not stall your project.
- Always raise the presser foot before threading so the tension discs release.
- Pull the bobbin thread tail to confirm it feeds smoothly before you start sewing.
- Wind bobbins at a steady speed; uneven winding causes inconsistent tension.
Adjust Tension for the Fabric and Thread
Tension that is too loose for the thread weight lets the loop collapse before the hook can catch it. This shows up as skipped stitches plus loose, loopy stitches on the underside. Increase top tension in small increments, sew a test seam, and check both sides. If the top thread is too tight, you may see the bobbin thread pulled to the top, which is a different problem and calls for backing off.
Thread weight and fiber also play a role. A very fine thread in a machine set for medium weight can slip, while a thick decorative thread may need a larger needle and a looser top tension. Metallic and specialty threads are especially prone to skipping because they are less flexible. If your machine has a tension setting for the thread type, use it, then fine-tune with test seams rather than guessing.
- Change one tension setting at a time and test after each adjustment.
- Keep a scrap of your project fabric nearby for every tension test.
- If two threads of different weights are used, expect to adjust tension between them.
Match the Presser Foot and Stitch to the Task
Some feet are designed to handle specific stitch types, and using the wrong one can cause skipped stitches even when everything else is correct. Decorative and reverse-pattern work benefits from a foot with a clear sole and a wide groove underneath, which lets dense stitching pass without lifting the fabric. Embroidery and appliqué need an open toe so you can see the stitching area and the foot does not ride up on thick thread.
If you are sewing piping, cording, or a raised seam, a foot with a deep groove underneath guides the cord evenly and keeps the needle from deflecting. When the foot is wrong for the job, the fabric lifts slightly with each stitch, the needle flexes, and the hook misses. Switching to the correct foot is often the fastest fix for a skip that appears only on one type of project.
- Use a clear-sole foot for decorative and reverse-pattern stitching so you can see each stitch land.
- Choose an open-toe foot for appliqué and satin stitches where visibility matters.
- For piping and cording, a grooved foot keeps the cord centered under the needle.
Skipped Stitch Diagnosis: Symptom, Cause, Fix, and When to Stop
- One or two skips on a long seam: Usually a slightly bent or dull needle, or a small burr on the point. Replace the needle and sew a test seam on the same fabric. If the skip disappears, finish the seam. If it returns within a few inches, move to the threading check.
- Skips plus loose, loopy stitches underneath: Top tension is too loose for the thread weight, or the thread is not seated in the tension discs. Rethread with the presser foot up, then increase top tension in small steps. If tension changes make the stitch worse on both sides, stop adjusting and check the bobbin case for lint or damage.
- Skips only on knits or stretch fabric: The needle is the wrong type for the material. Switch to a ballpoint or stretch needle and test on a scrap. If the skip continues with the correct needle, the fabric may need a stabilizer to prevent it from flexing as the needle enters.
- Skips only on decorative, reverse, or embroidery stitches: The presser foot is not suited to the stitch. A clear-sole or open-toe foot with a wide groove lets dense stitching pass without lifting the fabric. If the correct foot does not fix it, reduce stitch density or slow the machine speed.
- Skips on piping, cording, or raised seams: The needle is deflecting off the cord. A grooved piping foot keeps the cord centered under the needle. If the skip persists, the needle may be too fine for the layers; try the next size up.
- Skips continue after needle, threading, tension, and foot checks: The machine likely needs a service. Timing, hook clearance, or a worn part is beyond what at-home adjustment can correct. Stop adjusting and book a service. Continuing to sew risks damaging the machine or the project.
Feet and Accessories That Help Prevent Skips
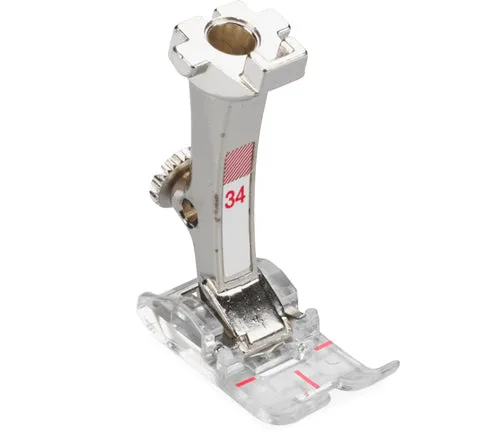
- #34 BERNINA Reverse-pattern Foot with Clear Sole: Designed for decorative stitches and reverse-pattern work with a clear sole and a wide groove underneath. The clear sole shows exactly where each stitch lands, and the groove lets dense stitching pass without lifting the fabric, which reduces skipped stitches on decorative seams.
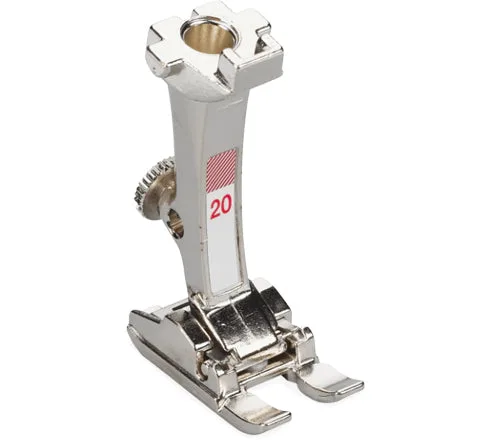
- #20 BERNINA Open Embroidery Foot: Open toe design gives an unobstructed view of the needle and stitching area, with a wide groove underneath for dense embroidery and satin stitches. When you can see the stitch forming, you catch a skip immediately and can adjust before it repeats across the whole design.
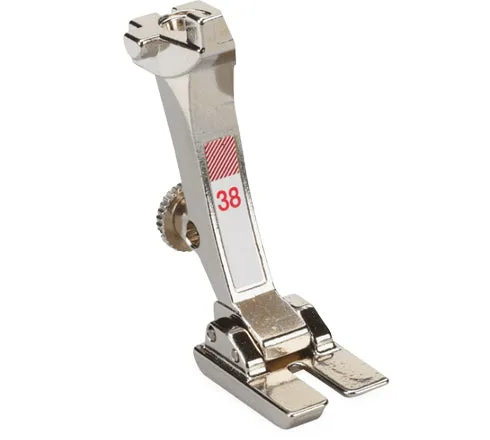
- #38 BERNINA Piping Foot: Deep groove on the underside guides cording or piping smoothly under the needle. Piping and cording can deflect a needle and cause skips; a grooved foot keeps the cord centered so the needle enters cleanly.
- Bernette Bobbins 10 Pack – Compatible with Bernette B79, B77, B70, B37, B38, B05 & More: Pack of 10 durable plastic bobbins designed for consistent thread tension across a range of Bernette machines. A damaged or unevenly wound bobbin causes intermittent skips, so having spares ready lets you swap one out and keep testing without stopping.
Skipped stitches are a signal, not a mystery. Change the needle, rethread completely, adjust tension in small steps, and make sure the foot matches the stitch. If the skip survives all four checks, the machine is telling you it needs a technician, and that is the right time to stop sewing and get it looked at.