Quick answer
Attach your rainfly before you need it: stake out the tent, lay the fly over the top with the vestibule facing your entry, and connect all clips and Velcro wraps. For a vehicle awning, mount it to a roof rack or rear hatch, unroll it, and stake the legs taut. Always set up in calm conditions and double-check guy lines before rain arrives.
Why rainfly and awning setup matters more than you think
A rainfly is your tent’s first line of defense against wind-driven rain, but it only works if it’s tensioned correctly and not touching the inner tent walls. An awning extends your dry living space, turning a muddy site into a usable patio. Both require deliberate setup: rushed rigging leads to sagging fabric, pooled water, and a wet night. The steps below apply to most Kelty tents and the Sideroads Awning, but always follow your specific product’s instructions for pole and attachment details.
Tools and pre-setup checks
Before you leave home, confirm you have all guy lines, stakes, and repair patches. At camp, pick a spot that’s slightly elevated and free of dead branches. For the awning, verify your vehicle has a compatible rack or mounting points. If your tent’s rainfly has been stored compressed, shake it out and let it air for a few minutes—this makes it easier to orient correctly.
How to attach a rainfly: step-by-step
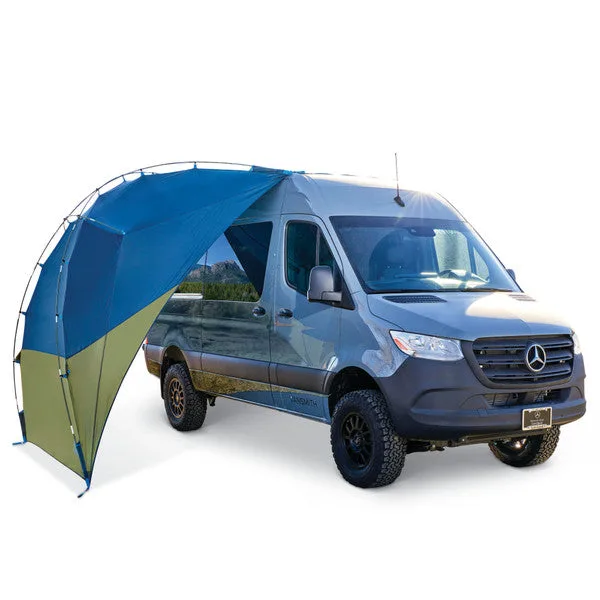
Start by pitching your tent fully and staking it out. Drape the rainfly over the tent with the vestibule aligned over the door. Attach the fly’s clips to the pole intersections, working from the top down. Secure Velcro wraps around poles and close all buckles. Guy out the vestibule and sides, keeping the fly taut but not stretched. The fly should never touch the inner tent body; if it does, adjust guy lines or add a pole. For vehicles, the Sideroads Awning mounts to a rear or side rack; unroll it, extend the legs, and stake them at a slight outward angle. Use the included guy lines if winds pick up.
Rainfly and awning setup steps
- Pitch and stake the tent: Set up your tent fully on a level, debris-free spot. Stake all corners and guy out the base. A loose tent makes rainfly attachment difficult and reduces weather resistance. Checkpoint: the tent body should be taut and wrinkle-free before you add the fly.
- Drape and align the rainfly: Lay the rainfly over the tent with the vestibule over the door and any vents facing away from the wind. Don’t drag it across the ground—lift it into place. Common mistake: putting the fly on backward, which blocks ventilation and entry.
- Connect all attachment points: Clip the fly to pole intersections, wrap Velcro straps around poles, and buckle any remaining tabs. Work from the top down so the fly doesn’t shift. Checkpoint: every clip and strap should be fastened; missing one can cause flapping and wear.
- Tension guy lines and vestibule: Stake out the vestibule and side guy lines at a 45-degree angle. Adjust tension so the fly is taut but not stretched. The fly must not touch the inner tent. Common mistake: over-tensioning, which pulls stakes out or tears fabric in wind.
- Mount and deploy the vehicle awning: Attach the Sideroads Awning to your vehicle’s rear or side rack using the supplied hardware. Unroll the awning, extend the legs, and stake them slightly outward. Add guy lines if wind is forecast. Checkpoint: the awning should be stable enough to resist a light breeze without sagging.
- Final weatherproofing check: Walk around the tent and awning. Look for gaps, loose stakes, or fabric touching the ground. Adjust as needed. If rain is imminent, consider adding a Raincover over your pack and stow gear inside the vestibule. Next step: keep a small towel handy to wipe down wet surfaces before packing up.
Product facts
- Sideroads Awning: Sideroads Awning mounts to the rear or side of your vehicle for protection from sun, wind, and rain. Creates a dry, shaded space for cooking or socializing without packing a separate canopy.
- Raincover: Raincover is a lightweight, waterproof cover that adjusts quickly and comes in three sizes: medium (30-50L), large (55-75L), and XL (80-105L). Adds an extra layer of campsite rain protection for your pack when the awning or tent vestibule is full.
- 4-6 PERSON SQUAD 4/SEASON TENT: 4-6 Person Squad 4-Season Tent has 15,000 mm polyurethane coating and poles that withstand up to 4 lbs per sq ft of snow. Built for extreme weather, so its rainfly and structure can handle heavy rain and snow loads when pitched correctly.