Quick Answer
Replace Tommanikin neck skins when you see visible wear, tearing, or hygiene concerns. For the non-bleed version, swap them every 5-10 training sessions or sooner if the silicone surface becomes rough. The replacement takes about two minutes and requires no tools.
Why Replacement Matters for Training Realism
A worn neck skin changes how your Tommanikin feels during cricothyrotomy or needle decompression practice. The non-bleed design already reduces cleanup, but a degraded surface can split unexpectedly or fail to hold a training device in place. Regular replacement keeps each session consistent and prevents bad habits from forming on a damaged simulator.
Hygiene is another reason. Over time, skin oils, disinfectant residues, and repeated punctures create micro-tears where bacteria can collect. Swapping the neck skin resets the training surface and lowers cross-contamination risk between students.
Signs It Is Time to Swap
Look for visible cracks, frayed edges, or permanent deformation. If the neck skin no longer fits snugly around the manikin collar or slides during use, replace it immediately. A loose skin can shift landmarks and mislead trainees. Also check for discoloration or sticky residue that does not wash off—these indicate material breakdown.
How to Replace Tommanikin Neck Skins (Non-Bleed)
- Inspect the current neck skin: Check for tears, thinning, or loss of elasticity. Run your fingers along the edges and around the trachea area. If you feel rough spots or see any hole larger than a needle puncture, the skin is due for replacement. Common mistake: replacing only when a tear is obvious. Replace at the first sign of surface degradation to maintain consistent training resistance.
- Remove the old neck skin: Gently peel the skin away from the manikin collar, starting at the back of the neck. Pull slowly to avoid tearing the underlying foam or plastic. If the skin is stuck, use a small amount of water or silicone-safe lubricant to loosen the bond. Checkpoint: after removal, wipe the manikin neck area with a mild disinfectant and let it dry completely before installing the new skin.
- Install the new neck skin: Align the new skin with the manikin collar, ensuring the trachea notch is centered. Stretch the skin evenly over the neck, smoothing out any wrinkles from the center outward. Press the edges firmly into the collar groove so the skin sits flush. Common mistake: stretching the skin too much on one side, causing it to slip during training. Apply even tension and check symmetry before use.
- Test the fit and function: Perform a quick cricothyrotomy or needle decompression on the new skin to confirm it holds the training device correctly. The skin should feel taut but not overly tight. If it shifts, remove and reinstall with more even tension. Checkpoint: if the skin slides after one or two punctures, it may be the wrong size or the manikin collar may be worn. Consider replacing the manikin base if the problem persists.
Product Facts
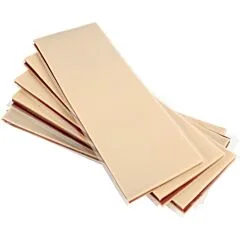
- Tommanikin Replacement Neck Skins - Non-Bleed (10 PK): The Tommanikin Replacement Neck Skins - Non-Bleed (10 PK) provides a 10-pack of non-bleed neck skins compatible with Tommanikin models from North American Rescue. The non-bleed design keeps training sessions cleaner by omitting simulated bleeding. Having a 10-pack on hand means you can replace skins quickly between classes without reordering each time. The non-bleed version is ideal for basic airway and surgical cric training where blood simulation is unnecessary, saving setup and cleanup time.