Quick Answer
To apply VIK(WG)1 transfers, prepare a clean gloss surface, soak the transfer in warm water, slide it onto the shield, and seal it with matte varnish. Work in a dust-free area and use tweezers for precise placement.
Why Surface Prep Matters
Transfers adhere best to a smooth, glossy surface. A matte or textured shield can cause the decal to silver and not conform properly. Apply a coat of gloss varnish before placing the transfer to ensure a strong bond and reduce visible edges.
Choosing the Right Tools
Use a sharp hobby knife to cut out each design, tweezers for handling, and a soft brush or cotton bud for positioning. A bowl of warm (not hot) water releases the decal from the backing paper in about 20-30 seconds. Avoid using your fingers, as oils can prevent the decal from sticking.
Step-by-Step Application Process
- Prepare the Shield Surface: Clean the shield to remove dust and grease, then apply a coat of gloss varnish and let it dry completely. A smooth surface prevents air bubbles and silvering. Check that the gloss is fully cured before proceeding.
- Cut Out the Transfer: Use a sharp hobby knife to cut closely around the chosen design, leaving a small margin of clear film. This reduces the chance of the film lifting at the edges. Cut close but not through the printed area to avoid weakening the design.
- Soak in Warm Water: Submerge the cut transfer in warm water for 20-30 seconds until the decal slides freely on the backing paper. Do not soak too long, or the decal may curl or stick to itself. If the decal doesn't slide after 30 seconds, wait a few more seconds rather than forcing it.
- Position and Slide: Slide the decal onto the shield using tweezers and a damp brush. Position it carefully, then gently press from the center outward to expel air bubbles and excess water. Use a soft brush to nudge the decal into place; never pull it, as it can tear.
- Blot and Let Dry: Gently blot excess water with a clean, lint-free cloth or cotton bud. Allow the transfer to dry completely for at least a few hours before handling. Do not touch the decal while it dries; movement can cause misalignment.
- Seal with Varnish: Once dry, apply a coat of matte varnish to protect the transfer and blend it with the surrounding paint. This also prevents scratches during gaming. Use a spray varnish for an even coat; brush-on varnish may lift the decal if applied too heavily.
Product Fact
-
VIK(WG)1: The VIK(WG)1 transfer sheet includes Viking shield designs specifically for 14mm diameter round shields, compatible with Warlord Games 28mm miniatures. This means the transfers are pre-sized to fit standard 28mm round shields, saving you from trimming and ensuring a clean application.
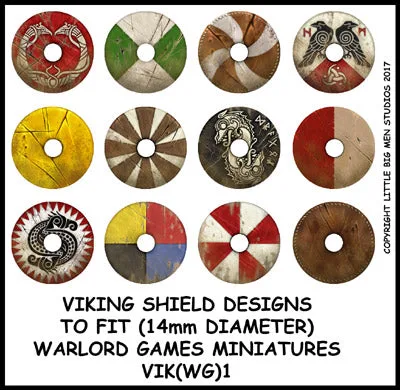
VIK(WG)1
Now that your shields are decorated, consider adding a weathering wash to integrate the transfers with the rest of your miniature—it will give them a battle-worn look that matches the rest of your warband.