Quick Answer
Assembling a 3-point lighting kit with muslin backdrops takes about 20 minutes. Focus on positioning the key, fill, and back lights correctly while ensuring the backdrop is wrinkle-free and evenly lit.
Why a Muslin Backdrop Works for 3-Point Lighting
Muslin backdrops are lightweight, easy to store, and create a soft, professional background that doesn't reflect harsh shadows. When paired with a 3-point lighting setup, the fabric helps separate the subject from the background without adding glare.
The key is to keep the backdrop at least 3–4 feet behind the subject to avoid casting shadows from the key light. A common mistake is placing the backdrop too close, which makes wrinkles and uneven lighting more visible.
Choosing the Right Light Kit for Your Setup
A kit like the H9004SB-69BWG includes everything you need for a basic 3-point lighting setup: two softboxes, a boom stand, and a background support system. The included 45W 5500K bulbs provide consistent daylight-balanced light, which simplifies white balance during shooting.
One limitation: the softboxes are 16x24 inches, which are great for headshots and small product work but may not provide enough diffusion for full-body portraits. If you shoot larger subjects, consider adding a larger softbox or umbrella.
Step-by-Step Assembly Guide
- 1. Assemble the Background Support System: Unfold the background stand crossbar and extend it to full width (10 ft). Attach the muslin backdrop using clamps or the included clips. Drape the fabric evenly and smooth out major wrinkles with your hands or a steamer. Checkpoint: Ensure the crossbar is locked securely before hanging the backdrop to prevent sagging.
- 2. Position the Key Light (Main Light): Place one softbox on a 7ft light stand and position it 45 degrees to the side of the subject, about 3–4 feet away. Aim it slightly downward toward the subject's face. Use the ON/OFF switch to turn on the bulbs. Common mistake: Placing the key light too close creates harsh shadows; too far and the subject looks flat.
- 3. Set Up the Fill Light: Place the second softbox on the opposite side of the camera, also at 45 degrees but farther away (about 5–6 feet). This softens shadows created by the key light. If the fill light is too bright, move it back or use a lower wattage bulb. Checkpoint: The fill light should be about half the intensity of the key light for a natural look.
- 4. Add the Back Light (Hair Light): Attach the 20" EZ softbox to the boom stand and position it behind the subject, aimed at the back of the head or shoulders. The boom stand allows you to suspend the light without it appearing in the frame. Common mistake: Pointing the back light directly at the camera lens can cause lens flare; angle it slightly toward the subject.
- 5. Adjust the Backdrop and Final Check: Ensure the muslin backdrop is evenly lit by checking for hot spots or shadows. If needed, move the subject farther from the backdrop. Confirm all light stands are stable and cables are taped down to prevent tripping. Checkpoint: Do a test shot and review the histogram to ensure no clipped highlights on the backdrop.
Product Facts
-
H9004SB-69BWG Photography Studio Video Lighting Chromakey Screen 3 Muslin Backdrops Lighting Kit Background Support Kit-Green/Black/White: Includes 2 x 16x24" soft boxes, 2 x 4-socket lamps, 8 x 45W 5500K bulbs, 2 x 7ft light stands, 1 boom stand, background stand, and 3 muslin backdrops. This kit provides all the essential components for a 3-point lighting setup with a muslin background, saving you from buying items separately.
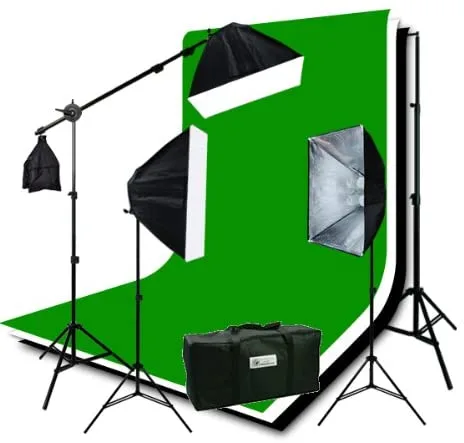
H9004SB-69BWG Photography Studio Video Lighting Chromakey Screen 3 Muslin Backdrops Lighting Kit Background Support Kit-Green/Black/White