Quick answer
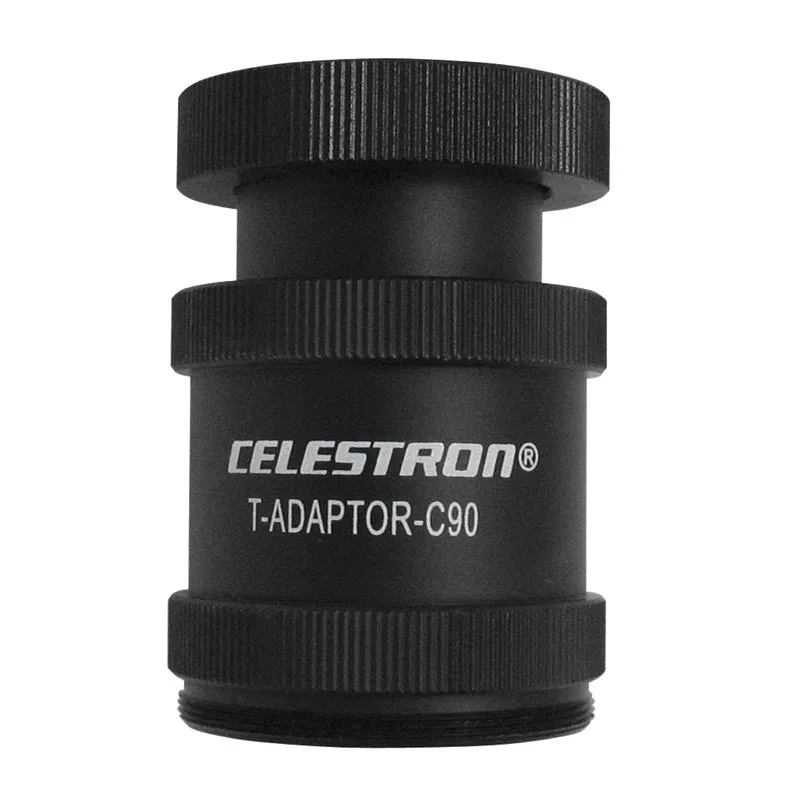
To attach a camera to your telescope, you need a T-ring that matches your camera brand and a T-adapter that matches your telescope's focuser or rear cell. Thread the T-ring onto the T-adapter, then attach the assembly to your telescope and camera. For a Celestron NexStar 4SE, the Celestron T-Adapter 93635-A threads directly onto the rear cell. Always confirm your telescope has enough backfocus before buying.
Understand the two pieces: T-ring and T-adapter
A T-ring is a thin metal ring that replaces your camera lens. It has a universal M42x0.75 thread on the back and a bayonet mount on the front that matches your camera brand (Canon EF, Nikon F, Sony E, etc.). The T-adapter is the other half: it has a matching M42 thread on one end and a telescope-specific connection on the other—often a 1.25-inch or 2-inch nosepiece, or a threaded collar for a particular scope. You need both. Some telescopes, like the Celestron NexStar 4SE, use a dedicated T-adapter that screws directly onto the rear cell without a separate nosepiece.
Check backfocus and focuser travel before you buy
Backfocus is the distance from the telescope's rear connection point to the camera sensor. Many visual telescopes do not have enough inward focus travel to reach prime focus with a camera attached. Newtonian reflectors often need a low-profile focuser or a Barlow lens to reach focus. SCTs and Maksutov-Cassegrains typically have generous backfocus, but you still need to confirm. If your telescope is a Celestron NexStar 4SE, the 93635-A T-adapter is designed to provide the correct spacing. For other scopes, look up your model's backfocus specification or test with a temporary setup before buying dedicated adapters.
Assemble the camera and adapter indoors first
Before going outside in the dark, practice threading the T-ring onto the T-adapter and mounting the camera. The T-ring threads are fine and easy to cross-thread if you rush. Attach the T-ring to the camera first, then thread the T-ring and camera assembly onto the T-adapter. Tighten firmly but do not overtighten—you only need a snug fit to prevent light leaks and wobble. Once assembled, the camera should be rigid with no play. If you feel resistance, stop and realign the threads.
Attach the assembly to the telescope and balance
Remove your diagonal and eyepiece. For a 1.25-inch nosepiece adapter, insert it into the focuser and tighten the thumbscrew. For a threaded adapter like the Celestron 93635-A, screw it onto the rear cell threads until snug. Then attach the camera assembly. The added weight will shift your telescope's balance. Rebalance your mount before observing: for an equatorial mount, adjust the counterweight; for an alt-az mount, ensure the tube is not front-heavy. An unbalanced scope will track poorly and may drift during long exposures.
Set camera to manual mode and focus
Switch your camera to manual (M) mode. Set ISO to 800 or 1600 for a start, and use a shutter speed of 1/125s for the Moon or 1/2s for bright planets. Turn off autofocus and image stabilization. Use live view magnified 10x on a bright star to achieve precise focus. If you cannot reach focus, you may need an extension tube or a different adapter. For deep-sky objects, you will need a tracking mount and longer exposures, often with a guidescope. The NexStar 4SE's alt-az mount is not ideal for long exposures due to field rotation, but it works well for lunar and planetary imaging.
Step-by-step: Attaching your camera
- Identify your camera mount and telescope connection: Determine your camera brand's lens mount (e.g., Canon EF, Nikon F) and your telescope's rear thread or focuser size (e.g., 1.25-inch, 2-inch, or SCT thread). This tells you which T-ring and T-adapter to buy. Checkpoint: Write down both specifications before ordering.
- Buy the correct T-ring and T-adapter: Purchase a T-ring for your camera brand and a T-adapter that matches your telescope. For a Celestron NexStar 4SE, use the Celestron T-Adapter 93635-A. For other scopes, choose a 1.25-inch or 2-inch nosepiece adapter or a dedicated threaded adapter. Common mistake: Buying a T-adapter without a T-ring, or vice versa.
- Attach T-ring to camera: Remove the camera lens and thread the T-ring onto the camera's lens mount. It should click or thread smoothly. Do not force it. Checkpoint: The T-ring should sit flush against the camera body.
- Thread T-adapter onto T-ring: Screw the T-adapter onto the exposed M42 threads of the T-ring. Turn until snug. Avoid over-tightening, which can bind the threads. Common mistake: Cross-threading. If it resists, back off and realign.
- Attach the assembly to the telescope: Remove the diagonal and eyepiece. Insert the nosepiece into the focuser and tighten the thumbscrew, or screw the threaded adapter onto the rear cell. Support the camera with one hand while tightening. Checkpoint: Gently wiggle the camera—there should be no play.
- Balance the telescope: The camera adds weight. Rebalance your mount by adjusting the counterweight or sliding the tube in its rings. An unbalanced scope tracks poorly. Common mistake: Skipping balance, leading to motor strain and blurry images.
- Focus and test: Set camera to manual mode, live view, and magnify a bright star. Turn the focus knob until the star is a pinpoint. If you cannot reach focus, you may need an extension tube or a different adapter. Checkpoint: If no focus, try focusing on a distant terrestrial object in daylight first.
Product facts
- Celestron T-Adapter for NexStar 4SE Telescopes - 93635-A: A Camera T-Adapter for NexStar 4SE and for all C90 Spotting Scopes. A T-Adapter allows you to attach your 35mm SLR camera to the prime focus of your telescope or spotting scope. This arrangement is used for terrestrial photography and short exposure lunar and planetary photography. It can also be used for long exposure deep-sky photography when using a separate guidescope. Both a T-Adapter and dedicated camera T-Ring are required. This adapter is the correct rear-cell connection for the NexStar 4SE, so you avoid guessing which nosepiece fits. It also works with C90 spotting scopes for daytime photography. Remember you still need a T-ring for your specific camera brand.