Quick Answer
To build the Perfect Gundam BB236 SD kit cleanly, work in small sub-assemblies, remove nubs flush with a hobby knife, and dry-fit before pressing parts together.
Why SD Kits Need a Different Approach
SD (Super Deformed) kits like the Perfect Gundam BB236 SD are compact and stylized, with larger part proportions and fewer moving parts than standard 1/144 kits. That means the build is quicker, but the small parts can be easy to lose or force together incorrectly.
Because the scale is smaller, nub marks and seam lines stand out more. Taking a little extra time on cleanup and alignment makes a much bigger visual difference than on a larger kit.
Trade-Off: Speed vs. Detail
You can snap this kit together in under an hour, but rushing often leads to loose joints or visible stress marks. If you want a display piece rather than a quick desk toy, budget an extra 30 minutes for sanding and panel lining.
The chibi-style silhouette is the main appeal, so preserving the clean, rounded shapes matters more than adding extra panel lines.
Step-by-Step Build Process
- Prepare Your Workspace: Lay out the runners, a hobby knife, nippers, and sanding sticks. Sort parts by runner letter and number so you can find them quickly during assembly. Check that you have all runners and parts before starting; missing parts are easier to identify early.
- Cut Parts Carefully: Use nippers to cut each part away from the runner, leaving a small nub. Cut away from the part surface to avoid stress marks. Leave a 1-2mm nub; do not cut flush with the part in one go.
- Clean the Nubs: Trim the remaining nub with a hobby knife, then sand the area with fine-grit sandpaper (400-600) to make it flush. For curved surfaces, sand gently in small circles. Check the sanded area under good light for any remaining nub or discoloration.
- Dry-Fit Before Pressing: Test-fit each joint and connection before applying pressure. If a part feels too tight, sand the peg slightly; if too loose, apply a thin layer of glue or clear nail polish to thicken it. Never force a part; you could snap a peg or stress the plastic.
- Assemble in Sub-Units: Build the head, torso, arms, and legs as separate sub-assemblies, then connect them. This makes it easier to handle small parts and apply decals or panel lining later. Keep sub-assemblies separated until all cleanup is done on each one.
- Final Assembly and Detailing: Attach all sub-assemblies, then optionally panel line with a fine-tip marker and apply stickers. Use a matte topcoat to protect the finish and hide small imperfections. Let the topcoat dry fully before posing or displaying the kit.
Product Spotlight
-
Perfect gundam BB236 SD: The Perfect Gundam BB236 SD is a compact, stylized SD (Super Deformed) figure with a recognizable Perfect Gundam silhouette in chibi form. Its small scale and bold proportions make it a quick, satisfying build that looks great on a desk or shelf once assembled cleanly.
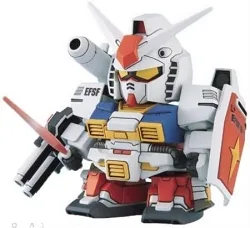
Perfect gundam BB236 SD