Quick answer
To frame a finished 5x7 needlepoint, use a white frame with a bevel-cut mat to protect the canvas and give it a professional look. The key is centering the design behind the mat opening and securing the canvas flat before closing the frame.
Why a mat matters for needlepoint framing
A mat lifts the glass away from the canvas, preventing stitches from being flattened or damaged. It also hides any uneven edges where the canvas was taped or trimmed. The white frame for 5x7 needlepoint includes a 4-ply bevel-cut ivory cream mat that adds a clean, finished border around your work.
What to check before you start
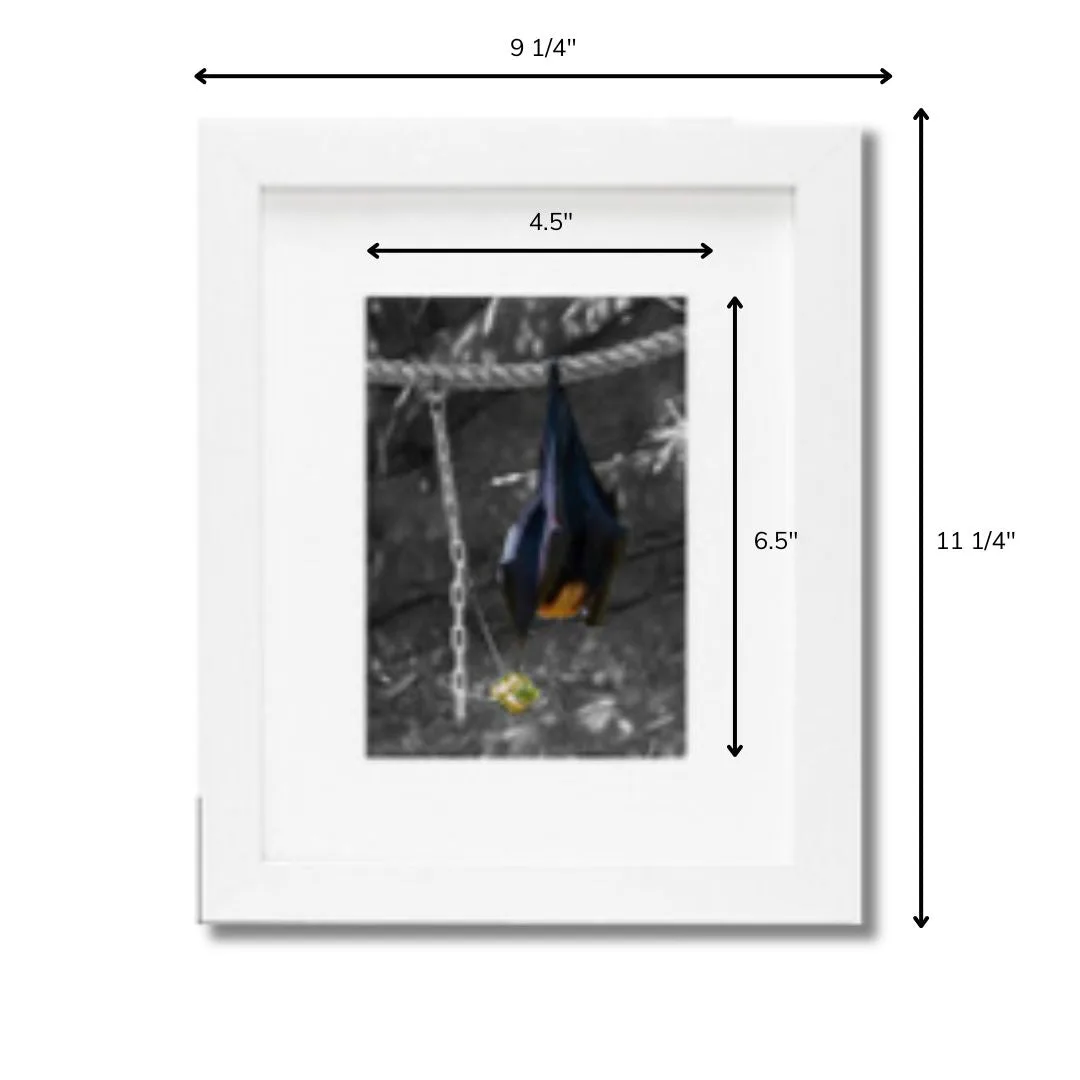
The mat opening on a standard 5x7 frame measures 4.5 x 6.5 inches, which is slightly smaller than the canvas. This allows full coverage of the canvas edges but may crop details around the design perimeter. Before framing, lay your needlepoint behind the mat to confirm that all important elements remain visible. If critical stitches fall too close to the edge, consider a custom mat with a larger opening.
Steps to frame your 5x7 needlepoint
- Prepare the canvas: Trim excess canvas to about 1 inch beyond the design area. Press the finished needlepoint gently with a steam iron on low heat (face down on a towel) to remove any curling. Let it cool flat. Common mistake: Trimming too close to the stitches. Leave at least 1 inch of margin for mounting.
- Center the design behind the mat: Place the mat on top of the canvas and adjust until the design is centered within the opening. Use a piece of painter's tape to hold the canvas temporarily in place on the back of the mat. Checkpoint: Look through the mat opening from the front to confirm no important stitches are hidden by the mat edge.
- Mount the canvas to the backing board: Remove the frame backing. Lay the canvas centered on the backing board. Fold the excess canvas over the edges and secure with archival tape or small framing staples. Pull gently so the canvas lies flat but not stretched tight. Common mistake: Over-stretching can distort stitches. The canvas should be taut, not drum-tight.
- Assemble the frame: Place the mat over the mounted canvas, then insert the sandwich (backing board, canvas, mat) into the frame. Secure the frame tabs or turn buttons. Wipe the glass and frame with a soft cloth before closing. Checkpoint: Ensure no dust or lint is trapped between the mat and glass before final closure.
- Add hanging hardware: Attach a sawtooth hanger or D-rings with wire to the back of the frame. Measure and center the hardware so the frame hangs level. Common mistake: Placing hardware off-center causes the frame to tilt. Use a level to check before hanging.
Product used in this guide
-
White Frame For 5" x 7" Needlepoint: The white molded MDF frame is designed for self-finishing a 5x7 needlepoint. The mat opening is 4.5 x 6.5 inches and the bevel-cut mat board is 4-ply thick. The slightly smaller mat opening ensures your canvas edges are fully hidden, but you must verify that no design details are lost before mounting.
White Frame For 5" x 7" Needlepoint